
KVM + LinuxBridge 的网络虚拟化解决方案实践
2019-02-05 21:24 云物互联 阅读(2579) 评论(0) 编辑 收藏 举报目录
文章目录
前言
本文相关的网络术语、基本概念与实现原理均有在 在《Networking 基本术语/概念》一文中提及,本文不再赘述。本篇主要以实践的角度来学习、记录和体会 KVM+LinuxBridge 虚拟化解决方案的实现细节。
Linux bridge 的基本操作
创建 Bridge
brctl addbr br0
ip link set br0 up
刚新建的 bridge 是一个独立的虚拟网络设备,现阶段只有一个端口连着网络协议栈(TCP/IP Stack),此时的 bridge 没有实际功能,网络拓扑如下:
+----------------------------------------------------------------+
|                                                                |
|       +------------------------------------------------+       |
|       |             Newwork Protocol Stack             |       |
|       +------------------------------------------------+       |
|              ↑                                ↑                |
|..............|................................|................|
|              ↓                                ↓                |
|        +----------+                     +------------+         |
|        |   eth0   |                     |     br0    |         |
|        +----------+                     +------------+         |
| 192.168.3.21 ↑                                                 |
|              |                                                 |
|              |                                                 |
+--------------|-------------------------------------------------+
               ↓
         Physical Network
将 veth pair 连上 Bridge
ip link add veth0 type veth peer name veth1
ip addr add 192.168.3.101/24 dev veth0
ip addr add 192.168.3.102/24 dev veth1
ip link set veth0 up
ip link set veth1 up

brctl addif br0 veth0
此时网络拓扑如下:
+----------------------------------------------------------------+
|                                                                |
|       +------------------------------------------------+       |
|       |             Newwork Protocol Stack             |       |
|       +------------------------------------------------+       |
|            ↑            ↑              |            ↑          |
|............|............|..............|............|..........|
|            ↓            ↓              ↓            ↓          |
|        +------+     +--------+     +-------+    +-------+      |
|        | .3.21|     |        |     | .3.101|    | .3.102|      |
|        +------+     +--------+     +-------+    +-------+      |
|        | eth0 |     |   br0  |<--->| veth0 |    | veth1 |      |
|        +------+     +--------+     +-------+    +-------+      |
|            ↑                           ↑            ↑          |
|            |                           |            |          |
|            |                           +------------+          |
|            |                                                   |
+------------|---------------------------------------------------+
             ↓
     Physical Network
- veth0 与 veth1 相连(类似网线的两端)。
- veth0 和 veth1 都与网络协议栈相连(具有 IP 地址)。
- veth0 与 br0 相连,其一端被插入到 br0 中。两者是双向通道。
- 协议栈和 veth0 之间变成了单向通道,veth0 能接受协议栈发来的数据,但 veth0 不会把从外面收到的数据转发给协议栈。
- br0 的 “隐藏 MAC 地址” 变成了 veth0 的 mac 地址
相当于 bridge 在 veth0 和协议栈之间插了一脚,veth0 本来要转发给协议栈的数据给拦截并全部转发给 bridge 了(接入到 Bridge 的网络设备只能将数据包发送给 Bridge),同时 bridge 也可以向 veth0 发送数据。
为 Bridge 配置 IP 地址
Bridge 有 “隐藏 MAC 地址”,也可以为其配置 IP 地址,一般的我们将挂载到 Bridge 的网络设备(e.g. eth0 veth0)的 IP 地址给 Bridge 使用。
ip addr del 192.168.3.101/24 dev veth0
ip addr add 192.168.3.101/24 dev br0
此时网络拓扑如下:
+----------------------------------------------------------------+
|                                                                |
|       +------------------------------------------------+       |
|       |             Newwork Protocol Stack             |       |
|       +------------------------------------------------+       |
|            ↑            ↑                           ↑          |
|............|............|...........................|..........|
|            ↓            ↓                           ↓          |
|        +------+     +--------+     +-------+    +-------+      |
|        | .3.21|     | .3.101 |     |       |    | .3.102|      |
|        +------+     +--------+     +-------+    +-------+      |
|        | eth0 |     |   br0  |<--->| veth0 |    | veth1 |      |
|        +------+     +--------+     +-------+    +-------+      |
|            ↑                           ↑            ↑          |
|            |                           |            |          |
|            |                           +------------+          |
|            |                                                   |
+------------|---------------------------------------------------+
             ↓
     Physical Network
- veth0 没有了 IP 地址,这样的 veth0 其实和协议栈之间还是有联系的,但因为没有了 IP 地址,协议栈在路由的时候不会将数据包发给 veth0。
- br0 和 veth1 通过 veth0 连接了起来,此时的 veth0 相当于一根网线。
验证:
# 通过 veth0 不能 ping 通 veth1
ping -c 1 -I veth0 192.168.3.102

# 通过 br0 能 ping 通 veth0
ping -c 1 -I br0 192.168.3.102
问题:此时 br0 还是 ping 不同网关(.3.1),因为 br0 上只有两个端口,并没有连接网关,所以无法将数据帧转发给网关。
将物理网卡接口设备挂靠 Bridge
brctl addif br0 eth0
NOTE:物理网卡设备接口挂靠到 Bridge 之后,物理网卡设备的 IP 地址就会无效。避免影响协议栈的路由选择,如果不指定网卡的话进行 ping 的话,协议栈就有可能会优先将数据包转发给 eth0 而不是转发给 br0。
# 错误的路由规则
Destination     Gateway         Genmask         Flags Metric Ref    Use Iface
default         192.168.3.1     0.0.0.0         UG    0      0        0 eth0

# 删除旧的默认网关(系统自动为网卡 eth0 生成的,也会自动删除)
ip addr del 192.168.3.21/24 dev eth0

# 添加新的默认网关(设备缺省为 br0)
ip route add default via 192.168.3.1 dev br0

# 正确的路由规则
Destination     Gateway         Genmask         Flags Metric Ref    Use Iface
default         192.168.3.1     0.0.0.0         UG    0      0        0 br0
将 eth0 加入 br0 的效果与加入 veth0 是一样的(Bridge 不区分物理或网络设备),从外部网络接收到的数据包会转发给 br0,变成了一根 “网线”。
此时网络拓扑如下:
+----------------------------------------------------------------+
|                                                                |
|       +------------------------------------------------+       |
|       |             Newwork Protocol Stack             |       |
|       +------------------------------------------------+       |
|                         ↑                           ↑          |
|.........................|...........................|..........|
|                         ↓                           ↓          |
|        +------+     +--------+     +-------+    +-------+      |
|        |      |     | .3.101 |     |       |    | .3.102|      |
|        +------+     +--------+     +-------+    +-------+      |
|        | eth0 |<--->|   br0  |<--->| veth0 |    | veth1 |      |
|        +------+     +--------+     +-------+    +-------+      |
|            ↑                           ↑            ↑          |
|            |                           |            |          |
|            |                           +------------+          |
|            |                                                   |
+------------|---------------------------------------------------+
             ↓
     Physical Network
- eth0 变成了连接 br0 和外部网络的网卡,如果外部网络与 veth0/1 处于同一网络,则可以正常访问外网。
NOTE 1:eth0 要启用混杂模式 ifconfig eth0 0.0.0.0 promisc(不根据自身的 MAC 地址过滤数据帧,即转发所有数据帧)
NOTE 2:由于 Linux 下的 ARP 特性,当协议栈转发外部网络的 arp 请求时,不管路由给 101 还是 102,都会得到两个 arp 应答,分别包含 br0 和 veth1 的 MAC 地址。这是因为 Linux 觉得从外部网络接收到的 101 和 102 数据包无论是从 br0 还是 veth1 进入协议栈都是一样的。由于回复了两个 arp 应答,而外部网络的设备只会随机的用到其中的一个,所以外部网络发送给 102 的数据包可能会从 101 的 br0 上进来,反之亦然。说明数据流在 Bridge 并没有完全的隔离开,br0 和 veth1 会收到对方的 IP 应答包。为了解决上述问题,可以配置 rp_filter、arp_filter、arp_ignore、arp_announce 等参数,但会比较复杂。所以一般不建议同一个 Bridge 上有多个端口接入到 Linux 操作系统的网络协议栈。上述只是用于说明的测试拓扑。
Linux Bridge 与虚拟机
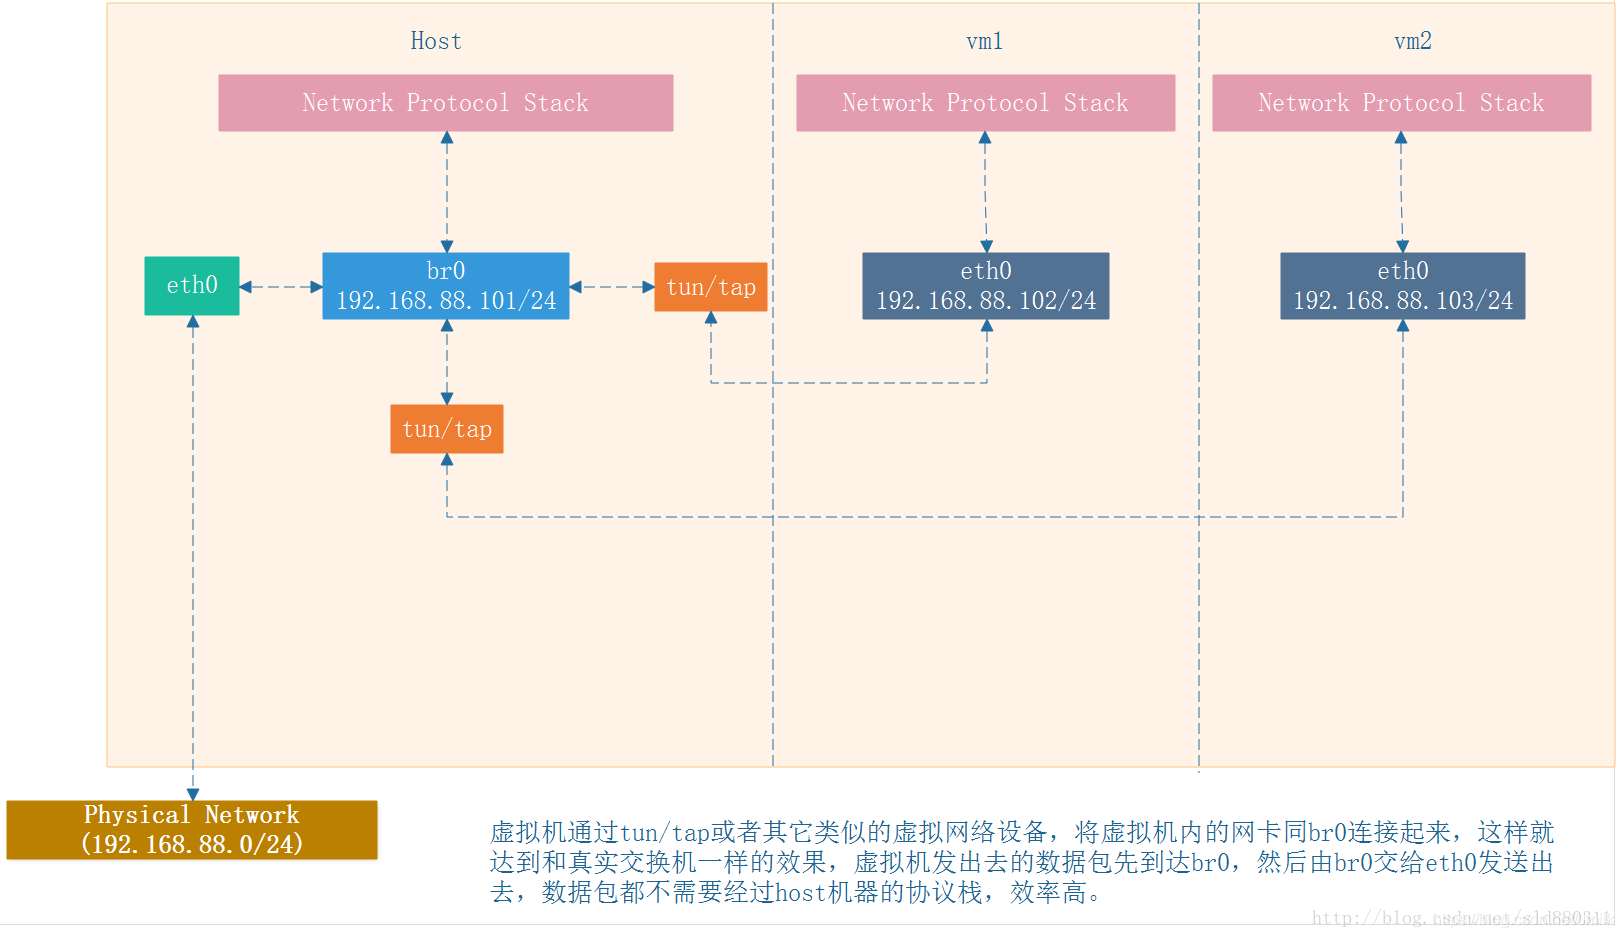
Linux 上的 KVM 虚拟机通过虚拟网卡设备(e.g. tap、tun)将虚拟机与 Bridge 连接起来,达到与真实交换机一样的网络拓扑模型。虚拟机发出的数据包先到 br0 然后再由 br0 交给 eth0 并发送到外部网络。整个过程数据包都不需要经过宿主机的网络协议栈,效率高。
+----------------------------------------------------------------+-----------------------------------------+-----------------------------------------+
|                          Host                                  |              VirtualMachine1            |              VirtualMachine2            |
|                                                                |                                         |                                         |
|       +------------------------------------------------+       |       +-------------------------+       |       +-------------------------+       |
|       |             Newwork Protocol Stack             |       |       |  Newwork Protocol Stack |       |       |  Newwork Protocol Stack |       |
|       +------------------------------------------------+       |       +-------------------------+       |       +-------------------------+       |
|                          ↑                                     |                   ↑                     |                    ↑                    |
|..........................|.....................................|...................|.....................|....................|....................|
|                          ↓                                     |                   ↓                     |                    ↓                    |
|                     +--------+                                 |               +-------+                 |                +-------+                |
|                     | .3.101 |                                 |               | .3.102|                 |                | .3.103|                |
|        +------+     +--------+     +-------+                   |               +-------+                 |                +-------+                |
|        | eth0 |<--->|   br0  |<--->|tun/tap|                   |               | eth0  |                 |                | eth0  |                |
|        +------+     +--------+     +-------+                   |               +-------+                 |                +-------+                |
|            ↑             ↑             ↑                       |                   ↑                     |                    ↑                    |
|            |             |             +-------------------------------------------+                     |                    |                    |
|            |             ↓                                     |                                         |                    |                    |
|            |         +-------+                                 |                                         |                    |                    |
|            |         |tun/tap|                                 |                                         |                    |                    |
|            |         +-------+                                 |                                         |                    |                    |
|            |             ↑                                     |                                         |                    |                    |
|            |             +-------------------------------------------------------------------------------|--------------------+                    |
|            |                                                   |                                         |                                         |
|            |                                                   |                                         |                                         |
|            |                                                   |                                         |                                         |
+------------|---------------------------------------------------+-----------------------------------------+-----------------------------------------+
             ↓
     Physical Network  (192.168.3.0/24)
Linux Bridge 与容器
容器运行在自己单独的 network namespace 里,有着自己单独的协议栈,整体上的网络拓扑与虚拟机的情况差不多,但容器采用了另一种方式来和外界通信:
+----------------------------------------------------------------+-----------------------------------------+-----------------------------------------+
|                          Host                                  |              Container 1                |              Container 2                |
|                                                                |                                         |                                         |
|       +------------------------------------------------+       |       +-------------------------+       |       +-------------------------+       |
|       |             Newwork Protocol Stack             |       |       |  Newwork Protocol Stack |       |       |  Newwork Protocol Stack |       |
|       +------------------------------------------------+       |       +-------------------------+       |       +-------------------------+       |
|            ↑             ↑                                     |                   ↑                     |                    ↑                    |
|............|.............|.....................................|...................|.....................|....................|....................|
|            ↓             ↓                                     |                   ↓                     |                    ↓                    |
|        +------+     +--------+                                 |               +-------+                 |                +-------+                |
|        |.3.101|     |  .9.1  |                                 |               |  .9.2 |                 |                |  .9.3 |                |
|        +------+     +--------+     +-------+                   |               +-------+                 |                +-------+                |
|        | eth0 |     |   br0  |<--->|  veth |                   |               | eth0  |                 |                | eth0  |                |
|        +------+     +--------+     +-------+                   |               +-------+                 |                +-------+                |
|            ↑             ↑             ↑                       |                   ↑                     |                    ↑                    |
|            |             |             +-------------------------------------------+                     |                    |                    |
|            |             ↓                                     |                                         |                    |                    |
|            |         +-------+                                 |                                         |                    |                    |
|            |         |  veth |                                 |                                         |                    |                    |
|            |         +-------+                                 |                                         |                    |                    |
|            |             ↑                                     |                                         |                    |                    |
|            |             +-------------------------------------------------------------------------------|--------------------+                    |
|            |                                                   |                                         |                                         |
|            |                                                   |                                         |                                         |
|            |                                                   |                                         |                                         |
+------------|---------------------------------------------------+-----------------------------------------+-----------------------------------------+
             ↓
     Physical Network  (192.168.3.0/24)
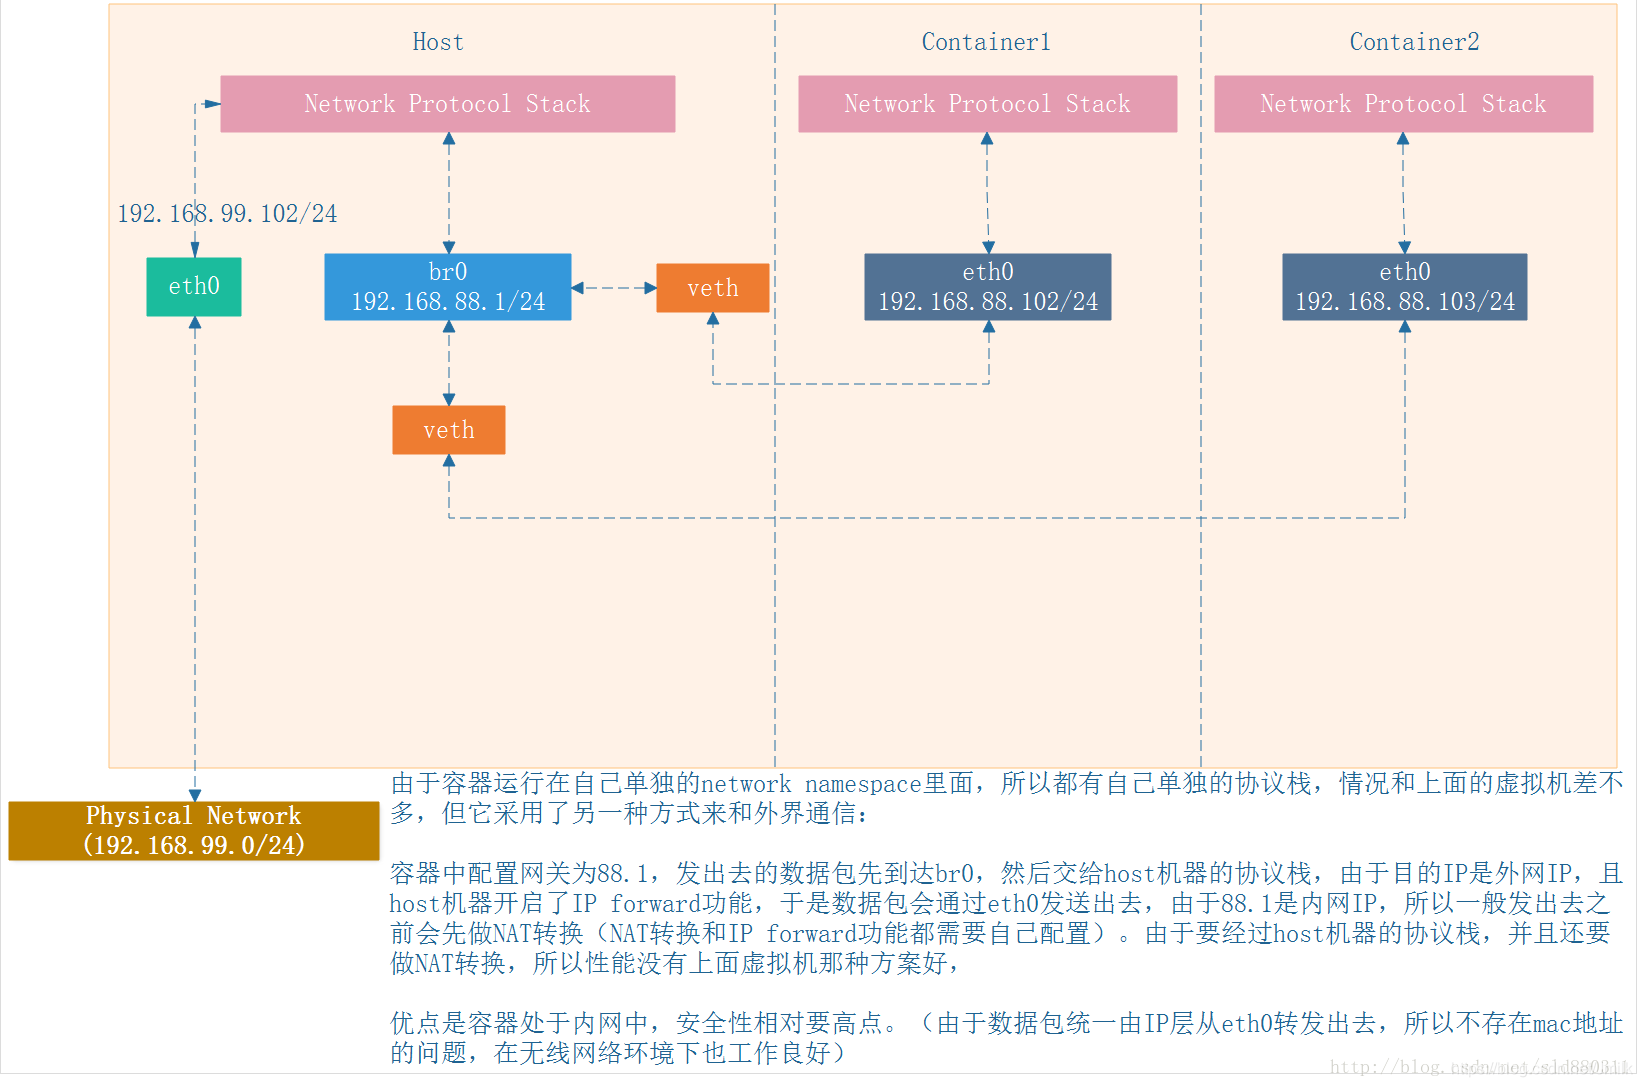
容器中配置网关为 .9.1,发送的数据包先到达 br0 然后再交给宿主机的协议栈,由于目的 IP 是外网 IP,且宿主机开启了 IP forward(路由转发)功能,于是数据包就会通过 eth0 发送出去。由于 .9.1 是内网 IP,所以一般发出去之前会先做 NAT(网络地址转换)。显然 “容器+Bridge” 的性能没有 “虚拟机+Bridge” 的好,不过优点是容器处于内网中,安全性相对要高点。(由于数据包统一由 IP 层从 eth0 转发出去,所以不存在上文提到的多个 MAC 地址应答的问题)
Linux Bridge 的 MAC 地址行为
# 创建 bridge,查看默认 mac
root@ubuntu:~# ip link add br-mac type bridge
20: br-mac: <BROADCAST,MULTICAST> mtu 1500 qdisc noop state DOWN group default
    link/ether f6:b0:c9:7c:04:1d brd ff:ff:ff:ff:ff:ff

#创建 veth pair 设备
root@ubuntu:~# ip link add mac-veth01 type veth peer name mac-veth02
20: br-mac: <BROADCAST,MULTICAST> mtu 1500 qdisc noop state DOWN group default
    link/ether f6:b0:c9:7c:04:1d brd ff:ff:ff:ff:ff:ff
21: mac-veth02: <BROADCAST,MULTICAST> mtu 1500 qdisc noop state DOWN group default qlen 1000
    link/ether 92:a2:23:d5:88:56 brd ff:ff:ff:ff:ff:ff
22: mac-veth01: <BROADCAST,MULTICAST> mtu 1500 qdisc noop state DOWN group default qlen 1000
    link/ether de:ee:ff:8d:0c:50 brd ff:ff:ff:ff:ff:ff

# attach mac-veth01(大 MAC)
20: br-mac: <BROADCAST,MULTICAST> mtu 1500 qdisc noop state DOWN group default
    link/ether de:ee:ff:8d:0c:50(自动变为mac-veth01的mac) brd ff:ff:ff:ff:ff:ff
21: mac-veth02: <BROADCAST,MULTICAST> mtu 1500 qdisc noop state DOWN group default qlen 1000
    link/ether 92:a2:23:d5:88:56 brd ff:ff:ff:ff:ff:ff
22: mac-veth01: <BROADCAST,MULTICAST> mtu 1500 qdisc noop master br-mac state DOWN group default qlen 1000
    link/ether de:ee:ff:8d:0c:50 brd ff:ff:ff:ff:ff:ff

# attach mac-veth02(小 MAC)
root@ubuntu:~# ip link set dev mac-veth02 master br-mac
20: br-mac: <BROADCAST,MULTICAST> mtu 1500 qdisc noop state DOWN group default
    link/ether 92:a2:23:d5:88:56(变化为小mac,mac-veth02的mac) brd ff:ff:ff:ff:ff:ff
21: mac-veth02: <BROADCAST,MULTICAST> mtu 1500 qdisc noop master br-mac state DOWN group default qlen 1000
    link/ether 92:a2:23:d5:88:56 brd ff:ff:ff:ff:ff:ff
22: mac-veth01: <BROADCAST,MULTICAST> mtu 1500 qdisc noop state DOWN group default qlen 1000
    link/ether de:ee:ff:8d:0c:50 brd ff:ff:ff:ff:ff:ff

# 增加 mac-veth02 的 mac
root@ubuntu:~# ifconfig mac-veth02 hw ether de:ee:ff:8d:0c:51
20: br-mac: <BROADCAST,MULTICAST> mtu 1500 qdisc noop state DOWN group default
    link/ether de:ee:ff:8d:0c:50(变化为小mac,mac-veth01的mac) brd ff:ff:ff:ff:ff:ff
21: mac-veth02: <BROADCAST,MULTICAST> mtu 1500 qdisc noop master br-mac state DOWN group default qlen 1000
    link/ether de:ee:ff:8d:0c:51 brd ff:ff:ff:ff:ff:ff
22: mac-veth01: <BROADCAST,MULTICAST> mtu 1500 qdisc noop master br-mac state DOWN group default qlen 1000
    link/ether de:ee:ff:8d:0c:50 brd ff:ff:ff:ff:ff:ff

# 更改 br-mac 的 mac(大 mac)
root@ubuntu:~# ifconfig br-mac hw ether de:ee:ff:8d:0c:52
20: br-mac: <BROADCAST,MULTICAST> mtu 1500 qdisc noop state DOWN group default
    link/ether de:ee:ff:8d:0c:52(变化为指定的mac) brd ff:ff:ff:ff:ff:ff
21: mac-veth02: <BROADCAST,MULTICAST> mtu 1500 qdisc noop master br-mac state DOWN group default qlen 1000
    link/ether de:ee:ff:8d:0c:51 brd ff:ff:ff:ff:ff:ff
22: mac-veth01: <BROADCAST,MULTICAST> mtu 1500 qdisc noop master br-mac state DOWN group default qlen 1000
    link/ether de:ee:ff:8d:0c:50 brd ff:ff:ff:ff:ff:ff

# 设置 br-mac same as mac-veth01,mac-veth02 mac 减小
root@ubuntu:~# ifconfig br-mac hw ether de:ee:ff:8d:0c:50
root@ubuntu:~# ifconfig mac-veth02 hw ether de:ee:ff:8d:0c:49
20: br-mac: <BROADCAST,MULTICAST> mtu 1500 qdisc noop state DOWN group default
    link/ether de:ee:ff:8d:0c:50(和设置的 mac 一样,不变) brd ff:ff:ff:ff:ff:ff
21: mac-veth02: <BROADCAST,MULTICAST> mtu 1500 qdisc noop master br-mac state DOWN group default qlen 1000
    link/ether de:ee:ff:8d:0c:49 brd ff:ff:ff:ff:ff:ff
22: mac-veth01: <BROADCAST,MULTICAST> mtu 1500 qdisc noop master br-mac state DOWN group default qlen 1000
    link/ether de:ee:ff:8d:0c:50 brd ff:ff:ff:ff:ff:ff

# 增加 mac-veth01 的 mac
root@ubuntu:~# ifconfig mac-veth01 hw ether de:ee:ff:8d:0c:51
20: br-mac: <BROADCAST,MULTICAST> mtu 1500 qdisc noop state DOWN group default
    link/ether de:ee:ff:8d:0c:50(mac 不变) brd ff:ff:ff:ff:ff:ff
21: mac-veth02: <BROADCAST,MULTICAST> mtu 1500 qdisc noop master br-mac state DOWN group default qlen 1000
    link/ether de:ee:ff:8d:0c:49 brd ff:ff:ff:ff:ff:ff
22: mac-veth01: <BROADCAST,MULTICAST> mtu 1500 qdisc noop master br-mac state DOWN group default qlen 1000
    link/ether de:ee:ff:8d:0c:51 brd ff:ff:ff:ff:ff:ff

# 增加新的设备
root@ubuntu:~# ip link add mac-veth03 type veth peer name mac-veth04
20: br-mac: <BROADCAST,MULTICAST> mtu 1500 qdisc noop state DOWN group default
    link/ether de:ee:ff:8d:0c:50 brd ff:ff:ff:ff:ff:ff
21: mac-veth02: <BROADCAST,MULTICAST> mtu 1500 qdisc noop master br-mac state DOWN group default qlen 1000
    link/ether de:ee:ff:8d:0c:49 brd ff:ff:ff:ff:ff:ff
22: mac-veth01: <BROADCAST,MULTICAST> mtu 1500 qdisc noop master br-mac state DOWN group default qlen 1000
    link/ether de:ee:ff:8d:0c:51 brd ff:ff:ff:ff:ff:ff
23: mac-veth04: <BROADCAST,MULTICAST> mtu 1500 qdisc noop state DOWN group default qlen 1000
    link/ether 46:62:dd:cd:4f:41 brd ff:ff:ff:ff:ff:ff
24: mac-veth03: <BROADCAST,MULTICAST> mtu 1500 qdisc noop state DOWN group default qlen 1000
    link/ether c6:3f:65:95:e0:93 brd ff:ff:ff:ff:ff:ff

# attach mac-veth04(小 mac)
root@ubuntu:~# brctl addif br-mac mac-veth04
20: br-mac: <BROADCAST,MULTICAST> mtu 1500 qdisc noop state DOWN group default
    link/ether de:ee:ff:8d:0c:50(不变) brd ff:ff:ff:ff:ff:ff
21: mac-veth02: <BROADCAST,MULTICAST> mtu 1500 qdisc noop master br-mac state DOWN group default qlen 1000
    link/ether de:ee:ff:8d:0c:49 brd ff:ff:ff:ff:ff:ff
22: mac-veth01: <BROADCAST,MULTICAST> mtu 1500 qdisc noop master br-mac state DOWN group default qlen 1000
    link/ether de:ee:ff:8d:0c:51 brd ff:ff:ff:ff:ff:ff
23: mac-veth04: <BROADCAST,MULTICAST> mtu 1500 qdisc noop master br-mac state DOWN group default qlen 1000
    link/ether 46:62:dd:cd:4f:41 brd ff:ff:ff:ff:ff:ff
24: mac-veth03: <BROADCAST,MULTICAST> mtu 1500 qdisc noop state DOWN group default qlen 1000
    link/ether c6:3f:65:95:e0:93 brd ff:ff:ff:ff:ff:ff
结论:br0 如果没有指定 hw MAC, br0 的 MAC 地址会根据 bridge 中 port 的变化,自动选择 port 中最小的一个 MAC 地址作为 br0 的 MAC 地址。br0 只能指定 port 中有的 interface 的 MAC 作为 br0 的 MAC 地址。
Linux Bridge 常用指令
help:
$ brctl
Usage: brctl [commands]
commands:
    addbr       <bridge>        add bridge
    delbr       <bridge>        delete bridge
    addif       <bridge> <device>   add interface to bridge
    delif       <bridge> <device>   delete interface from bridge
    hairpin     <bridge> <port> {on|off}    turn hairpin on/off
    setageing   <bridge> <time>     set ageing time
    setbridgeprio   <bridge> <prio>     set bridge priority
    setfd       <bridge> <time>     set bridge forward delay
    sethello    <bridge> <time>     set hello time
    setmaxage   <bridge> <time>     set max message age
    setpathcost <bridge> <port> <cost>  set path cost
    setportprio <bridge> <port> <prio>  set port priority
    show        [ <bridge> ]        show a list of bridges
    showmacs    <bridge>        show a list of mac addrs
    showstp     <bridge>        show bridge stp info
    stp         <bridge> {on|off}   turn stp on/off
常用指令:
# 创建网桥
brctl addbr br-test
# 为网桥添加物理接口
brctl addif br-test enp4s0
# 删除网桥
brctl delbr br-test
# 删除网桥接口
brctl delif br-test enp4s0
# 显示网桥列表信息
brctl show
# 显示网桥br-test的信息
brctl show br-test
# 显示网桥的MAC地址信息
brctl showmacs br-test
# 显示网桥的stp信息
brctl showstp br-test
# 开|关 STP 生成树,关闭可以减少数据包污染
brctl stp br-test on|off
# 为网络设备开启混杂模式
ifconfig eth0 0.0.0.0 promisc
KVM 虚拟机应用 Linux Bridge + VLAN 实现网络隔离
实验平台:VMware Workstations
操作系统:CentOS7/1台
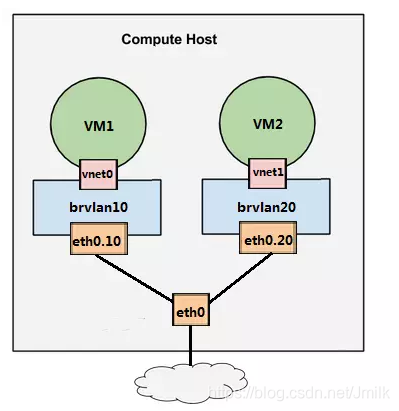
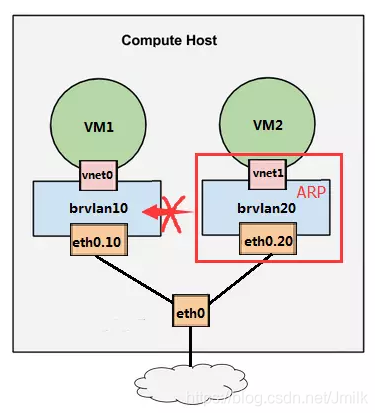
网络拓扑:
初始网络状态:
[root@localhost ~]# ip a
1: lo: <LOOPBACK,UP,LOWER_UP> mtu 65536 qdisc noqueue state UNKNOWN qlen 1000
    link/loopback 00:00:00:00:00:00 brd 00:00:00:00:00:00
    inet 127.0.0.1/8 scope host lo
       valid_lft forever preferred_lft forever
    inet6 ::1/128 scope host
       valid_lft forever preferred_lft forever
2: eno16777736: <BROADCAST,MULTICAST,UP,LOWER_UP> mtu 1500 qdisc pfifo_fast state UP qlen 1000
    link/ether 00:0c:29:12:dc:bc brd ff:ff:ff:ff:ff:ff
    inet 192.168.1.111/24 brd 192.168.1.255 scope global dynamic eno16777736
       valid_lft 7175sec preferred_lft 7175sec
    inet6 fe80::20c:29ff:fe12:dcbc/64 scope link
       valid_lft forever preferred_lft forever
4: virbr0: <NO-CARRIER,BROADCAST,MULTICAST,UP> mtu 1500 qdisc noqueue state DOWN qlen 1000
    link/ether 52:54:00:17:86:70 brd ff:ff:ff:ff:ff:ff
    inet 192.168.122.1/24 brd 192.168.122.255 scope global virbr0
       valid_lft forever preferred_lft forever
5: virbr0-nic: <BROADCAST,MULTICAST> mtu 1500 qdisc pfifo_fast master virbr0 state DOWN qlen 1000
    link/ether 52:54:00:17:86:70 brd ff:ff:ff:ff:ff:ff
6: ens34: <BROADCAST,MULTICAST,UP,LOWER_UP> mtu 1500 qdisc pfifo_fast state UP qlen 1000
    link/ether 00:0c:29:12:dc:c6 brd ff:ff:ff:ff:ff:ff
    inet 192.168.1.104/24 brd 192.168.1.255 scope global dynamic ens34
       valid_lft 7197sec preferred_lft 7197sec
    inet6 fe80::20c:29ff:fe12:dcc6/64 scope link
       valid_lft forever preferred_lft forever

[root@localhost ~]# brctl show
bridge name	bridge id		STP enabled	interfaces
virbr0		8000.525400178670	yes		virbr0-nic

[root@localhost ~]# route -nne
Kernel IP routing table
Destination     Gateway         Genmask         Flags   MSS Window  irtt Iface
0.0.0.0         192.168.1.1     0.0.0.0         UG        0 0          0 eno16777736
0.0.0.0         192.168.1.1     0.0.0.0         UG        0 0          0 ens34
192.168.1.0     0.0.0.0         255.255.255.0   U         0 0          0 eno16777736
192.168.1.0     0.0.0.0         255.255.255.0   U         0 0          0 ens34
192.168.122.0   0.0.0.0         255.255.255.0   U         0 0          0 virbr0
检查 Linux Kernel 是否加载了 802.1q(802.1.q VLAN)模块:
[root@localhost ~]# lsmod | grep 802
8021q                  33208  0
garp                   14384  1 8021q
mrp                    18542  1 8021q

[root@localhost ~]# dmesg | grep -i 802
...
[29081.756858] 8021q: 802.1Q VLAN Support v1.8
若没有,则加载:
# 临时加载
 modprobe 8021q
 # 永久加载 vi /etc/sysconfig/modules/8021q.modules
modprobe 8021q
安装 vconfig 工具:
yum -y install epel-release
yum -y install vconfig
创建网桥设备:
[root@localhost images]# brctl addbr brvlan-10
[root@localhost images]# brctl addbr brvlan-20

[root@localhost ~]# brctl show
bridge name	bridge id		STP enabled	interfaces
brvlan-10		8000.000000000000	no
brvlan-20		8000.000000000000	no
virbr0	     	8000.52540027ffd2	yes		virbr0-nic
配置网桥设备:
[root@localhost network-scripts]# cat ifcfg-brvlan-10
DEVICE=brvlan-10
ONBOOT=yes
BOOTPROTO=static
TYPE=bridge

[root@localhost network-scripts]# cat ifcfg-brvlan-20
DEVICE=brvlan-20
ONBOOT=yes
BOOTPROTO=static
TYPE=bridge
使能网桥设备:
ifup brvlan-10
ifup brvlan-20
创建 VLAN 子设备:
[root@localhost ~]# vconfig add eno16777736 10
Added VLAN with VID == 10 to IF -:eno16777736:-

[root@localhost ~]# vconfig add eno16777736 20
Added VLAN with VID == 20 to IF -:eno16777736:-
配置 VLAN 子设备:
[root@localhost network-scripts]# cat ifcfg-eno16777736.10
VLAN=yes
TYPE=vlan
PHYSDEV=eno16777736
VLAN_ID=10
NAME=eno16777736.10
ZONE=trusted
DEVICE=eno16777736.10
BRIDGE=brvlan-10
ONBOOT=yes
BOOTPROTO=static

[root@localhost network-scripts]# cat ifcfg-eno16777736.20
VLAN=yes
TYPE=vlan
PHYSDEV=eno16777736
VLAN_ID=20
NAME=eno16777736.20
ZONE=trusted
DEVICE=eno16777736.20
BRIDGE=brvlan-20
ONBOOT=yes
BOOTPROTO=static
使能 VLAN 子设备:
ifup eno16777736.10
ifup eno16777736.20
查看 VLAN 子设备是否已经成功挂载到 Bridge 设备上:
[root@localhost ~]# brctl show
bridge name	bridge id		STP enabled	interfaces
brvlan-10		8000.000c2927d53b	no		eno16777736.10
brvlan-20		8000.000c2927d53b	no		eno16777736.20
virbr0		    8000.52540027ffd2	yes		virbr0-nic
或者可以通过指令来主动挂载:
[root@localhost ~]# brctl addif brvlan-10 eno16777736.10
[root@localhost ~]# brctl addif brvlan-20 eno16777736.20
确认所有设备都 Connection successfully activated:
[root@localhost network-scripts]# systemctl restart network

[root@localhost network-scripts]# ifconfig
brvlan-10: flags=4163<UP,BROADCAST,RUNNING,MULTICAST>  mtu 1500
        ether 00:0c:29:27:d5:3b  txqueuelen 1000  (Ethernet)
        RX packets 16  bytes 1088 (1.0 KiB)
        RX errors 0  dropped 0  overruns 0  frame 0
        TX packets 16  bytes 1312 (1.2 KiB)
        TX errors 0  dropped 0 overruns 0  carrier 0  collisions 0

brvlan-20: flags=4163<UP,BROADCAST,RUNNING,MULTICAST>  mtu 1500
        ether 00:0c:29:27:d5:3b  txqueuelen 1000  (Ethernet)
        RX packets 8  bytes 544 (544.0 B)
        RX errors 0  dropped 0  overruns 0  frame 0
        TX packets 8  bytes 656 (656.0 B)
        TX errors 0  dropped 0 overruns 0  carrier 0  collisions 0

eno16777736: flags=4163<UP,BROADCAST,RUNNING,MULTICAST>  mtu 1500
        inet 192.168.1.110  netmask 255.255.255.0  broadcast 192.168.1.255
        inet6 fe80::20c:29ff:fe27:d53b  prefixlen 64  scopeid 0x20<link>
        ether 00:0c:29:27:d5:3b  txqueuelen 1000  (Ethernet)
        RX packets 156560  bytes 211445300 (201.6 MiB)
        RX errors 0  dropped 0  overruns 0  frame 0
        TX packets 65791  bytes 5353556 (5.1 MiB)
        TX errors 0  dropped 0 overruns 0  carrier 0  collisions 0

eno16777736.10: flags=4163<UP,BROADCAST,RUNNING,MULTICAST>  mtu 1500
        ether 00:0c:29:27:d5:3b  txqueuelen 1000  (Ethernet)
        RX packets 16  bytes 1088 (1.0 KiB)
        RX errors 0  dropped 0  overruns 0  frame 0
        TX packets 16  bytes 1312 (1.2 KiB)
        TX errors 0  dropped 0 overruns 0  carrier 0  collisions 0

eno16777736.20: flags=4163<UP,BROADCAST,RUNNING,MULTICAST>  mtu 1500
        ether 00:0c:29:27:d5:3b  txqueuelen 1000  (Ethernet)
        RX packets 8  bytes 544 (544.0 B)
        RX errors 0  dropped 0  overruns 0  frame 0
        TX packets 8  bytes 656 (656.0 B)
        TX errors 0  dropped 0 overruns 0  carrier 0  collisions 0

ens34: flags=4163<UP,BROADCAST,RUNNING,MULTICAST>  mtu 1500
        inet 192.168.1.103  netmask 255.255.255.0  broadcast 192.168.1.255
        inet6 fe80::20c:29ff:fe27:d545  prefixlen 64  scopeid 0x20<link>
        ether 00:0c:29:27:d5:45  txqueuelen 1000  (Ethernet)
        RX packets 8543  bytes 758616 (740.8 KiB)
        RX errors 0  dropped 0  overruns 0  frame 0
        TX packets 5876  bytes 2137551 (2.0 MiB)
        TX errors 0  dropped 0 overruns 0  carrier 0  collisions 0

lo: flags=73<UP,LOOPBACK,RUNNING>  mtu 65536
        inet 127.0.0.1  netmask 255.0.0.0
        inet6 ::1  prefixlen 128  scopeid 0x10<host>
        loop  txqueuelen 1000  (Local Loopback)
        RX packets 46  bytes 3442 (3.3 KiB)
        RX errors 0  dropped 0  overruns 0  frame 0
        TX packets 46  bytes 3442 (3.3 KiB)
        TX errors 0  dropped 0 overruns 0  carrier 0  collisions 0

virbr0: flags=4163<UP,BROADCAST,RUNNING,MULTICAST>  mtu 1500
        inet 192.168.122.1  netmask 255.255.255.0  broadcast 192.168.122.255
        ether 52:54:00:27:ff:d2  txqueuelen 1000  (Ethernet)
        RX packets 259  bytes 21178 (20.6 KiB)
        RX errors 0  dropped 0  overruns 0  frame 0
        TX packets 108  bytes 14101 (13.7 KiB)
        TX errors 0  dropped 0 overruns 0  carrier 0  collisions 0
创建 KVM 虚拟机 VM1、2,并且分别选用 VLAN 10、20:
- VM1
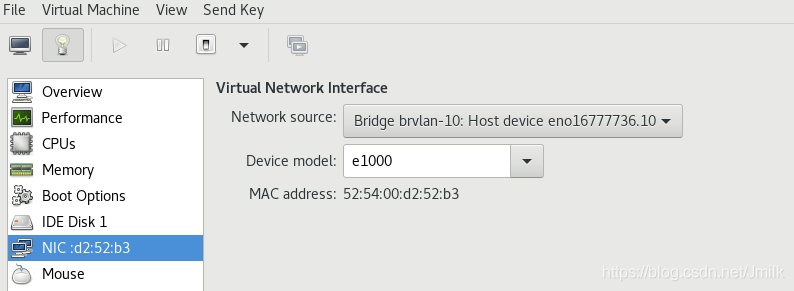
[root@localhost images]# virsh domiflist VM1
Interface  Type       Source     Model       MAC
-------------------------------------------------------
vnet1      bridge     brvlan-10  e1000       52:54:00:d2:52:b3
- VM2

[root@localhost images]# virsh domiflist VM2
Interface  Type       Source     Model       MAC
-------------------------------------------------------
vnet0      bridge     brvlan-20  e1000       52:54:00:a4:2d:a9
通过 VM MAC 地址可知 VM1、2 对应宿主机的 tap 设备分别是 vnet1、vnet0(以 MAC 地址而非序号作为映照关系)。再次查看网桥设备信息,vnet1、vnet0 也分别挂在到了网桥 brvlan-10、brvlan-20 上。
[root@localhost images]# brctl show
bridge name	bridge id		STP enabled	interfaces
brvlan-10		8000.000c2927d53b	no		eno16777736.10
							                vnet1
brvlan-20		8000.000c2927d53b	no		eno16777736.20
						                   	vnet0
virbr0		    8000.52540027ffd2	yes		virbr0-nic
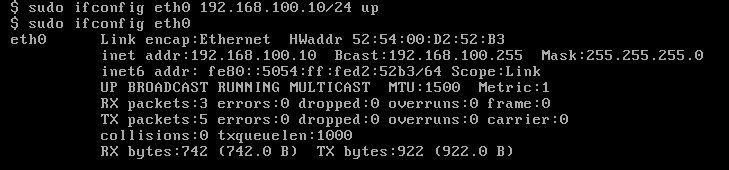
分别为 vnet0、vnet1 配置相同 IP 逻辑网段的 IP 地址,以此来验证 VLAN 的网络隔离性:
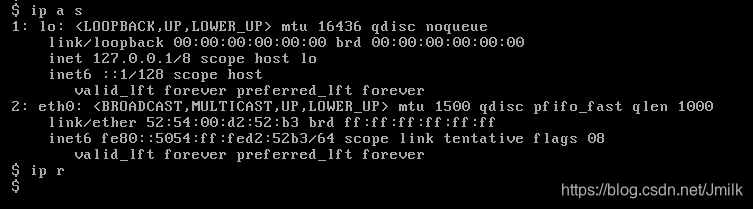
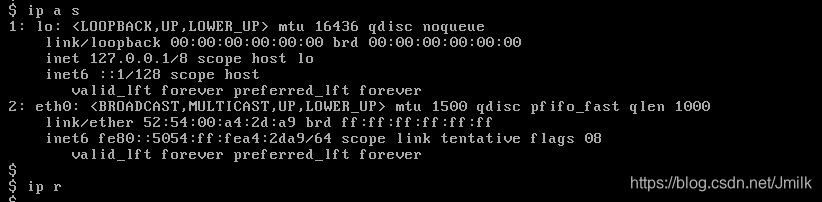
- VM1
- VM2
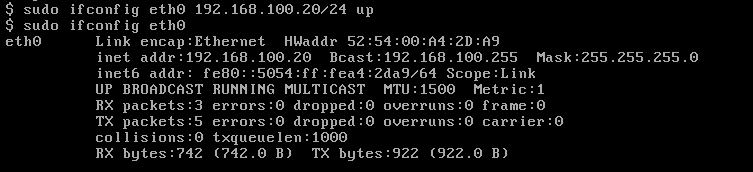
验证结果就是:VM1 与 VM2 是不通的。
我再使用同样的方法创建一个 VM3 并选用网络 eno16777736.20(VLAN 20),设定其 IP 地址为 192.168.100.30,此时的 VM3 是可以 Ping 通 VM2 的。
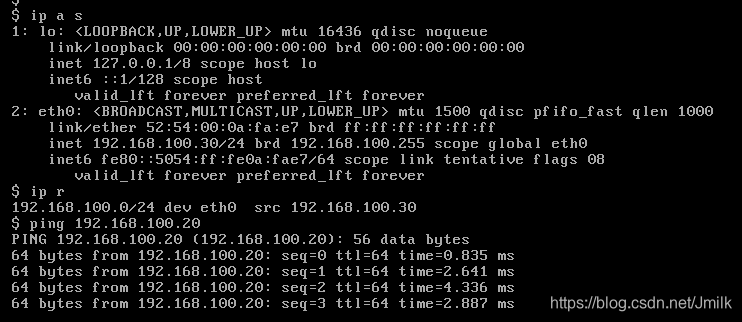
原因:VM2 向 VM1 发 Ping 包前,需要知道 VM1 的 IP 192.168.100.10 所对应的 MAC 地址。所以 VM2 会在 LAN·2 中广播 ARP 包,以此来取得 IP 为 192.168.100.10 的网卡 MAC 地址。但 ARP 是二层协议,VLAN 的隔离作用使得 ARP 请求包只能在 VLAN 20(LAN·2) 内进行广播,VLAN 10 里的设备是收不到的,所以 VM1 做出应答,所以 VM2 也就 Ping 不到 VM1。VLAN 的核心意义正是隔离广播域。
TSG
问题:Failed to restart network
[root@localhost network-scripts]# systemctl status network
...
Failed to start LSB: Bring up/down networking.

[root@localhost network-scripts]# journalctl -xe
...
Feb 14 09:19:27 localhost network[73824]: Bringing up interface eno16777736.20:  Error: Connection activation failed: Master device 'eno16777736.10' can't be activated: Device unmanaged or not available for activation
Feb 14 09:19:27 localhost network[73824]: [FAILED]
解决:检查 ifcfg-eno16777736.20 配置发现有写错,改正之后还是不行,发现 ifcfg-brvlan-20 的配置也写错了。都改正之后解决了该问题,说明如果 VLAN 子设备关联的网桥设备没有被使能的话,该设备也无法使能。
问题:启动 KVM 虚拟机卡在 further output written to /dev/ttyS0 较长时间。
解决:虚拟机镜像有设定进程在写串口,把 Serial 设备删除即可或者等待超时即可。

KVM 虚拟机应用 Linux Bridge + VLAN 实现网络隔离与跨主机互通
实验平台:VMware Workstations
操作系统:CentOS7/2台
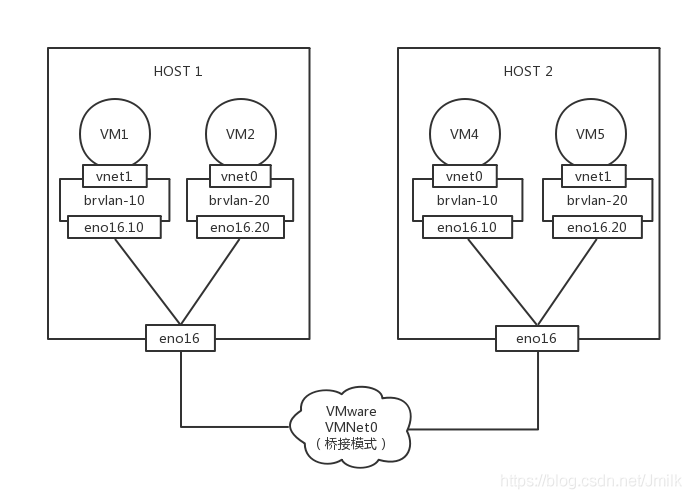
网络拓扑:
首先在 Host2 中重复上述操作:
[root@localhost network-scripts]# brctl show
[root@localhost images]# brctl show
bridge name	bridge id		STP enabled	interfaces
brvlan-10		8000.000c2912dcbc	no		eno16777736.10
					                   		vnet0
brvlan-20		8000.000c2912dcbc	no		eno16777736.20
						                	vnet1
virbr0	    	8000.525400178670	yes		virbr0-nic

[root@localhost images]# virsh domiflist VM4
Interface  Type       Source     Model       MAC
-------------------------------------------------------
vnet0      bridge     brvlan-10  e1000       52:54:00:e2:10:56

[root@localhost images]# virsh domiflist VM5
Interface  Type       Source     Model       MAC
-------------------------------------------------------
vnet1      bridge     brvlan-20  e1000       52:54:00:8b:60:75
- VM4 Ping VM1
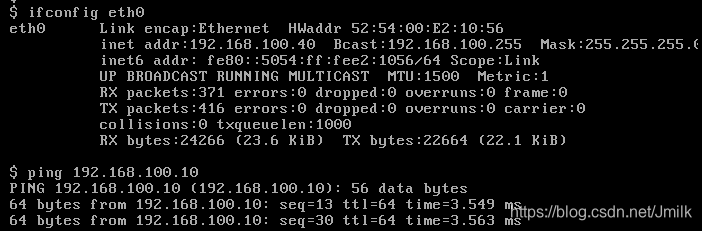
- VM5 Ping VM2
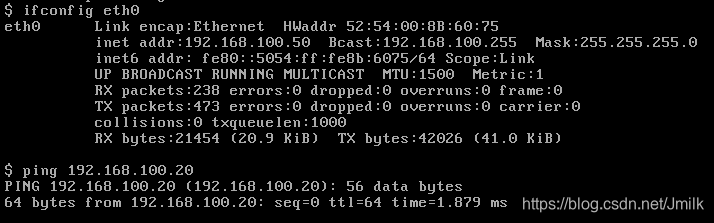
- VM4 Ping VM2 不通
- VM5 Ping VM1 不通
使用 tcpdump 抓包,分析网络包传输路劲
VM1 Ping VM4
- Host 1
[root@localhost ~]# tcpdump -i vnet1 -nntv src host 192.168.100.10 and dst host 192.168.100.40
tcpdump: listening on vnet0, link-type EN10MB (Ethernet), capture size 262144 bytes
ARP, Ethernet (len 6), IPv4 (len 4), Reply 192.168.100.10 is-at 52:54:00:d2:52:b3, length 46
ARP, Ethernet (len 6), IPv4 (len 4), Request who-has 192.168.100.40 tell 192.168.100.10, length 46
ARP, Ethernet (len 6), IPv4 (len 4), Request who-has 192.168.100.40 tell 192.168.100.10, length 46
IP (tos 0x0, ttl 64, id 29210, offset 0, flags [none], proto ICMP (1), length 84)
    192.168.100.10 > 192.168.100.40: ICMP echo reply, id 24577, seq 59, length 64

[root@localhost ~]# tcpdump -i brvlan-10 -nntv src 192.168.100.10 and dst host 192.168.100.40
tcpdump: listening on brvlan-10, link-type EN10MB (Ethernet), capture size 262144 bytes
IP (tos 0x0, ttl 64, id 15697, offset 0, flags [DF], proto ICMP (1), length 84)
    192.168.100.10 > 192.168.100.40: ICMP echo request, id 28417, seq 709, length 64
IP (tos 0x0, ttl 64, id 15715, offset 0, flags [DF], proto ICMP (1), length 84)
    192.168.100.10 > 192.168.100.40: ICMP echo request, id 28417, seq 710, length 64
^C
2 packets captured
2 packets received by filter
0 packets dropped by kernel

[root@localhost ~]# tcpdump -i eno16777736.10 -nntv src 192.168.100.10 and dst host 192.168.100.40
tcpdump: listening on eno16777736.10, link-type EN10MB (Ethernet), capture size 262144 bytes
IP (tos 0x0, ttl 64, id 37908, offset 0, flags [DF], proto ICMP (1), length 84)
    192.168.100.10 > 192.168.100.40: ICMP echo request, id 28417, seq 361, length 64
IP (tos 0x0, ttl 64, id 38117, offset 0, flags [DF], proto ICMP (1), length 84)
    192.168.100.10 > 192.168.100.40: ICMP echo request, id 28417, seq 362, length 64
^C
2 packets captured
2 packets received by filter
0 packets dropped by kernel

[root@localhost ~]# tcpdump -i eno16777736 -nntv src 192.168.100.10 and dst host 192.168.100.40
tcpdump: listening on eno16777736, link-type EN10MB (Ethernet), capture size 262144 bytes
IP (tos 0x0, ttl 64, id 40904, offset 0, flags [DF], proto ICMP (1), length 84)
    192.168.100.10 > 192.168.100.40: ICMP echo request, id 28417, seq 386, length 64
NOTE:vnet1 => brvlan-10 => eno16777736.10 => eno16777736 是有 ICMP echo request 包的,而 vnet0、eno16777736.20 和 brvlan-20 这几个设备没有,符合 隔离 效果。第一次 Ping 时候可以看见会有 ARP request 包从 vnet1 发出。
- Host 2
[root@localhost images]# tcpdump -i eno16777736 -nntv src 192.168.100.10 and dst host 192.168.100.40
tcpdump: listening on eno16777736, link-type EN10MB (Ethernet), capture size 262144 bytes
IP (tos 0x0, ttl 64, id 48645, offset 0, flags [DF], proto ICMP (1), length 84)
    192.168.100.10 > 192.168.100.40: ICMP echo request, id 28417, seq 979, length 64
^C
1 packet captured
1 packet received by filter
0 packets dropped by kernel

[root@localhost images]# tcpdump -i eno16777736.10 -nntv src 192.168.100.10 and dst host 192.168.100.40
tcpdump: listening on eno16777736.10, link-type EN10MB (Ethernet), capture size 262144 bytes
IP (tos 0x0, ttl 64, id 51595, offset 0, flags [DF], proto ICMP (1), length 84)
    192.168.100.10 > 192.168.100.40: ICMP echo request, id 28417, seq 1001, length 64
IP (tos 0x0, ttl 64, id 51667, offset 0, flags [DF], proto ICMP (1), length 84)
    192.168.100.10 > 192.168.100.40: ICMP echo request, id 28417, seq 1002, length 64
^C
2 packets captured
2 packets received by filter
0 packets dropped by kernel

[root@localhost images]# tcpdump -i brvlan-10 -nntv src 192.168.100.10 and dst host 192.168.100.40
tcpdump: listening on brvlan-10, link-type EN10MB (Ethernet), capture size 262144 bytes
IP (tos 0x0, ttl 64, id 52927, offset 0, flags [DF], proto ICMP (1), length 84)
    192.168.100.10 > 192.168.100.40: ICMP echo request, id 28417, seq 1014, length 64
^C
1 packet captured
1 packet received by filter
0 packets dropped by kernel

[root@localhost images]# tcpdump -i vnet0 -nntv src 192.168.100.10 and dst host 192.168.100.40
tcpdump: listening on vnet0, link-type EN10MB (Ethernet), capture size 262144 bytes
IP (tos 0x0, ttl 64, id 54132, offset 0, flags [DF], proto ICMP (1), length 84)
    192.168.100.10 > 192.168.100.40: ICMP echo request, id 28417, seq 1024, length 64
IP (tos 0x0, ttl 64, id 54242, offset 0, flags [DF], proto ICMP (1), length 84)
    192.168.100.10 > 192.168.100.40: ICMP echo request, id 28417, seq 1025, length 64
^C
2 packets captured
2 packets received by filter
0 packets dropped by kernel
NOTE:eno16777736 => eno16777736.10 => brvlan-10 => vnet0 能收到 ICMP echo request 包,所以 VM1 和 VM4 可以通信。
因为 Host1 和 Host2 的物理网络(eno16777736)都连接在 VMware Bridging 上,所以当有二层数据帧到达该网卡时就会被转发出去,从而首先实现了跨主机的二层 ARP 请求/应答。然后再依赖于 Linux VLAN Device 的 VLAN Tag 实现了跨主机的三层 IP 请求/应答。可见实际上 eno16777736 甚至于不需要 IP 地址,也不妨碍跨主机的虚拟机之间的通信。
KVM 虚拟机应用 Linux Bridge + VLAN 实现网络隔离、跨主机互通并且与外网互通
实验平台:VMware Workstations
操作系统:CentOS7/3台
当前环境外部网关是 192.168.1.1,所以只要把第一层网关(可配置的内部网络)和二层网关(不可配置的运营商网络)直连起来就可以实现 KVM 虚拟机与外网通信了。抽象一下如下图所示:
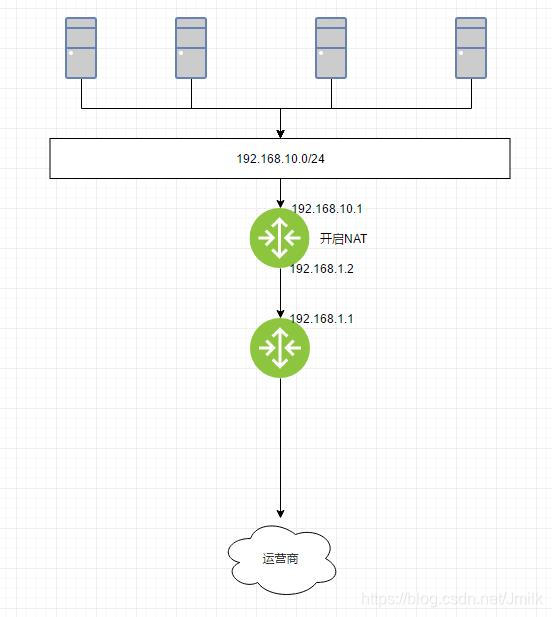
网络拓扑:

首先还是要安装上述步骤准备好 Host1、2 的 VLAN 子设备、Bridge 以及 VMs 等等, 这里不再赘述。该实验的重点在于如何在 Host3 构建第二层路由网关,使得 VM1 可以 Ping 通 Ext GW。
创建 Host3 的 VLAN 子设备,这些子设备分别成为了各自处于的 VLAN 网络的网关:
[root@localhost network-scripts]# cat ifcfg-eno33554960
HWADDR=00:0C:29:A2:2E:AE
TYPE=Ethernet
BOOTPROTO=static
DEFROUTE=yes
PEERDNS=yes
PEERROUTES=yes
IPV4_FAILURE_FATAL=no
IPV6INIT=yes
IPV6_AUTOCONF=yes
IPV6_DEFROUTE=yes
IPV6_PEERDNS=yes
IPV6_PEERROUTES=yes
IPV6_FAILURE_FATAL=no
NAME=eno33554960
UUID=0c66d88f-6d8e-4c16-8d14-85543d37f222
ONBOOT=yes

[root@localhost network-scripts]# cat ifcfg-eno33554960.10
VLAN=yes
TYPE=vlan
PHYSDEV=eno33554960
VLAN_ID=10
NAME=eno33554960.10
ZONE=trusted
DEVICE=eno33554960.10
ONBOOT=yes
BOOTPROTO=static
IPADDR=192.168.10.1
NETMASK=255.255.255.0

[root@localhost network-scripts]# cat ifcfg-eno33554960.20
VLAN=yes
TYPE=vlan
PHYSDEV=eno33554960
VLAN_ID=20
NAME=eno33554960.20
ZONE=trusted
DEVICE=eno33554960.20
ONBOOT=yes
BOOTPROTO=static
IPADDR=192.168.20.1
NATMASK=255.255.255.0
开启 Host3 的路由转发功能:
[root@localhost ~]# sysctl -p
net.ipv4.ip_forward = 1

[root@localhost ~]# iptables -t nat -A POSTROUTING -j MASQUERADE
[root@localhost ~]# iptables -nvL -t nat
Chain PREROUTING (policy ACCEPT 587 packets, 36974 bytes)
 pkts bytes target     prot opt in     out     source               destination

Chain INPUT (policy ACCEPT 15 packets, 3981 bytes)
 pkts bytes target     prot opt in     out     source               destination

Chain OUTPUT (policy ACCEPT 1 packets, 328 bytes)
 pkts bytes target     prot opt in     out     source               destination

Chain POSTROUTING (policy ACCEPT 0 packets, 0 bytes)
 pkts bytes target     prot opt in     out     source               destination
    6   676 MASQUERADE  all  --  *      *       0.0.0.0/0            0.0.0.0/0
设定路由表项:
[root@localhost ~]# route -nne
Kernel IP routing table
Destination     Gateway         Genmask         Flags   MSS Window  irtt Iface
0.0.0.0         192.168.1.1     0.0.0.0         UG        0 0          0 eno33554960
169.254.0.0     0.0.0.0         255.255.0.0     U         0 0          0 eno33554960
192.168.1.0     192.168.1.109   255.255.255.0   UG        0 0          0 eno16777736
192.168.1.0     0.0.0.0         255.255.255.0   U         0 0          0 eno16777736
192.168.1.1     0.0.0.0         255.255.255.255 UH        0 0          0 eno33554960
192.168.10.0    192.168.10.1    255.255.255.0   UG        0 0          0 eno33554960.10
192.168.20.0    0.0.0.0         255.255.255.0   U         0 0          0 eno33554960.20
NOTE:核心表项为 192.168.1.0 192.168.1.109 255.255.255.0 UG 0 0 0 eno16777736 和 192.168.10.0 192.168.10.1 255.255.255.0 UG 0 0 0 eno33554960.10,前者表示要去 192.168.1.0/24 段的数据包下一跳到 192.168.1.109;后者表示要去 192.168.10.0/24 的数据包下一跳到 192.168.10.1;这样数据包的来往回路就打通了。
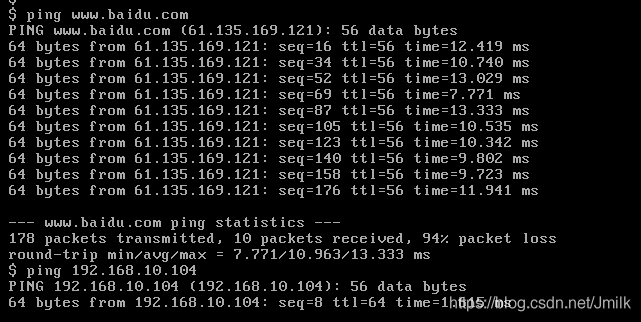
配置 VM1 的路由表项,默认静态路由丢到 VLAN 网管上:

这样 VM1 就可以 Ping 通外网了,当然也还能够 Ping 通通 VLAN 的 VM4。
总结:KVM + LinuxBridge 的网络虚拟化方案
- 物理交换机可以配置多个 VLAN,每个 VLAN 拥有多个端口。 同 VLAN 端口之间可以交换转发,不同 VLAN 端口之间互相隔离。 所以物理交换机其包含两层功能:交换(forwarding)与隔离。
- Linux 的 VLAN 设备实现的是隔离功能,但没有交换功能。 一个 VLAN 母设备(e.g. eno16777736)不能拥有两个相同 ID 的 VLAN 子设备,因此也不可能出现数据交换情况。
- 而 Linux Bridge 专门实现了交换功能。 将应该处于同一个 VLAN 中的设备(e.g. eno16777736.10@eno16777736、vnet0、vnet2)都挂载到一个 Bridge 上,设备之间就可以交换数据了。
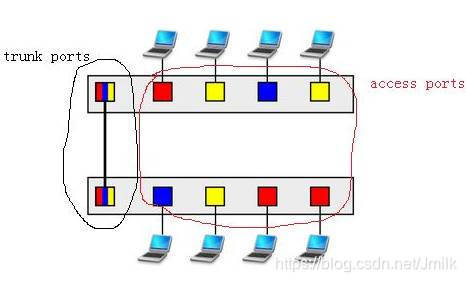
一言以蔽之,Linux Bridge + VLAN = 虚拟交换机:
- 设备 eno16777736.10、vnet1 和 brvlan-10 都接入到了虚拟交换机上 VLAN 10 的 Access 口。
- 设备 eno16777736.20、vnet0、vnet2 和 brvlan-20 都接入到了虚拟交换机上 VLAN 20 的 Access 口。
- 物理网卡设备接口 eno16777736 就相当于虚拟交换机上的 Trunk 口,允许 VLAN 10 和 VLAN 20 的数据通过。
- 虚拟交换机有效解决了云计算环境中的 IP 地址重叠问题。
最后,感谢公司的网络高手们给予的帮助和指点。之所以做此实践,是为了更好的理解 OpenStack Neutron 实现所依赖的底层技术支撑。万变不离其宗,Neutron 有一天可能会被淘汰,但 Linux 的网络虚拟化技术常在。
参考文章
https://segmentfault.com/a/1190000009491002?utm_source=tag-newest
https://blog.csdn.net/sld880311/article/details/77840343
https://blog.csdn.net/weixin_44046696/article/details/85991151
《每天 5 分钟学习 OpenStack》

