SpringBoot 源码解析 (二)----- Spring Boot精髓:启动流程源码分析
本文从源代码的角度来看看Spring Boot的启动过程到底是怎么样的,为何以往纷繁复杂的配置到如今可以这么简便。
入口类
@SpringBootApplication
public class HelloWorldMainApplication {

    public static void main(String[] args) {
        SpringApplication.run(HelloWorldMainApplication.class, args);
    }

}
@SpringBootApplication我们上一篇文章中大概的讲过了,有兴趣的可以看看我第一篇关于SpringBoot的文章,本篇文章主要关注SpringApplication.run(HelloWorldMainApplication.class, args);,我们跟进去看看
// 调用静态类,参数对应的就是HelloWorldMainApplication.class以及main方法中的args
public static ConfigurableApplicationContext run(Class<?> primarySource,String... args) {
    return run(new Class<?>[] { primarySource }, args);
}
public static ConfigurableApplicationContext run(Object[] sources, String[] args) {
    return (new SpringApplication(sources)).run(args);
}
它实际上会构造一个SpringApplication的实例,并把我们的启动类HelloWorldMainApplication.class作为参数传进去,然后运行它的run方法
SpringApplication构造器
public SpringApplication(ResourceLoader resourceLoader, Class<?>... primarySources) {
    this.resourceLoader = resourceLoader;
    Assert.notNull(primarySources, "PrimarySources must not be null");
    //把HelloWorldMainApplication.class设置为属性存储起来
    this.primarySources = new LinkedHashSet<>(Arrays.asList(primarySources));
    //设置应用类型是Standard还是Web
    this.webApplicationType = deduceWebApplicationType();
    //设置初始化器(Initializer),最后会调用这些初始化器
    setInitializers((Collection) getSpringFactoriesInstances( ApplicationContextInitializer.class));
    //设置监听器(Listener)
    setListeners((Collection) getSpringFactoriesInstances(ApplicationListener.class));
    this.mainApplicationClass = deduceMainApplicationClass();
}
先将HelloWorldMainApplication.class存储在this.primarySources属性中
设置应用类型
private WebApplicationType deduceWebApplicationType() {
    if (ClassUtils.isPresent(REACTIVE_WEB_ENVIRONMENT_CLASS, null)
            && !ClassUtils.isPresent(MVC_WEB_ENVIRONMENT_CLASS, null)) {
        return WebApplicationType.REACTIVE;
    }
    for (String className : WEB_ENVIRONMENT_CLASSES) {
        if (!ClassUtils.isPresent(className, null)) {
            return WebApplicationType.NONE;
        }
    }
    return WebApplicationType.SERVLET;
}

// 相关常量
private static final String REACTIVE_WEB_ENVIRONMENT_CLASS = "org.springframework."
        + "web.reactive.DispatcherHandler";
private static final String MVC_WEB_ENVIRONMENT_CLASS = "org.springframework."
        + "web.servlet.DispatcherServlet";
private static final String[] WEB_ENVIRONMENT_CLASSES = { "javax.servlet.Servlet",
        "org.springframework.web.context.ConfigurableWebApplicationContext" };
这里主要是通过类加载器判断REACTIVE相关的Class是否存在,如果不存在,则web环境即为SERVLET类型。这里设置好web环境类型,在后面会根据类型初始化对应环境。大家还记得我们第一篇文章中引入的依赖吗?
<dependency>
    <groupId>org.springframework.boot</groupId>
    <artifactId>spring-boot-starter-web</artifactId>
</dependency>
spring-boot-starter-web 的pom又会引入Tomcat和spring-webmvc,如下
<dependency>
  <groupId>org.springframework</groupId>
  <artifactId>spring-webmvc</artifactId>
  <version>5.0.5.RELEASE</version>
  <scope>compile</scope>
</dependency>
我们来看看spring-webmvc这个jar包
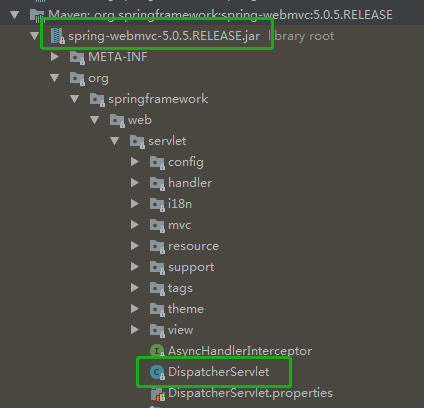
很明显spring-webmvc中存在DispatcherServlet这个类,也就是我们以前SpringMvc的核心Servlet,通过类加载能加载DispatcherServlet这个类,那么我们的应用类型自然就是WebApplicationType.SERVLET
public enum WebApplicationType {
    NONE,
    SERVLET,
    REACTIVE;

    private WebApplicationType() {
    }
}
设置初始化器(Initializer)
//设置初始化器(Initializer),最后会调用这些初始化器
setInitializers((Collection) getSpringFactoriesInstances( ApplicationContextInitializer.class));
我们先来看看getSpringFactoriesInstances( ApplicationContextInitializer.class)
private <T> Collection<T> getSpringFactoriesInstances(Class<T> type) {
    return getSpringFactoriesInstances(type, new Class<?>[] {});
}

// 这里的入参type就是ApplicationContextInitializer.class
private <T> Collection<T> getSpringFactoriesInstances(Class<T> type,
        Class<?>[] parameterTypes, Object... args) {
    ClassLoader classLoader = Thread.currentThread().getContextClassLoader();
    // 使用Set保存names来避免重复元素
    Set<String> names = new LinkedHashSet<>(
            SpringFactoriesLoader.loadFactoryNames(type, classLoader));
    // 根据names来进行实例化
    List<T> instances = createSpringFactoriesInstances(type, parameterTypes,
            classLoader, args, names);
    // 对实例进行排序
    AnnotationAwareOrderComparator.sort(instances);
    return instances;
}
这里面首先会根据入参type读取所有的names(是一个String集合),然后根据这个集合来完成对应的实例化操作:
// 入参就是ApplicationContextInitializer.class
public static List<String> loadFactoryNames(Class<?> factoryClass, ClassLoader classLoader) {
  String factoryClassName = factoryClass.getName();

  try {
      //从类路径的META-INF/spring.factories中加载所有默认的自动配置类
      Enumeration<URL> urls = classLoader != null?classLoader.getResources("META-INF/spring.factories"):ClassLoader.getSystemResources("META-INF/spring.factories");
      ArrayList result = new ArrayList();

      while(urls.hasMoreElements()) {
          URL url = (URL)urls.nextElement();
          Properties properties = PropertiesLoaderUtils.loadProperties(new UrlResource(url));
          //获取ApplicationContextInitializer.class的所有值
          String factoryClassNames = properties.getProperty(factoryClassName);
          result.addAll(Arrays.asList(StringUtils.commaDelimitedListToStringArray(factoryClassNames)));
      }

      return result;
  } catch (IOException var8) {
      throw new IllegalArgumentException("Unable to load [" + factoryClass.getName() + "] factories from location [" + "META-INF/spring.factories" + "]", var8);
  }
}
这个方法会尝试从类路径的META-INF/spring.factories处读取相应配置文件,然后进行遍历,读取配置文件中Key为:org.springframework.context.ApplicationContextInitializer的value。以spring-boot-autoconfigure这个包为例,它的META-INF/spring.factories部分定义如下所示:

org.springframework.context.ApplicationContextInitializer=\
org.springframework.boot.autoconfigure.SharedMetadataReaderFactoryContextInitializer,\
org.springframework.boot.autoconfigure.logging.AutoConfigurationReportLoggingInitializer
这两个类名会被读取出来,然后放入到Set<String>集合中,准备开始下面的实例化操作:
// parameterTypes: 上一步得到的names集合
private <T> List<T> createSpringFactoriesInstances(Class<T> type,
        Class<?>[] parameterTypes, ClassLoader classLoader, Object[] args,
        Set<String> names) {
    List<T> instances = new ArrayList<T>(names.size());
    for (String name : names) {
        try {
            Class<?> instanceClass = ClassUtils.forName(name, classLoader);
            //确认被加载类是ApplicationContextInitializer的子类
            Assert.isAssignable(type, instanceClass);
            Constructor<?> constructor = instanceClass.getDeclaredConstructor(parameterTypes);
            //反射实例化对象
            T instance = (T) BeanUtils.instantiateClass(constructor, args);
            //加入List集合中
            instances.add(instance);
        }
        catch (Throwable ex) {
            throw new IllegalArgumentException(
                    "Cannot instantiate " + type + " : " + name, ex);
        }
    }
    return instances;
}
确认被加载的类确实是org.springframework.context.ApplicationContextInitializer的子类,然后就是得到构造器进行初始化,最后放入到实例列表中。
因此,所谓的初始化器就是org.springframework.context.ApplicationContextInitializer的实现类,这个接口是这样定义的:
public interface ApplicationContextInitializer<C extends ConfigurableApplicationContext> {

    void initialize(C applicationContext);

}
在Spring上下文被刷新之前进行初始化的操作。典型地比如在Web应用中,注册Property Sources或者是激活Profiles。Property Sources比较好理解,就是配置文件。Profiles是Spring为了在不同环境下(如DEV,TEST,PRODUCTION等),加载不同的配置项而抽象出来的一个实体。
设置监听器(Listener)
下面开始设置监听器:
setListeners((Collection) getSpringFactoriesInstances(ApplicationListener.class));
我们还是跟进代码看看getSpringFactoriesInstances
// 这里的入参type是:org.springframework.context.ApplicationListener.class
private <T> Collection<? extends T> getSpringFactoriesInstances(Class<T> type) {
    return getSpringFactoriesInstances(type, new Class<?>[] {});
}

private <T> Collection<? extends T> getSpringFactoriesInstances(Class<T> type,
        Class<?>[] parameterTypes, Object... args) {
    ClassLoader classLoader = Thread.currentThread().getContextClassLoader();
    // Use names and ensure unique to protect against duplicates
    Set<String> names = new LinkedHashSet<String>(
            SpringFactoriesLoader.loadFactoryNames(type, classLoader));
    List<T> instances = createSpringFactoriesInstances(type, parameterTypes,
            classLoader, args, names);
    AnnotationAwareOrderComparator.sort(instances);
    return instances;
}
可以发现,这个加载相应的类名,然后完成实例化的过程和上面在设置初始化器时如出一辙,同样,还是以spring-boot-autoconfigure这个包中的spring.factories为例,看看相应的Key-Value:
org.springframework.context.ApplicationListener=\
org.springframework.boot.autoconfigure.BackgroundPreinitializer

org.springframework.context.ApplicationListener=\
org.springframework.boot.ClearCachesApplicationListener,\
org.springframework.boot.builder.ParentContextCloserApplicationListener,\
org.springframework.boot.context.FileEncodingApplicationListener,\
org.springframework.boot.context.config.AnsiOutputApplicationListener,\
org.springframework.boot.context.config.ConfigFileApplicationListener,\
org.springframework.boot.context.config.DelegatingApplicationListener,\
org.springframework.boot.context.logging.ClasspathLoggingApplicationListener,\
org.springframework.boot.context.logging.LoggingApplicationListener,\
org.springframework.boot.liquibase.LiquibaseServiceLocatorApplicationListener
这10个监听器会贯穿springBoot整个生命周期。至此,对于SpringApplication实例的初始化过程就结束了。
SpringApplication.run方法
完成了SpringApplication实例化,下面开始调用run方法:
public ConfigurableApplicationContext run(String... args) {
    // 计时工具
    StopWatch stopWatch = new StopWatch();
    stopWatch.start();

    ConfigurableApplicationContext context = null;
    Collection<SpringBootExceptionReporter> exceptionReporters = new ArrayList<>();

    configureHeadlessProperty();

    // 第一步:获取并启动监听器
    SpringApplicationRunListeners listeners = getRunListeners(args);
    listeners.starting();

    try {
        ApplicationArguments applicationArguments = new DefaultApplicationArguments(args);

        // 第二步:根据SpringApplicationRunListeners以及参数来准备环境
        ConfigurableEnvironment environment = prepareEnvironment(listeners,applicationArguments);
        configureIgnoreBeanInfo(environment);

        // 准备Banner打印器 - 就是启动Spring Boot的时候打印在console上的ASCII艺术字体
        Banner printedBanner = printBanner(environment);

        // 第三步:创建Spring容器
        context = createApplicationContext();

        exceptionReporters = getSpringFactoriesInstances(
                SpringBootExceptionReporter.class,
                new Class[] { ConfigurableApplicationContext.class }, context);

        // 第四步:Spring容器前置处理
        prepareContext(context, environment, listeners, applicationArguments,printedBanner);

        // 第五步:刷新容器
        refreshContext(context);

     // 第六步:Spring容器后置处理
        afterRefresh(context, applicationArguments);

      // 第七步:发出结束执行的事件
        listeners.started(context);
        // 第八步:执行Runners
        this.callRunners(context, applicationArguments);
        stopWatch.stop();
        // 返回容器
        return context;
    }
    catch (Throwable ex) {
        handleRunFailure(context, listeners, exceptionReporters, ex);
        throw new IllegalStateException(ex);
    }
}
- 第一步:获取并启动监听器
- 第二步:根据SpringApplicationRunListeners以及参数来准备环境
- 第三步:创建Spring容器
- 第四步:Spring容器前置处理
- 第五步:刷新容器
- 第六步:Spring容器后置处理
- 第七步:发出结束执行的事件
- 第八步:执行Runners
下面具体分析。
第一步:获取并启动监听器
获取监听器
跟进getRunListeners方法:
private SpringApplicationRunListeners getRunListeners(String[] args) {
    Class<?>[] types = new Class<?>[] { SpringApplication.class, String[].class };
    return new SpringApplicationRunListeners(logger, getSpringFactoriesInstances(SpringApplicationRunListener.class, types, this, args));
}
这里仍然利用了getSpringFactoriesInstances方法来获取实例,大家可以看看前面的这个方法分析,从META-INF/spring.factories中读取Key为org.springframework.boot.SpringApplicationRunListener的Values:
org.springframework.boot.SpringApplicationRunListener=\
org.springframework.boot.context.event.EventPublishingRunListener
getSpringFactoriesInstances中反射获取实例时会触发EventPublishingRunListener的构造函数,我们来看看EventPublishingRunListener的构造函数:
 1 public class EventPublishingRunListener implements SpringApplicationRunListener, Ordered {
 2     private final SpringApplication application;
 3     private final String[] args;
 4     //广播器
 5     private final SimpleApplicationEventMulticaster initialMulticaster;
 6
 7     public EventPublishingRunListener(SpringApplication application, String[] args) {
 8         this.application = application;
 9         this.args = args;
10         this.initialMulticaster = new SimpleApplicationEventMulticaster();
11         Iterator var3 = application.getListeners().iterator();
12
13         while(var3.hasNext()) {
14             ApplicationListener<?> listener = (ApplicationListener)var3.next();
15             //将上面设置到SpringApplication的十一个监听器全部添加到SimpleApplicationEventMulticaster这个广播器中
16             this.initialMulticaster.addApplicationListener(listener);
17         }
18
19     }
20     //略...
21 }
我们看到EventPublishingRunListener里面有一个广播器,EventPublishingRunListener 的构造方法将SpringApplication的十一个监听器全部添加到SimpleApplicationEventMulticaster这个广播器中,我们来看看是如何添加到广播器:
 1 public abstract class AbstractApplicationEventMulticaster implements ApplicationEventMulticaster, BeanClassLoaderAware, BeanFactoryAware {
 2     //广播器的父类中存放保存监听器的内部内
 3     private final AbstractApplicationEventMulticaster.ListenerRetriever defaultRetriever = new AbstractApplicationEventMulticaster.ListenerRetriever(false);
 4
 5     @Override
 6     public void addApplicationListener(ApplicationListener<?> listener) {
 7         synchronized (this.retrievalMutex) {
 8             Object singletonTarget = AopProxyUtils.getSingletonTarget(listener);
 9             if (singletonTarget instanceof ApplicationListener) {
10                 this.defaultRetriever.applicationListeners.remove(singletonTarget);
11             }
12             //内部类对象
13             this.defaultRetriever.applicationListeners.add(listener);
14             this.retrieverCache.clear();
15         }
16     }
17
18     private class ListenerRetriever {
19         //保存所有的监听器
20         public final Set<ApplicationListener<?>> applicationListeners = new LinkedHashSet();
21         public final Set<String> applicationListenerBeans = new LinkedHashSet();
22         private final boolean preFiltered;
23
24         public ListenerRetriever(boolean preFiltered) {
25             this.preFiltered = preFiltered;
26         }
27
28         public Collection<ApplicationListener<?>> getApplicationListeners() {
29             LinkedList<ApplicationListener<?>> allListeners = new LinkedList();
30             Iterator var2 = this.applicationListeners.iterator();
31
32             while(var2.hasNext()) {
33                 ApplicationListener<?> listener = (ApplicationListener)var2.next();
34                 allListeners.add(listener);
35             }
36
37             if (!this.applicationListenerBeans.isEmpty()) {
38                 BeanFactory beanFactory = AbstractApplicationEventMulticaster.this.getBeanFactory();
39                 Iterator var8 = this.applicationListenerBeans.iterator();
40
41                 while(var8.hasNext()) {
42                     String listenerBeanName = (String)var8.next();
43
44                     try {
45                         ApplicationListener<?> listenerx = (ApplicationListener)beanFactory.getBean(listenerBeanName, ApplicationListener.class);
46                         if (this.preFiltered || !allListeners.contains(listenerx)) {
47                             allListeners.add(listenerx);
48                         }
49                     } catch (NoSuchBeanDefinitionException var6) {
50                         ;
51                     }
52                 }
53             }
54
55             AnnotationAwareOrderComparator.sort(allListeners);
56             return allListeners;
57         }
58     }
59     //略...
60 }
上述方法定义在SimpleApplicationEventMulticaster父类AbstractApplicationEventMulticaster中。关键代码为this.defaultRetriever.applicationListeners.add(listener);,这是一个内部类,用来保存所有的监听器。也就是在这一步,将spring.factories中的监听器传递到SimpleApplicationEventMulticaster中。我们现在知道EventPublishingRunListener中有一个广播器SimpleApplicationEventMulticaster,SimpleApplicationEventMulticaster广播器中又存放所有的监听器。
启动监听器
我们上面一步通过getRunListeners方法获取的监听器为EventPublishingRunListener,从名字可以看出是启动事件发布监听器,主要用来发布启动事件。
public class EventPublishingRunListener implements SpringApplicationRunListener, Ordered {
    private final SpringApplication application;
    private final String[] args;
    private final SimpleApplicationEventMulticaster initialMulticaster;
我们先来看看SpringApplicationRunListener这个接口
package org.springframework.boot;
public interface SpringApplicationRunListener {

    // 在run()方法开始执行时,该方法就立即被调用,可用于在初始化最早期时做一些工作
    void starting();
    // 当environment构建完成,ApplicationContext创建之前,该方法被调用
    void environmentPrepared(ConfigurableEnvironment environment);
    // 当ApplicationContext构建完成时,该方法被调用
    void contextPrepared(ConfigurableApplicationContext context);
    // 在ApplicationContext完成加载,但没有被刷新前,该方法被调用
    void contextLoaded(ConfigurableApplicationContext context);
    // 在ApplicationContext刷新并启动后,CommandLineRunners和ApplicationRunner未被调用前,该方法被调用
    void started(ConfigurableApplicationContext context);
    // 在run()方法执行完成前该方法被调用
    void running(ConfigurableApplicationContext context);
    // 当应用运行出错时该方法被调用
    void failed(ConfigurableApplicationContext context, Throwable exception);
}
SpringApplicationRunListener接口在Spring Boot 启动初始化的过程中各种状态时执行,我们也可以添加自己的监听器,在SpringBoot初始化时监听事件执行自定义逻辑,我们先来看看SpringBoot启动时第一个启动事件listeners.starting():
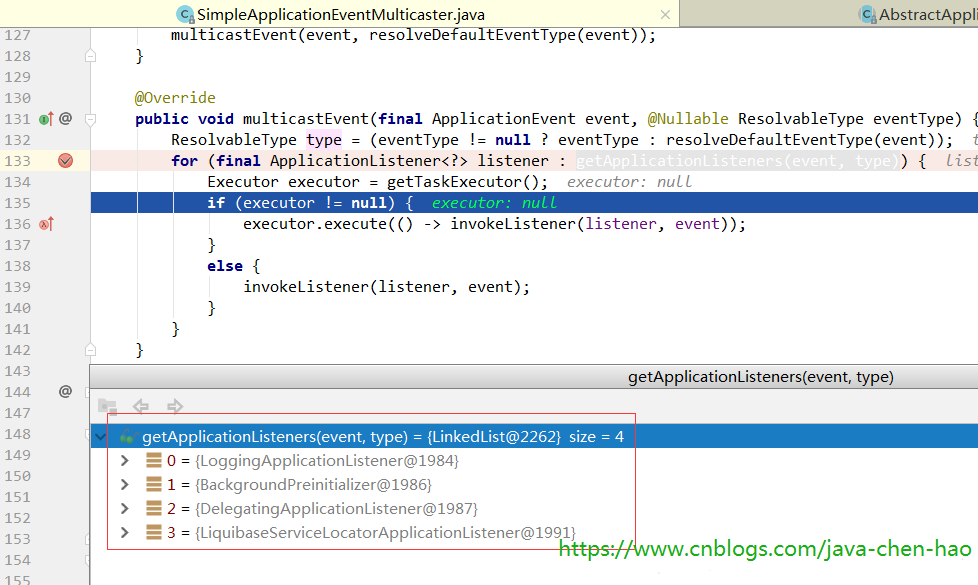
@Override
public void starting() {
    //关键代码,先创建application启动事件`ApplicationStartingEvent`
    this.initialMulticaster.multicastEvent(new ApplicationStartingEvent(this.application, this.args));
}
这里先创建了一个启动事件ApplicationStartingEvent,我们继续跟进SimpleApplicationEventMulticaster,有个核心方法:
@Override
public void multicastEvent(final ApplicationEvent event, @Nullable ResolvableType eventType) {
    ResolvableType type = (eventType != null ? eventType : resolveDefaultEventType(event));
    //通过事件类型ApplicationStartingEvent获取对应的监听器
    for (final ApplicationListener<?> listener : getApplicationListeners(event, type)) {
        //获取线程池,如果为空则同步处理。这里线程池为空,还未没初始化。
        Executor executor = getTaskExecutor();
        if (executor != null) {
            //异步发送事件
            executor.execute(() -> invokeListener(listener, event));
        }
        else {
            //同步发送事件
            invokeListener(listener, event);
        }
    }
}
这里会根据事件类型ApplicationStartingEvent获取对应的监听器,在容器启动之后执行响应的动作,有如下4种监听器:
我们选择springBoot 的日志监听器来进行讲解,核心代码如下:
@Override
public void onApplicationEvent(ApplicationEvent event) {
    //在springboot启动的时候
    if (event instanceof ApplicationStartedEvent) {
        onApplicationStartedEvent((ApplicationStartedEvent) event);
    }
    //springboot的Environment环境准备完成的时候
    else if (event instanceof ApplicationEnvironmentPreparedEvent) {
        onApplicationEnvironmentPreparedEvent(
                (ApplicationEnvironmentPreparedEvent) event);
    }
    //在springboot容器的环境设置完成以后
    else if (event instanceof ApplicationPreparedEvent) {
        onApplicationPreparedEvent((ApplicationPreparedEvent) event);
    }
    //容器关闭的时候
    else if (event instanceof ContextClosedEvent && ((ContextClosedEvent) event)
            .getApplicationContext().getParent() == null) {
        onContextClosedEvent();
    }
    //容器启动失败的时候
    else if (event instanceof ApplicationFailedEvent) {
        onApplicationFailedEvent();
    }
}
因为我们的事件类型为ApplicationEvent,所以会执行onApplicationStartedEvent((ApplicationStartedEvent) event);。springBoot会在运行过程中的不同阶段,发送各种事件,来执行对应监听器的对应方法。
第二步:环境构建
ConfigurableEnvironment environment = prepareEnvironment(listeners,applicationArguments);
跟进去该方法:
private ConfigurableEnvironment prepareEnvironment(
        SpringApplicationRunListeners listeners,
        ApplicationArguments applicationArguments) {
    //获取对应的ConfigurableEnvironment
    ConfigurableEnvironment environment = getOrCreateEnvironment();
    //配置
    configureEnvironment(environment, applicationArguments.getSourceArgs());
    //发布环境已准备事件,这是第二次发布事件
    listeners.environmentPrepared(environment);
    bindToSpringApplication(environment);
    ConfigurationPropertySources.attach(environment);
    return environment;
}
来看一下getOrCreateEnvironment()方法,前面已经提到,environment已经被设置了servlet类型,所以这里创建的是环境对象是StandardServletEnvironment。
private ConfigurableEnvironment getOrCreateEnvironment() {
    if (this.environment != null) {
        return this.environment;
    }
    if (this.webApplicationType == WebApplicationType.SERVLET) {
        return new StandardServletEnvironment();
    }
    return new StandardEnvironment();
}
接下来看一下listeners.environmentPrepared(environment);,上面已经提到了,这里是第二次发布事件。什么事件呢?来看一下根据事件类型获取到的监听器:
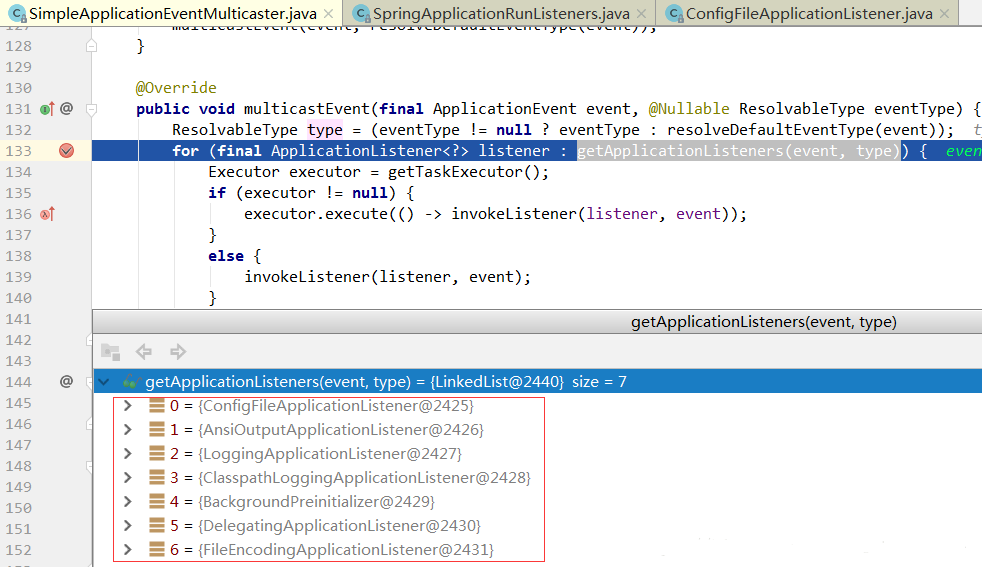
主要来看一下ConfigFileApplicationListener,该监听器非常核心,主要用来处理项目配置。项目中的 properties 和yml文件都是其内部类所加载。具体来看一下:
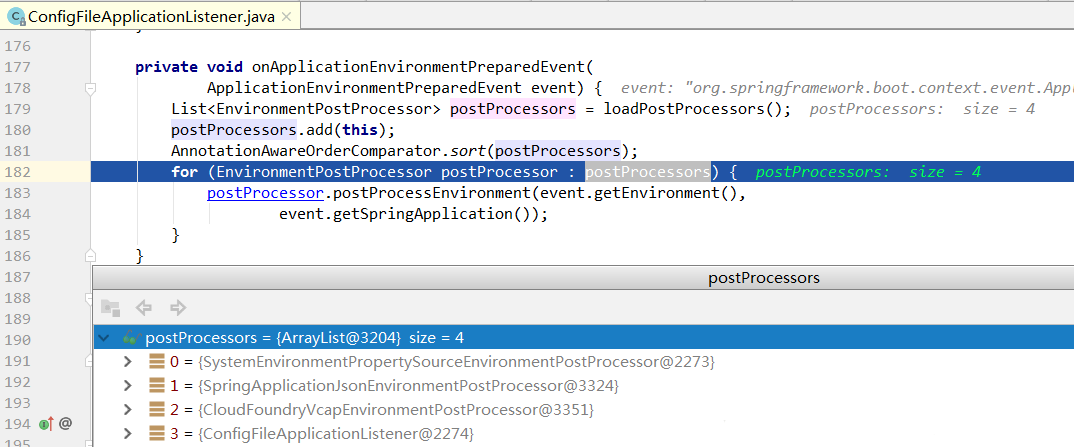
首先还是会去读spring.factories 文件,List<EnvironmentPostProcessor> postProcessors = loadPostProcessors();获取的处理类有以下四种:
# Environment Post Processors
org.springframework.boot.env.EnvironmentPostProcessor=
org.springframework.boot.cloud.CloudFoundryVcapEnvironmentPostProcessor,
org.springframework.boot.env.SpringApplicationJsonEnvironmentPostProcessor,
org.springframework.boot.env.SystemEnvironmentPropertySourceEnvironmentPostProcessor
在执行完上述三个监听器流程后,ConfigFileApplicationListener会执行该类本身的逻辑。由其内部类Loader加载项目制定路径下的配置文件:
private static final String DEFAULT_SEARCH_LOCATIONS = "classpath:/,classpath:/config/,file:./,file:./config/";
至此,项目的变量配置已全部加载完毕,来一起看一下:

这里一共6个配置文件,取值顺序由上到下。也就是说前面的配置变量会覆盖后面同名的配置变量。项目配置变量的时候需要注意这点。
第三步:创建容器
context = createApplicationContext();
继续跟进该方法:
public static final String DEFAULT_WEB_CONTEXT_CLASS = "org.springframework.boot.web.servlet.context.AnnotationConfigServletWebServerApplicationContext";
protected ConfigurableApplicationContext createApplicationContext() {
    Class<?> contextClass = this.applicationContextClass;
    if (contextClass == null) {
        try {
            switch (this.webApplicationType) {
            case SERVLET:
                contextClass = Class.forName(DEFAULT_WEB_CONTEXT_CLASS);
                break;
            case REACTIVE:
                contextClass = Class.forName(DEFAULT_REACTIVE_WEB_CONTEXT_CLASS);
                break;
            default:
                contextClass = Class.forName(DEFAULT_CONTEXT_CLASS);
            }
        }
        catch (ClassNotFoundException ex) {
            throw new IllegalStateException(
                    "Unable create a default ApplicationContext, "
                            + "please specify an ApplicationContextClass",
                    ex);
        }
    }
    return (ConfigurableApplicationContext) BeanUtils.instantiateClass(contextClass);
}
这里创建容器的类型 还是根据webApplicationType进行判断的,该类型为SERVLET类型,所以会通过反射装载对应的字节码,也就是AnnotationConfigServletWebServerApplicationContext
第四步:Spring容器前置处理
这一步主要是在容器刷新之前的准备动作。包含一个非常关键的操作:将启动类注入容器,为后续开启自动化配置奠定基础。
prepareContext(context, environment, listeners, applicationArguments,printedBanner);
继续跟进该方法:
private void prepareContext(ConfigurableApplicationContext context,
        ConfigurableEnvironment environment, SpringApplicationRunListeners listeners,
        ApplicationArguments applicationArguments, Banner printedBanner) {
    //设置容器环境,包括各种变量
    context.setEnvironment(environment);
    //执行容器后置处理
    postProcessApplicationContext(context);
    //执行容器中的ApplicationContextInitializer(包括 spring.factories和自定义的实例)
    applyInitializers(context);
  //发送容器已经准备好的事件,通知各监听器
    listeners.contextPrepared(context);

    //注册启动参数bean,这里将容器指定的参数封装成bean,注入容器
    context.getBeanFactory().registerSingleton("springApplicationArguments",
            applicationArguments);
    //设置banner
    if (printedBanner != null) {
        context.getBeanFactory().registerSingleton("springBootBanner", printedBanner);
    }
    //获取我们的启动类指定的参数,可以是多个
    Set<Object> sources = getAllSources();
    Assert.notEmpty(sources, "Sources must not be empty");
    //加载我们的启动类,将启动类注入容器
    load(context, sources.toArray(new Object[0]));
    //发布容器已加载事件。
    listeners.contextLoaded(context);
}
调用初始化器
protected void applyInitializers(ConfigurableApplicationContext context) {
    // 1. 从SpringApplication类中的initializers集合获取所有的ApplicationContextInitializer
    for (ApplicationContextInitializer initializer : getInitializers()) {
        // 2. 循环调用ApplicationContextInitializer中的initialize方法
        Class<?> requiredType = GenericTypeResolver.resolveTypeArgument(
                initializer.getClass(), ApplicationContextInitializer.class);
        Assert.isInstanceOf(requiredType, context, "Unable to call initializer.");
        initializer.initialize(context);
    }
}
这里终于用到了在创建SpringApplication实例时设置的初始化器了,依次对它们进行遍历,并调用initialize方法。我们也可以自定义初始化器,并实现initialize方法,然后放入META-INF/spring.factories配置文件中Key为:org.springframework.context.ApplicationContextInitializer的value中,这里我们自定义的初始化器就会被调用,是我们项目初始化的一种方式
加载启动指定类(重点)
大家先回到文章最开始看看,在创建SpringApplication实例时,先将HelloWorldMainApplication.class存储在this.primarySources属性中,现在就是用到这个属性的时候了,我们来看看getAllSources()
public Set<Object> getAllSources() {
    Set<Object> allSources = new LinkedHashSet();
    if (!CollectionUtils.isEmpty(this.primarySources)) {
        //获取primarySources属性,也就是之前存储的HelloWorldMainApplication.class
        allSources.addAll(this.primarySources);
    }

    if (!CollectionUtils.isEmpty(this.sources)) {
        allSources.addAll(this.sources);
    }

    return Collections.unmodifiableSet(allSources);
}
很明显,获取了this.primarySources属性,也就是我们的启动类HelloWorldMainApplication.class,我们接着看load(context, sources.toArray(new Object[0]));
protected void load(ApplicationContext context, Object[] sources) {
    BeanDefinitionLoader loader = createBeanDefinitionLoader(getBeanDefinitionRegistry(context), sources);
    if (this.beanNameGenerator != null) {
        loader.setBeanNameGenerator(this.beanNameGenerator);
    }
    if (this.resourceLoader != null) {
        loader.setResourceLoader(this.resourceLoader);
    }
    if (this.environment != null) {
        loader.setEnvironment(this.environment);
    }
    loader.load();
}

private int load(Class<?> source) {
    if (isGroovyPresent()
            && GroovyBeanDefinitionSource.class.isAssignableFrom(source)) {
        // Any GroovyLoaders added in beans{} DSL can contribute beans here
        GroovyBeanDefinitionSource loader = BeanUtils.instantiateClass(source,
                GroovyBeanDefinitionSource.class);
        load(loader);
    }
    if (isComponent(source)) {
        //以注解的方式,将启动类bean信息存入beanDefinitionMap,也就是将HelloWorldMainApplication.class存入了beanDefinitionMap
        this.annotatedReader.register(source);
        return 1;
    }
    return 0;
}
启动类HelloWorldMainApplication.class被加载到 beanDefinitionMap中,后续该启动类将作为开启自动化配置的入口,后面一篇文章我会详细的分析,启动类是如何加载,以及自动化配置开启的详细流程。
通知监听器,容器已准备就绪
listeners.contextLoaded(context);
主还是针对一些日志等监听器的响应处理。
第五步:刷新容器
执行到这里,springBoot相关的处理工作已经结束,接下的工作就交给了spring。我们来看看refreshContext(context);
protected void refresh(ApplicationContext applicationContext) {
    Assert.isInstanceOf(AbstractApplicationContext.class, applicationContext);
    //调用创建的容器applicationContext中的refresh()方法
    ((AbstractApplicationContext)applicationContext).refresh();
}
public void refresh() throws BeansException, IllegalStateException {
    synchronized (this.startupShutdownMonitor) {
        /**
         * 刷新上下文环境
         */
        prepareRefresh();

        /**
         * 初始化BeanFactory,解析XML,相当于之前的XmlBeanFactory的操作,
         */
        ConfigurableListableBeanFactory beanFactory = obtainFreshBeanFactory();

        /**
         * 为上下文准备BeanFactory,即对BeanFactory的各种功能进行填充,如常用的注解@Autowired @Qualifier等
         * 添加ApplicationContextAwareProcessor处理器
         * 在依赖注入忽略实现*Aware的接口,如EnvironmentAware、ApplicationEventPublisherAware等
         * 注册依赖,如一个bean的属性中含有ApplicationEventPublisher(beanFactory),则会将beanFactory的实例注入进去
         */
        prepareBeanFactory(beanFactory);

        try {
            /**
             * 提供子类覆盖的额外处理,即子类处理自定义的BeanFactoryPostProcess
             */
            postProcessBeanFactory(beanFactory);

            /**
             * 激活各种BeanFactory处理器,包括BeanDefinitionRegistryBeanFactoryPostProcessor和普通的BeanFactoryPostProcessor
             * 执行对应的postProcessBeanDefinitionRegistry方法 和  postProcessBeanFactory方法
             */
            invokeBeanFactoryPostProcessors(beanFactory);

            /**
             * 注册拦截Bean创建的Bean处理器,即注册BeanPostProcessor,不是BeanFactoryPostProcessor,注意两者的区别
             * 注意,这里仅仅是注册,并不会执行对应的方法,将在bean的实例化时执行对应的方法
             */
            registerBeanPostProcessors(beanFactory);

            /**
             * 初始化上下文中的资源文件,如国际化文件的处理等
             */
            initMessageSource();

            /**
             * 初始化上下文事件广播器,并放入applicatioEventMulticaster,如ApplicationEventPublisher
             */
            initApplicationEventMulticaster();

            /**
             * 给子类扩展初始化其他Bean
             */
            onRefresh();

            /**
             * 在所有bean中查找listener bean,然后注册到广播器中
             */
            registerListeners();

            /**
             * 设置转换器
             * 注册一个默认的属性值解析器
             * 冻结所有的bean定义,说明注册的bean定义将不能被修改或进一步的处理
             * 初始化剩余的非惰性的bean,即初始化非延迟加载的bean
             */
            finishBeanFactoryInitialization(beanFactory);

            /**
             * 通过spring的事件发布机制发布ContextRefreshedEvent事件,以保证对应的监听器做进一步的处理
             * 即对那种在spring启动后需要处理的一些类,这些类实现了ApplicationListener<ContextRefreshedEvent>,
             * 这里就是要触发这些类的执行(执行onApplicationEvent方法)
             * 另外,spring的内置Event有ContextClosedEvent、ContextRefreshedEvent、ContextStartedEvent、ContextStoppedEvent、RequestHandleEvent
             * 完成初始化,通知生命周期处理器lifeCycleProcessor刷新过程,同时发出ContextRefreshEvent通知其他人
             */
            finishRefresh();
        }

        finally {

            resetCommonCaches();
        }
    }
}
refresh方法在spring整个源码体系中举足轻重,是实现 ioc 和 aop的关键。我之前也有文章分析过这个过程,大家可以去看看
第六步:Spring容器后置处理
protected void afterRefresh(ConfigurableApplicationContext context,
        ApplicationArguments args) {
}
扩展接口,设计模式中的模板方法,默认为空实现。如果有自定义需求,可以重写该方法。比如打印一些启动结束log,或者一些其它后置处理。
第七步:发出结束执行的事件
public void started(ConfigurableApplicationContext context) {
    //这里就是获取的EventPublishingRunListener
    Iterator var2 = this.listeners.iterator();

    while(var2.hasNext()) {
        SpringApplicationRunListener listener = (SpringApplicationRunListener)var2.next();
        //执行EventPublishingRunListener的started方法
        listener.started(context);
    }
}

public void started(ConfigurableApplicationContext context) {
    //创建ApplicationStartedEvent事件,并且发布事件
    //我们看到是执行的ConfigurableApplicationContext这个容器的publishEvent方法,和前面的starting是不同的
    context.publishEvent(new ApplicationStartedEvent(this.application, this.args, context));
}
获取EventPublishingRunListener监听器,并执行其started方法,并且将创建的Spring容器传进去了,创建一个ApplicationStartedEvent事件,并执行ConfigurableApplicationContext 的publishEvent方法,也就是说这里是在Spring容器中发布事件,并不是在SpringApplication中发布事件,和前面的starting是不同的,前面的starting是直接向SpringApplication中的11个监听器发布启动事件。
第八步:执行Runners
我们再来看看最后一步callRunners(context, applicationArguments);
private void callRunners(ApplicationContext context, ApplicationArguments args) {
    List<Object> runners = new ArrayList<Object>();
    //获取容器中所有的ApplicationRunner的Bean实例
    runners.addAll(context.getBeansOfType(ApplicationRunner.class).values());
    //获取容器中所有的CommandLineRunner的Bean实例
    runners.addAll(context.getBeansOfType(CommandLineRunner.class).values());
    AnnotationAwareOrderComparator.sort(runners);
    for (Object runner : new LinkedHashSet<Object>(runners)) {
        if (runner instanceof ApplicationRunner) {
            //执行ApplicationRunner的run方法
            callRunner((ApplicationRunner) runner, args);
        }
        if (runner instanceof CommandLineRunner) {
            //执行CommandLineRunner的run方法
            callRunner((CommandLineRunner) runner, args);
        }
    }
}
如果是ApplicationRunner的话,则执行如下代码:
private void callRunner(ApplicationRunner runner, ApplicationArguments args) {
    try {
        runner.run(args);
    } catch (Exception var4) {
        throw new IllegalStateException("Failed to execute ApplicationRunner", var4);
    }
}
如果是CommandLineRunner的话,则执行如下代码:
private void callRunner(CommandLineRunner runner, ApplicationArguments args) {
    try {
        runner.run(args.getSourceArgs());
    } catch (Exception var4) {
        throw new IllegalStateException("Failed to execute CommandLineRunner", var4);
    }
}
我们也可以自定义一些ApplicationRunner或者CommandLineRunner,实现其run方法,并注入到Spring容器中,在SpringBoot启动完成后,会执行所有的runner的run方法
至此,SpringApplication大概分析了一遍,还有很多细节和核心留在下面文章中讲。

