
About Information Property List Files
UILaunchImageFile
UILaunchImageFile (String - iOS) specifies the name of the launch image file for the app on older versions of iOS. If this key and the UILaunchImages key are both present, the app uses the UILaunchImages key. If neither key is present, the system looks for a launch image file with the name Default.png.
This key is supported in iOS 3.2 and later.
Naming Your Launch Image Files
The name of each launch image conveys its purpose and how it is used. It is recommended that you use the following format for launch image filenames:
<basename><usage_specific_modifiers>.png
The <basename> portion of the filename is the string that you specify using the UILaunchImageFile key. (If you do not specify the key, iOS uses the string Default for the launch image name.) To the base name, you can add several different types of modifiers:
- High-resolution image modifier—Use the @2x modifier to identify images that are intended for Retina displays.
- Platform-specific modifiers—Use the modifiers ~iphone or ~ipad to specify images targeting a specific size of device.
- Orientation-specific modifiers—Use the strings -Landscape, -Portrait, -LandscapeLeft, -LandscapeRight, or -PortraitUpsideDown to specify launch images when the device is in a specific orientation. More specific orientation modifiers take precedence over less-specific orientation modifiers. For example, an image with the -LandscapeLeft modifier takes precedence over an image with the -Landscape modifier when the device is in the correct orientation.
- iPhone 5 modifier—Use the string -568h to specify a launch image intended for devices whose screen is 568 points high. Because such devices also have Retina displays, you should also include the @2x modifier in the image name.
- URL scheme modifiers—Include the name of your app’s custom URL scheme in launch image names if you want those launch images displayed when your app is launched to open a URL of the specified type. The format of a scheme modifier is -<url_scheme> where <url_scheme> is your custom scheme name. For example, if your app opens URLs of the form myscheme://example.com, you would include -myscheme in your launch image names.
UILaunchImages
UILaunchImages (Array - iOS) explicitly specifies the launch images to use for the app. This key contains an array of dictionaries. Each dictionary contains detailed information about a single launch image and how it is used. Xcode fills in the value of each dictionary based on information you provide in your project settings.
Table 4 lists the keys that can be included in each dictionary of the array.
Table 4 Keys for launch image dictionaries
|
Key |
Description |
|
UILaunchImageName (required) |
A string containing the name of the PNG image file. The image file must reside at the top level of the app bundle. The name you specify for this key should not include a filename extension, nor should it include modifiers such as @2x, -568h, ~iphone, or ~ipad. On disk, your image filenames may still include the @2x, -568h, ~iphone, or ~ipad modifiers as appropriate, although they are not required. The system automatically considers such modifiers when choosing which file to load. |
|
UILaunchImageMinimumOSVersion (required) |
A string representing the minimum iOS version number for which the image is intended. The form of the version number is the same as for the LSMinimumSystemVersion key, which is a string of the form n.n.n where n is a number. For example, images targeting iOS 7 and later should specify a string “7.0”. |
|
UILaunchImageSize |
A string containing the width and height of the image. This string represents the size of the display for which the image is intended. You must specify the width and height with respect to the device in a portrait orientation. In other words, portrait and landscape images targeting the same device would have the same width and height. The format of this string is {width, height} where width and height are the size of the image in points. (The format of this string is the same as that generated by the NSStringFromCGSize function.) For example, the string {320, 480} specifies an image that can be used on an iPhone 4 or iPhone 4S. If you do not specify this key, the image size is assumed to be {320, 480}. |
|
UILaunchImageOrientation |
A string containing the orientation of the image. The value of this key is one of the following values:
If you do not specify a value for this key, the orientation is assumed to be Portrait. |
If this key is present, iOS 7 uses it exclusively to obtain launch images. The system does not fall back to the older naming conventions used prior to iOS 7.
This key is supported in iOS 7.0 and later.
https://developer.apple.com/library/ios/qa/qa1686/_index.html
App Icons on iPad and iPhone
Q: How are the icon files in my application bundle used on iPad and iPhone?
A: Below are guidelines for handling icon files for iPhone-only apps, iPad-only apps, and universal apps.
If you don't provide artwork for one of the listed optional icons, the system will automatically scale one of your existing icon images to an appropriate size. It is strongly recommended that your application include artwork for all the icons listed, at the specific sizes needed.
Prior to iOS 3.2, icon images were required to follow a strict naming convention. These legacy names are still listed in the tables below along with example names for the more recent icons. Except foriTunesArtwork, icon images included in your app can have arbitrary names.
Note: iOS ignores the PPI (Pixels Per Inch) of icon images. You may author your icon images at any PPI but their width and height, as measured in pixels, must match the values in the tables below.
Important: iTunesArtwork icon images should be in png format, but name them without the .png extension.
Icons for iPhone-only Apps
iPhone-only applications use the following icons. Items marked with "Required" must be included.
Note: You should include images for the iPad-specific icons even if your app is not a universal app. If available, they will be used when the app is installed on an iPad.
|
Image Size (px) |
File Name |
Used For |
App Store |
Ad Hoc |
|---|---|---|---|---|
|
512x512 |
iTunesArtwork |
App list in iTunes |
Do not include |
Optional but recommended |
|
1024x1024 |
iTunesArtwork@2x |
App list in iTunes on devices with retina display |
Do not include |
Optional but recommended |
|
120x120 |
Icon-60@2x.png |
Home screen on iPhone/iPod Touch with retina display |
Required |
Required |
|
180x180 |
Icon-60@3x.png |
Home screen on iPhone 6 Plus |
Optional but recommended |
Optional but recommended |
|
76x76 |
Icon-76.png |
Home screen on iPad |
Optional but recommended |
Optional but recommended |
|
152x152 |
Icon-76@2x.png |
Home screen on iPad with retina display |
Optional but recommended |
Optional but recommended |
|
40x40 |
Icon-Small-40.png |
Spotlight |
Optional but recommended |
Optional but recommended |
|
80x80 |
Icon-Small-40@2x.png |
Spotlight on devices with retina display |
Optional but recommended |
Optional but recommended |
|
120x120 |
Icon-Small-40@3x.png |
Spotlight on iPhone 6 Plus |
Optional but recommended |
Optional but recommended |
|
29x29 |
Icon-Small.png |
Settings |
Recommended if you have a Settings bundle, optional otherwise |
Recommended if you have a Settings bundle, optional otherwise |
|
58x58 |
Icon-Small@2x.png |
Settings on devices with retina display |
Recommended if you have a Settings bundle, optional otherwise |
Recommended if you have a Settings bundle, optional otherwise |
|
87x87 |
Icon-Small@3x.png |
Settings on iPhone 6 Plus |
Recommended if you have a Settings bundle, optional otherwise |
Recommended if you have a Settings bundle, optional otherwise |
In addition to the above icons, iPhone-only applications with a deployment target of iOS 6.1 or earlier use the following icons. Items marked with "Required" must be included if the application's deployment target is iOS 6.1 or earlier.
|
Image Size (px) |
File Name |
Used For |
App Store |
Ad Hoc |
|---|---|---|---|---|
|
57x57 |
Icon.png |
Home screen on iPhone/iPod touch (iOS 6.1 and earlier) |
Required |
Required |
|
114x114 |
Icon@2x.png |
Home screen on iPhone/iPod Touch with retina display (iOS 6.1 and earlier) |
Optional but recommended |
Optional but recommended |
|
72x72 |
Icon-72.png |
Home screen on iPad (iOS 6.1 and earlier) |
Optional but recommended |
Optional but recommended |
|
144x144 |
Icon-72@2x.png |
Home screen on iPad with retina display (iOS 6.1 and earlier) |
Optional but recommended |
Optional but recommended |
|
29x29 |
Icon-Small.png |
Spotlight on iPhone/iPod Touch (iOS 6.1 and earlier) and Settings |
Recommended if you have a Settings bundle, otherwise optional but recommended |
Recommended if you have a Settings bundle, otherwise optional but recommended |
|
58x58 |
Icon-Small@2x.png |
Spotlight on iPhone/iPod Touch with retina display (iOS 6.1 and earlier) and Settings on devices with retina display |
Recommended if you have a Settings bundle, otherwise optional but recommended |
Recommended if you have a Settings bundle, otherwise optional but recommended |
|
50x50 |
Icon-Small-50.png |
Spotlight on iPad (iOS 6.1 and earlier) |
Optional but recommended |
Optional but recommended |
|
100x100 |
Icon-Small-50@2x.png |
Spotlight on iPad with retina display (iOS 6.1 and earlier) |
Optional but recommended |
Optional but recommended |
You can include distinct images for the iPhone and iPad icons in categories where the required sizes are equivalent, for example, Settings.
Icons for iPad-only Apps
iPad-only applications use the following icons. Items marked with "Required" must be included.
|
Image Size (px) |
File Name |
Used For |
App Store |
Ad Hoc |
|---|---|---|---|---|
|
512x512 |
iTunesArtwork |
Ad Hoc iTunes |
Do not include |
Optional but recommended |
|
1024x1024 |
iTunesArtwork@2x |
Ad Hoc iTunes on devices with retina display |
Do not include |
Optional but recommended |
|
76x76 |
Icon-76.png |
Home screen on iPad |
Required |
Required |
|
152x152 |
Icon-76@2x.png |
Home screen on iPad with retina display |
Optional but recommended |
Optional but recommended |
|
40x40 |
Icon-Small-40.png |
Spotlight on iPad |
Optional but recommended |
Optional but recommended |
|
80x80 |
Icon-Small-40@2x.png |
Spotlight on iPad with retina display |
Optional but recommended |
Optional but recommended |
|
29x29 |
Icon-Small.png |
Settings on iPad |
Recommended if you have a Settings bundle, otherwise optional but recommended |
Recommended if you have a Settings bundle, otherwise optional but recommended |
|
58x58 |
Icon-Small@2x.png |
Settings on iPad with retina display |
Recommended if you have a Settings bundle, otherwise optional but recommended |
Recommended if you have a Settings bundle, otherwise optional but recommended |
In addition to the above icons, iPad-only applications with a deployment target of iOS 6.1 or earlier use the following icons. Items marked with "Required" must be included if the application's deployment target is iOS 6.1 or earlier.
|
Image Size (px) |
File Name |
Used For |
App Store |
Ad Hoc |
|---|---|---|---|---|
|
72x72 |
Icon-72.png |
Home screen on iPad (iOS 6.1 and earlier) |
Required |
Required |
|
144x144 |
Icon-72@2x.png |
Home screen on iPad with retina display (iOS 6.1 and earlier) |
Optional but recommended |
Optional but recommended |
|
50x50 |
Icon-Small-50.png |
Spotlight on iPad (iOS 6.1 and earlier) |
Optional but recommended |
Optional but recommended |
|
100x100 |
Icon-Small-50@2x.png |
Spotlight on iPad with retina display (iOS 6.1 and earlier) |
Optional but recommended |
Optional but recommended |
Icons for Universal Apps
Universal applications use the following icons. Items marked with "Required" must be included.
|
Image Size (px) |
File Name |
Used For |
App Store |
Ad Hoc |
|---|---|---|---|---|
|
512x512 |
iTunesArtwork |
App list in iTunes |
Do not include |
Optional but recommended |
|
1024x1024 |
iTunesArtwork@2x |
App list in iTunes for devices with retina display |
Do not include |
Optional but recommended |
|
120x120 |
Icon-60@2x.png |
Home screen on iPhone/iPod Touch with retina display |
Required |
Required |
|
180x180 |
Icon-60@3x.png |
Home screen on iPhone 6 Plus |
Optional but recommended |
Optional but recommended |
|
76x76 |
Icon-76.png |
Home screen on iPad |
Required |
Required |
|
152x152 |
Icon-76@2x.png |
Home screen on iPad with retina display |
Optional but recommended |
Optional but recommended |
|
40x40 |
Icon-Small-40.png |
Spotlight |
Optional but recommended |
Optional but recommended |
|
80x80 |
Icon-Small-40@2x.png |
Spotlight on devices with retina display |
Optional but recommended |
Optional but recommended |
|
120x120 |
Icon-Small-40@3x.png |
Spotlight on iPhone 6 Plus |
Optional but recommended |
Optional but recommended |
|
29x29 |
Icon-Small.png |
Settings |
Recommended if you have a Settings bundle, optional otherwise |
Recommended if you have a Settings bundle, optional otherwise |
|
58x58 |
Icon-Small@2x.png |
Settings on devices with retina display |
Recommended if you have a Settings bundle, optional otherwise |
Recommended if you have a Settings bundle, optional otherwise |
|
87x87 |
Icon-Small@2x.png |
Settings on iPhone 6 Plus |
Recommended if you have a Settings bundle, optional otherwise |
Recommended if you have a Settings bundle, optional otherwise |
In addition to the above icons, universal applications with a deployment target of iOS 6.1 or earlier use the following icons. Items marked with "Required" must be included if the application's deployment target is iOS 6.1 or earlier.
|
Image Size (px) |
File Name |
Used For |
App Store |
Ad Hoc |
|---|---|---|---|---|
|
57x57 |
Icon.png |
Home screen on iPhone/iPod touch (iOS 6.1 and earlier) |
Required |
Required |
|
114x114 |
Icon@2x.png |
Home screen on iPhone/iPod Touch with retina display (iOS 6.1 and earlier) |
Optional but recommended |
Optional but recommended |
|
72x72 |
Icon-72.png |
Home screen on iPad (iOS 6.1 and earlier) |
Required |
Required |
|
144x144 |
Icon-72@2x.png |
Home screen on iPad with retina display (iOS 6.1 and earlier) |
Optional but recommended |
Optional but recommended |
|
29x29 |
Icon-Small.png |
Spotlight on iPhone/iPod Touch (iOS 6.1 and earlier) and Settings |
Recommended if you have a Settings bundle, otherwise optional but recommended |
Recommended if you have a Settings bundle, otherwise optional but recommended |
|
58x58 |
Icon-Small@2x.png |
Spotlight on iPhone/iPod Touch with retina display (iOS 6.1 and earlier) and Settings on devices with retina display |
Recommended if you have a Settings bundle, otherwise optional but recommended |
Recommended if you have a Settings bundle, otherwise optional but recommended |
|
50x50 |
Icon-Small-50.png |
Spotlight on iPad (iOS 6.1 and earlier) |
Optional but recommended |
Optional but recommended |
|
100x100 |
Icon-Small-50@2x.png |
Spotlight on iPad with retina display (iOS 6.1 and earlier) |
Optional but recommended |
Optional but recommended |
You can include distinct images for the iPhone and iPad icons in categories where the required sizes are equivalent, for example, Settings.
Adding Icons to Your App
Asset catalogs are the preferred way to manage your application's icons. New projects are configured to use asset catalogs by default. Migrating an App Icon Set or Launch Image Set in the Asset Catalog Help describes how to migrate an existing project to use asset catalogs. If your application must support iOS 4.3, or you prefer not to use asset catalogs, you can manually configure your application's icons by editing the information property list for your application. See Configuring Icons Without an Asset Catalog.
Adding Icon Images to an Asset Catalog
-
Select the asset catalog in the project navigator. It is named Images.xcassets by default.
-
From the left column of the editor, select the icon set. For new or migrated projects it will be named 'AppIcon'. You may need to create an icon set by clicking the (+) button in the bottom left of the editor and choosing 'New App Icon' from the context menu.
Figure 1 The AppIcon set selected in the asset catalog.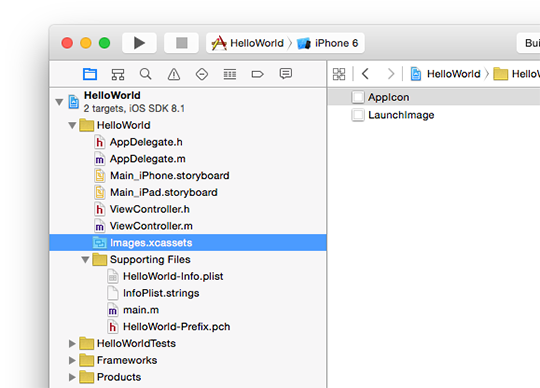
The set will only contain image wells for icons that are relevant depending upon your project's configuration at the time the asset catalog was created. If an image well is missing, expand the settings inspector and check the appropriate boxes under the App Icon pane depending upon your project's deployment target and supported devices.
Figure 2 Enable the necessary image wells under the App Icon pane of the settings inspector.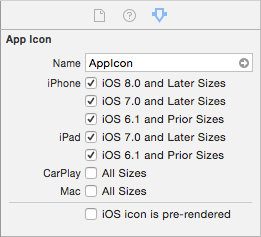
-
Drag images from the Finder onto each image well to configure the associated icon.
Figure 3 Complete icon set for a universal app with a deployment target less than iOS 7.0
Asset catalogs create a copy of images added to them. If you had previously added the images as resources to your project you can safely remove them.
-
Configure your app to use the new icon set.
-
-
Select the name of the project in the project navigator.
-
Select the name of your app from the list in the left column of the project editor.
-
Select the General tab at the top of the project editor.
-
Choose your icon set from the App Icons Source popup menu under the App Icons And Launch Images pane.
-
Figure 4 Configure the icon set for your app's target.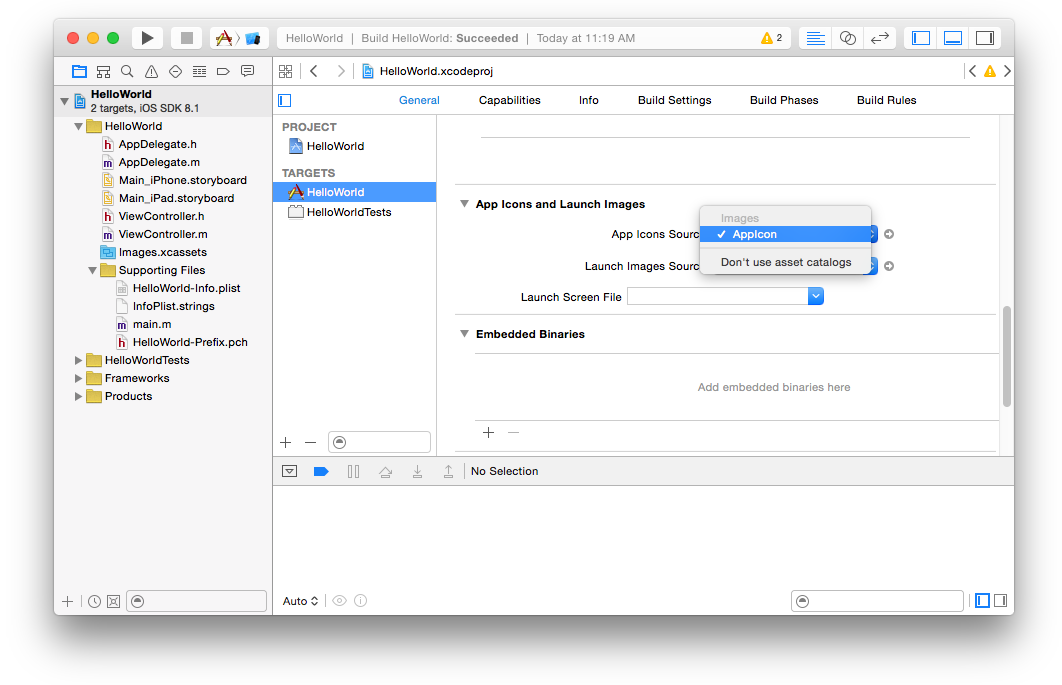
Configuring Icons Without an Asset Catalog
-
Follow the steps in the Xcode Project Navigator Help to add each icon image to your project as a resource.
-
Locate your application's information property list in the Xcode File Navigator. By default it will be named
<ProductName>-Info.plist, where<ProductName>is the name of your application. Right click it and choose Open As > Source Code. -
The final step varies depending upon whether your app must support iOS 4.3.
If your application supports iOS 4.3 you must include the CFBundleIconFiles key to specify your application's icon images. The value for this key is an array of strings, each identifying an image in the bundle. If you have included images for the iPad-specific icons, you may either list them under the CFBundleIconFiles key, or you can list them under the device specific CFBundleIconFiles~ipad key. iPad-only applications should list their icon images under the CFBundleIconFiles key.
Listing 1 Example configuration for a universal app with deployment target of iOS 4.3.
<key>CFBundleIconFiles</key> |
<array> |
<string>Icon-Small</string> |
<string>Icon-Small-40</string> |
<string>Icon-Small-50</string> |
<string>Icon</string> |
<string>Icon-60</string> |
<string>Icon-72</string> |
</array> |
<key>CFBundleIconFiles~ipad</key> |
<array> |
<string>Icon-Small</string> |
<string>Icon-Small-40</string> |
<string>Icon-Small-50</string> |
<string>Icon-72</string> |
<string>Icon-76</string> |
</array> |
If your application supports iOS 5.0 or above, you should include the CFBundleIcons key to specify your application's icon images. The value for this key is a dictionary with two child keys: CFBundlePrimaryIconand UINewsstandIcon. The UINewsstandIcon key is for newsstand apps and can otherwise be omitted. The value for the CFBundlePrimaryIcon key is a dictionary that identifies the icon images associated with the app bundle. It may contain two child keys: CFBundleIconFiles and UIPrerenderedIcon. The value for the UIPrerenderedIcon key is a boolean that specifies whether your icon files already incorporates a shine effect. The value for CFBundleIconFiles key is an array of strings, each identifying an image in the bundle.
Listing 2 Example configuration for a universal app with deployment target of iOS 5.0 or greater.
<key>CFBundleIcons</key> |
<dict> |
<key>CFBundlePrimaryIcon</key> |
<dict> |
<key>CFBundleIconFiles</key> |
<array> |
<string>Icon-Small</string> |
<string>Icon-Small-40</string> |
<string>Icon-Small-50</string> |
<string>Icon</string> |
<string>Icon-60</string> |
<string>Icon-72</string> |
</array> |
</dict> |
</dict> |
<key>CFBundleIcons~ipad</key> |
<dict> |
<key>CFBundlePrimaryIcon</key> |
<dict> |
<key>CFBundleIconFiles</key> |
<array> |
<string>Icon-Small</string> |
<string>Icon-Small-40</string> |
<string>Icon-Small-50</string> |
<string>Icon-72</string> |
<string>Icon-76</string> |
</array> |
</dict> |
</dict> |
Important: When specifying the name of each image, it is best to omit any extensions. Omitting the extension lets the system automatically detect high-resolution (@2x or @3x) variants of your image files using the standard-resolution image filename. If you include extensions, you must specify all image files (including the high-resolution variants) explicitly.
Troubleshooting
This section describes common problems and how to fix them.
Note: Before attempting further troubleshooting, perform a clean build of your application (Hold down the Option key and choose Product > Clean Build Folder, then Product > Build from the Xcode menu bar) and remove the app from your test device or simulator. Build your app again and attempt to reproduce the problem. You may also try clearing the contents of Xcode's derived data folder (~/Library/Developer/Xcode/DerivedData/) before building again.
My application fails to validate
There are multiple icon-related problems that will result in your application failing validation by Xcode or iTunes Connect. The underlying issue depends upon the error.
Error: Invalid Image Path
Your application's information property list references one or more icon images that were not included in the compiled bundle.
If your application is using asset catalogs to manage its icons then the information property list should not include any icon related keys; they will be added at build time by the asset catalog compiler.
-
Open the information property list for your app's target. It can be found under the Info tab in the project editor or in the File Navigator where it will be named either
<ProductName>-Info.plistorInfo.plist, where<ProductName>is the name of your app. -
Remove the following keys, including device specific variations.
-
“Icon file” (
CFBundleIconFile) -
“Icon files” (
CFBundleIconFiles) -
CFBundleIcons
-
If your application is not using asset catalogs to manage its icons, one or more of the images listed under the CFBundleIconFiles key or the CFBundleIcons key in the information property list is not associated as a resource of your application, may not have been added to your project, or may have been accidentally removed from your project. Verify that all the images named by either of these keys is included in your project then follow the resolution steps listed under My icons don't appear on the device to verify that it is associated with your application.
Error: Missing required icon file
Your have not included artwork for one or more of the required icons, based on your app's supported devices and deployment target.
Refer to the tables above for the list of required icons. Verify that each of your icon images matches the size listed in the table.
If your application is not using asset catalogs to manage its icons, verify that all of your icon images are listed under the CFBundleIconFiles key or the CFBundleIcons key as described in Configuring Icons Without an Asset Catalog. Remember that if you include filename extensions in the Information Property List, you must specify all image files (including the high-resolution variants) explicitly.
My icons don't appear on the device
If your project is using asset catalogs, your application may not be configured to use the correct icon set.
-
Select the name of the project in the project navigator.
-
Select the name of a target from the list in the left column of the project editor.
-
Select the General tab at the top of the project editor.
-
Verify that the name of the app icon set is selected in the Source menu under the App Icons section, as shown in Figure 5.
Figure 5 The Source menu controls which icon set is used as the app icon set.
If your project is not using asset catalogs to manage its icons, one or more of your icon images may not be associated with your app's target.
-
Select each of your icon images in the project navigator.
-
In the utility panel, check the box next to your app's target under the Target Membership pane as shown in Figure 6.
Figure 6 Associating an icon with a build target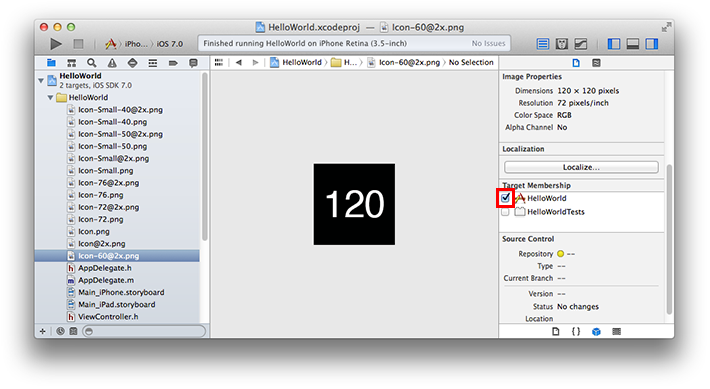
Verify that your icon images use a supported color model. Images that do not use the RGB color model may appear correctly in Xcode but will fail to load on the device. If your icons include transparent areas, use your preferred graphics editing software to fill these areas with a solid color.
Some graphics software may produce images which load correctly in Xcode but fail to load on the device, resulting in a blank icon. Try exporting your icon images with a different graphics editor such as the built in Preview app.
A previous version of my icon appears on the device
Your testing device or simulator may have a partially outdated build. That is, Xcode failed to copy a modified resource to the app bundle it installed on the device as part of the build & run process. To force Xcode to copy the most recent resources from your project directory:
-
Remove the app from your testing device or simulator.
-
Clean the build directory. Hold down the Option key and choose Product > Clean Build Folder, then Product > Build from the Xcode menu bar
-
Build and run your app.
If your project is using asset catalogs then you must replace the modified image in the asset catalog. Asset catalogs do not track files on disk, opting instead to make a copy of the image at the time it is added to the asset catalog.
My icon has a black background in the App Store
The Large App Icon you uploaded to iTunes Connect includes transparent areas. The iTunes Connect Developer Guide lists the complete requirements for the Large App Icon, including that it must be opaque.
You can use the Preview app to check your image for transparent areas, which will appear dark grey as shown in Figure 7. Use your preferred graphics editing software to fill in the transparent areas with the desired background color.
Figure 7 Preview's dark grey canvas background is visible through transparent areas in an image.![]()
The wrong icon appears in the App Store
Your application bundle includes additional images which are being detected as valid icon images.
Note: Different icon images from the application's bundle, and the large app icon, are displayed in various contexts within the App Store. For example, the incorrect icon image may appear in the search results but not on your application's landing page.
You may encounter this issue if your icon images deviate from the naming convention shown in the above tables. If your application bundle also contains once or more images that match the naming convention in the tables above, these images may be detected as valid icon images by the App Store. This may occur regardless of whether those images are included in the asset catalog or are referenced by the application's Information Property List. The solution is to rename or remove the images.
You may encounter this issue when building an app using a third party development environment or if your project was created using a template project provided by a third party. Both will usually include a default set of icon images. If you fail to remove these images or replace all of them with your own artwork, the App Store may display them in the search results for your app. Like the iOS home screen, the icons displayed in the search results depend upon the current device. It is possible that the incorrect icon is shown in the search results on certain devices but not others.
The solution is to delete any instances of the template-provided icons that remain in your project and remove any references to the deleted files from the information property list. Due to the wide variety of ways in which iOS versions have allowed developers to specify app icons in the Information Property List, you may find it simpler and less error prone to remove all icon related keys from the Information Property List and then reconfigure your app's icons using the steps presented in Adding Icons to Your App. See Start Over.
Start Over
If the none of the above solutions resolve the problem, follow the steps below to remove all the icons and icon related configuration from your app. Then follow the steps in Adding Icons to Your App to re-configure the proper icons for your app.
Warning: Make sure you have a backup of your icon artwork at a location outside of your project directory.
Remove the Icon Set From Your Asset Catalog
-
Select the asset catalog in the project navigator. It is named Images.xcassets by default.
-
In the left column of the editor, control click the icon set and choose
Remove Selected Itemsfrom the context menu. By default the icon set will be named 'AppIcon'.
Remove Icon Images From Your Project
Using the Xcode file navigator, remove any icon images from your project your had previously added to your project as resources. Icon images usually have a file name beginning with 'Icon' or 'AppIcon'.
Remove Icon Related Keys From The Information Property List
-
Open the Information Property List for your application. It can be found under the Info tab in the project editor or in the navigator where it will be named either
YourApp-Info.plistorInfo.plist. -
Remove the following keys, including device specific variations.
-
“Icon file” (
CFBundleIconFile) -
“Icon files” (
CFBundleIconFiles) -
CFBundleIcons
-
Clean The Project
To remove any cached icons, clean your target. Choose Product > Clean from the menu bar.
Finally, follow the steps in Adding Icons to Your App to re-configure the proper icons for your app.
Additional Resources
For additional information, see the App Icons section in the iOS App Programming Guide.
For information about designing your application's icons, see the App Icon section of the iOS Human Interface Guidelines.
For an example project with properly configured icons, see the Application Icons and Launch Images for iOS sample code.
Document Revision History
| Date | Notes |
|---|---|
| 2014-12-01 |
Added iPhone 6 Plus icons. Further expanded the troubleshooting section. |
|
Added iPhone 6 Plus icons. Further expanded the troubleshooting section. |
|
|
Added iPhone 6 Plus icons. Further expanded the troubleshooting section. |
|
| 2014-05-19 |
Added troubleshooting steps for incorrect icons appearing in the App Store search results. |
| 2014-02-03 |
Updated for Xcode 5 and iOS 7. |
| 2013-07-18 |
Added icon information for iPad with retina display. |
| 2011-07-14 |
After iOS 4.3, order doesn't matter in the icon arrangement. Added links to related references. |
| 2010-07-14 |
Fixed outdated "Add Icon files in Info.plist" section. |
| 2010-07-12 |
Updated for iOS 4 requirements. |
| 2010-04-09 |
New document that explains how the icon files in an application bundle are used on iPad and iPhone. |
Launching your iPhone Application in Landscape
This document describes in detail how to start your iPhone application in landscape orientation.
Introduction
iPhone applications typically launch into portrait orientation to match the orientation of the home screen. However, many applications are better suited to running in landscape orientation only. This document describes the changes you must apply to your application for it to launch into landscape orientation on iPhone and iPod Touch.
Note: While the techniques described in this document can be applied to iPad applications, it is recommended that iPad applications support all interface orientations.
Interface Orientation and the Status Bar
In the General tab of the project editor for your application' target, enable only the Landscape Left and Landscape Right options under Supported Device Orientation as shown in Figure 1. Make sure you have selected iPhone from the Devices menu when making the changes.
Figure 1 Configuring the Supported Interface Orientations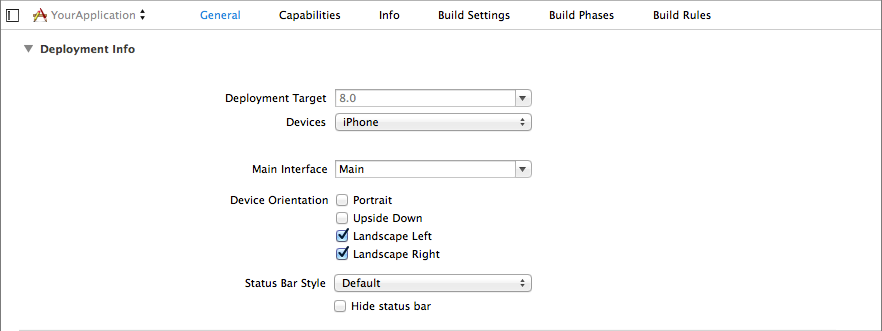
Changes made here are reflected under the UISupportedInterfaceOrientations key in your application's information property list.
The values of the UISupportedInterfaceOrientations key determine how the status bar is positioned while the the app is launching. In iOS 7 and below, if the UIInterfaceOrientationPortrait value is present, the status bar will always be positioned for portrait orientation. Otherwise, the status bar will be positioned according to the first orientation that appears under the UISupportedInterfaceOrientationskey.
The absence of an interface orientation value from the UISupportedInterfaceOrientations key prevents your app from rotating to that orientation after launch, even if the app window's root view controller supports the orientation. This provides a quick way to restrict the interface orientations supported by your app without implementing the -supportedInterfaceOrientations method in your applications's view controllers. See the View Controller Programming Guide for more information.
Warning: Certain built-in system view controllers can only display in portrait orientation. Presenting one of these view controllers without UIInterfaceOrientationPortrait as one of the specified values for the UISupportedInterfaceOrientations key will raise an exception. See Allowing Your App to Rotate Into Portrait Orientation After Launch for more information.
Launch Images
Launch images for iPhone apps are always sized to match the dimensions of the screen in portrait orientation. For applications that launch into landscape orientation, you should use your preferred graphics editing software to rotate the content of the launch image while keeping the image's size consistent with a portrait launch image (height > width).
Avoid using asset catalogs to manage the launch images of landscape applications. Except for launch images used by the iPhone 6 Plus, asset catalogs assume that all iPhone launch images are for the portrait orientation. When your application is compiled, entries for each launch image are added to the compiled information property list under the UILaunchImages key. The value for the UILaunchImageOrientationkey in each of these entries is always Portrait. These entries are then ignored at launch time because the value of Portrait for the UILaunchImageOrientation key does not match the launch orientation (Landscape Left or Landscape Right). The result is a blank screen during launch as the system cannot find an appropriate launch image.
Instead, you should use a Launch File if your application only supports iOS 8 and above. Otherwise, you will need to add your launch images as resources to your project and then add the UILaunchImages key to your application's information property list. Be sure to disable use of the asset catalog for managing the launch images by selecting 'Don't use asset catalogs' from the Launch Image Source menu under the General tab of the project editor for your applications' target.
Figure 2 Select 'Don't use asset catalogs' from the Launch Images Source menu to disable catalog-managed launch images
Listing 1 shows an example of the UILaunchImages key with entires for each device. Add this snippet to your application's information property list and then edit the value under each UILaunchImageName key to match the corresponding image from your project. Do not include the extension or any modifiers (@2x, @3x). You can edit your information property list by control+clicking on it in the File Navigator and choosingOpen As > Source Code from the popup menu.
Listing 1 Entries under the UILaunchImages key specify the launch image for each particular screen size
<key>UILaunchImages</key> |
<array> |
<dict> |
<key>UILaunchImageMinimumOSVersion</key> |
<string>7.0</string> |
<key>UILaunchImageName</key> |
<string>Default-iOS7-568h</string> |
<key>UILaunchImageOrientation</key> |
<string>Landscape</string> |
<key>UILaunchImageSize</key> |
<string>{320, 568}</string>
|
</dict> |
<dict> |
<key>UILaunchImageMinimumOSVersion</key> |
<string>7.0</string> |
<key>UILaunchImageName</key> |
<string>Default-iOS7</string> |
<key>UILaunchImageOrientation</key> |
<string>Landscape</string> |
<key>UILaunchImageSize</key> |
<string>{320, 480}</string>
|
</dict> |
<dict> |
<key>UILaunchImageMinimumOSVersion</key> |
<string>8.0</string> |
<key>UILaunchImageName</key> |
<string>Default-iOS8-667h</string> |
<key>UILaunchImageOrientation</key> |
<string>Landscape</string> |
<key>UILaunchImageSize</key> |
<string>{375, 667}</string>
|
</dict> |
<dict> |
<key>UILaunchImageMinimumOSVersion</key> |
<string>8.0</string> |
<key>UILaunchImageName</key> |
<string>Default-iOS8-736h</string> |
<key>UILaunchImageOrientation</key> |
<string>Landscape</string> |
<key>UILaunchImageSize</key> |
<string>{414, 736}</string>
|
</dict> |
</array> |
Configuring the App Window
Your application must assign a view controller to its window's rootViewController property before returning from application:didFinishLaunchingWithOptions:. If your application has specified a main storyboard, the initial view controller in the storyboard is automatically configured to be the window's root view controller.
Methods to Implement in Your App's View Controllers
For a view controller to support landscape orientation, you don't need to do anything. By default, view controllers support all orientations except portrait upside-down. However, becauseUIInterfaceOrientationPortrait was not included in the list of interface orientation values for the UISupportedInterfaceOrientations key in your app's Information Property List, the app will not rotate into portrait orientation, leaving landscape left and landscape right as the only allowed orientations. See the View Controller Programming Guide for more information.
For a view controller to support landscape orientation on iOS 5 and below, it must override the shouldAutorotateToInterfaceOrientation: method as shown in Listing 2.
Listing 2 Ensuring that landscape orientation is maintained
- (BOOL)shouldAutorotateToInterfaceOrientation:(UIInterfaceOrientation)interfaceOrientation |
{
|
return UIInterfaceOrientationIsLandscape(interfaceOrientation); |
} |
Designing Your Views
When designing a landscape-only view in Interface Builder, you should make most of your changes while editing the [wAny hAny] size class. Unless your app only supports iOS 8 or later, you should avoid making changes while editing the [wCompact hCompact] or [wAny hCompact] size classes. Changes made to these size classes are not included in the compatibility storyboard generated for devices running iOS 7 and below. Changes which should only apply to the iPhone 6 Plus should be made while editing the [wRegular hCompact] size class.
Interface Builder can simulate landscape metrics of various iOS devices in the Preview assistant, displayed alongside the editor. Enable the assistant editor and select Preview > Storyboard Name from the jump bar for the assistant editor as shown in Figure 3.
Figure 3 Selecting the Preview assistant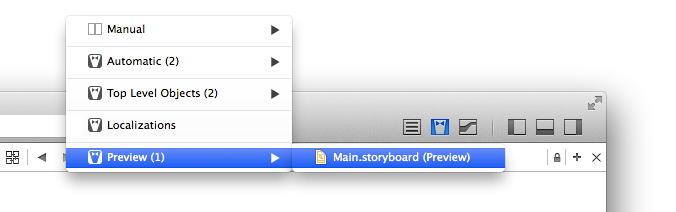
Simulated devices can be added using the + button in the bottom left corner of the assistant editor. To rotate a simulated device to landscape, click the button next to the device name as shown in Figure 4.
Figure 4 Click the button next to the device name to rotate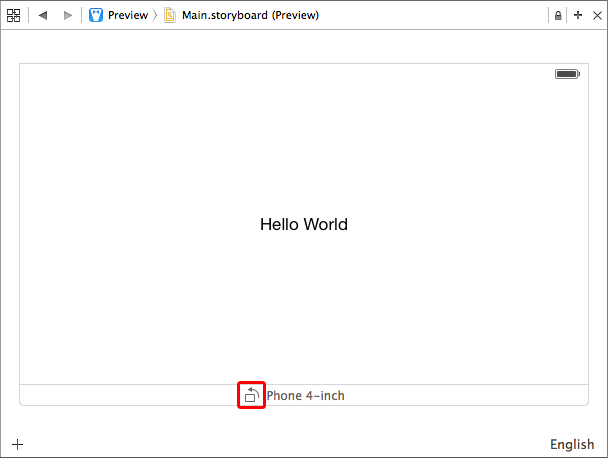
If you have opted to not use size classes for a storyboard, Interface Builder can apply landscape metrics to the canvas of the scene you are currently editing. When landscape metrics are applied, as shown in Figure 5, Interface Builder respects the constraints applied to each view and adjusts their position on the canvas.
Figure 5 Changing the simulated orientation of a view controller in Interface Builder.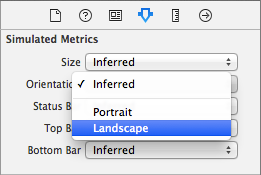
Regardless of how you orient the canvas in Interface Builder, remember that storyboard scenes themselves have no concept of interface orientation.
Allowing Your App to Rotate Into Portrait Orientation After Launch
Even if your app primarily displays its content in landscape, it may be advantageous or necessary to present certain view controllers in the portrait orientation. When UIKit detects a change in device orientation, it uses the UIApplication object and the root view controller to determine whether the new orientation is allowed. If both objects agree that the new orientation is supported, then auto rotation occurs. Otherwise the orientation change is ignored.
By default, the UIApplication object sources its supported interface orientations from the values specified for the UISupportedInterfaceOrientations key in the applications's Information Property List. You can override this behavior by implementing the application:supportedInterfaceOrientationsForWindow: method in your application's delegate. The supported orientation values returned by this method only take effect after the application has finished launching. You can therefore use this method to support a different set of orientations after launch.
Listing 3 Allowing your app to rotate into portrait after launch.
- (NSUInteger)application:(UIApplication *)application supportedInterfaceOrientationsForWindow:(UIWindow *)window |
{
|
return UIInterfaceOrientationMaskAllButUpsideDown; |
} |
Recall that view controllers support portrait and both landscape orientations by default. Without the UIApplication object preventing rotation into portrait orientation at the app level, you will need to implement -supportedInterfaceOrientations as shown in Listing 4 for all view controllers that must only display in landscape.
Listing 4 Supporting only landscape orientations for a view controller.
- (NSUInteger)supportedInterfaceOrientations |
{
|
return UIInterfaceOrientationMaskLandscape; |
} |
The system only queries the supported interface orientations of the app window's root view controller. You may discover that your view controller's supportedInterfaceOrientations method is not called if it is inside a container, such as a UINavigationController, which does not involve its child view controllers when deciding its supported interface orientations. In this case, the navigation controller's delegate should implement navigationControllerSupportedInterfaceOrientations: as shown in Listing 5. If your application must support iOS 6, you should instead subclass UINavigationController and overridesupportedInterfaceOrientations as shown in Listing 4.
Listing 5 Supporting only landscape orientations for a navigation controller.
-(NSUInteger)navigationControllerSupportedInterfaceOrientations:(UINavigationController *)navigationController |
{
|
return UIInterfaceOrientationMaskLandscape; |
} |
Document Revision History
| Date | Notes |
|---|---|
| 2015-05-26 |
Updated for Xcode 6 and iOS 8. |
| 2013-08-09 |
Updated to cover changes to auto-rotation that were introduced with iOS 6. |
| 2009-06-29 |
New document that describes how to start your iPhone application in landscape orientation at launch time. |
Copyright © 2015 Apple Inc. All Rights Reserved. Terms of Use | Privacy Policy | Updated: 2015-05-26
南来地,北往的,上班的,下岗的,走过路过不要错过!
======================个性签名=====================
之前认为Apple 的iOS 设计的要比 Android 稳定,我错了吗?
下载的许多客户端程序/游戏程序,经常会Crash,是程序写的不好(内存泄漏?刚启动也会吗?)还是iOS本身的不稳定!!!
如果在Android手机中可以简单联接到ddms,就可以查看系统log,很容易看到程序为什么出错,在iPhone中如何得知呢?试试Organizer吧,分析一下Device logs,也许有用.


