源码分析HotSpot GC过程(一)
对于HotSpot虚拟机垃圾回收过程,这里将分析介绍默认配置下MarkSweepPolicy的DefNewGeneration和TenuredGeneration的垃圾回收内容以及介绍其他GC策略和代实现的GC思想。GC的过程姑且简单地分为内存代实现无关的GC过程和内存代GC过程。
本文将先进行内存代实现无关的GC过程分析,内存代GC过程将在后面进行分析。
从GenCollectedHeap的do_collection()说起:
1.在GC之前有许多必要的检查和统计任务,比如对回收内存代的统计、堆内存大小的统计等,注意本节内容将不再去分析一些性能统计的内容,有兴趣的可自行分析。
(1).检查是否已经GC锁是否已经激活,并设置需要进行GC的标志为true,这时,通过is_active_and_needs_gc()就可以判断是否已经有线程触发了GC。
 if (GC_locker::check_active_before_gc()) {
    return; // GC is disabled (e.g. JNI GetXXXCritical operation)
  }
(2).检查是否需要回收所有的软引用。
 const bool do_clear_all_soft_refs = clear_all_soft_refs ||
                          collector_policy()->should_clear_all_soft_refs();
(3).记录永久代已经使用的内存空间大小。
const size_t perm_prev_used = perm_gen()->used();
(4).确定回收类型是否是FullGC以及gc触发类型(GC/Full GC(system)/Full GC,用作Log输出)。
bool complete = full && (max_level == (n_gens()-1));
    const char* gc_cause_str = "GC ";
    if (complete) {
      GCCause::Cause cause = gc_cause();
      if (cause == GCCause::_java_lang_system_gc) {
        gc_cause_str = "Full GC (System) ";
      } else {
        gc_cause_str = "Full GC ";
      }
    }
(5).gc计数加1操作(包括总GC计数和FullGC计数)。
increment_total_collections(complete);
(6).统计堆已被使用的空间大小。
size_t gch_prev_used = used();
(7).如果是FullGC,那么从最高的内存代到最低的内存代,若某个内存代不希望对比其更低的内存代进行单独回收,那么就以该内存代作为GC的起始内存代。这里说明下什么是单独回收。新生代比如DefNewGeneration的实现将对新生代使用复制算法进行垃圾回收,而老年代TenuredGeneration的垃圾回收则会使用其标记-压缩-清理算法对新生代也进行处理。所以可以说DefNewGeneration的垃圾回收是对新生代进行单独回收,而TenuredGeneration的垃圾回收则是对老年代和更低的内存代都进行回收。
  int starting_level = 0;
  if (full) {
      // Search for the oldest generation which will collect all younger
      // generations, and start collection loop there.
      for (int i = max_level; i >= 0; i--) {
        if (_gens[i]->full_collects_younger_generations()) {
          starting_level = i;
          break;
        }
      }
    }
2.接下来从GC的起始内存代开始,向最老的内存代进行回收 。
(1).其中should_collect()将根据该内存代GC条件返回是否应该对该内存代进行GC。若当前回收的内存代是最老的内存代,如果本次gc不是FullGC,将调用increment_total_full_collections()修正之前的FulllGC计数值。
   int max_level_collected = starting_level;
   for (int i = starting_level; i <= max_level; i++) {
      if (_gens[i]->should_collect(full, size, is_tlab)) {
        if (i == n_gens() - 1) {  // a major collection is to happen
          if (!complete) {
            // The full_collections increment was missed above.
            increment_total_full_collections();
          }
(2).统计GC前该内存代使用空间大小以及其他记录工作 。
(3).验证工作 。
先调用prepare_for_verify()使各内存代进行验证的准备工作(正常情况下什么都不需要做),随后调用Universe的verify()进行GC前验证
if (VerifyBeforeGC && i >= VerifyGCLevel &&
            total_collections() >= VerifyGCStartAt) {
          HandleMark hm;  // Discard invalid handles created during verification
          if (!prepared_for_verification) {
            prepare_for_verify();
            prepared_for_verification = true;
          }
          gclog_or_tty->print(" VerifyBeforeGC:");
          Universe::verify(true);
        }
线程、堆(各内存代)、符号表、字符串表、代码缓冲、系统字典等,如对堆的验证将对堆内的每个oop对象的类型Klass进行验证,验证对象是否是oop,类型klass是否在永久代,oop的klass域是否是klass 。那么为什么在这里进行GC验证?GC前验证和GC后验证又分别有什么作用? VerifyBeforeGC和VerifyAfterGC都需要和UnlockDiagnosticVMOptions配合使用以用来诊断JVM问题,但是验证过程非常耗时,所以在正常的编译版本中并没有将验证内容进行输出。
(4).保存内存代各区域的碰撞指针到该区域的_save_mark_word变量。
save_marks();
(5).初始化引用处理器。
ReferenceProcessor* rp = _gens[i]->ref_processor();
if (rp->discovery_is_atomic()) {
            rp->verify_no_references_recorded();
            rp->enable_discovery();
            rp->setup_policy(do_clear_all_soft_refs);
          } else {
            // collect() below will enable discovery as appropriate
          }
(6).由各内存代完成gc
_gens[i]->collect(full, do_clear_all_soft_refs, size, is_tlab);
(7).将不可触及的引用对象加入到Reference的pending链表
if (!rp->enqueuing_is_done()) {
            rp->enqueue_discovered_references();
          } else {
            rp->set_enqueuing_is_done(false);
          }
          rp->verify_no_references_recorded();
        }
其中enqueue_discovered_references根据是否使用压缩指针选择不同的enqueue_discovered_ref_helper()模板函数 ,enqueue_discovered_ref_helper()实现如下:
template <class T>
bool enqueue_discovered_ref_helper(ReferenceProcessor* ref,
                                   AbstractRefProcTaskExecutor* task_executor) {
  T* pending_list_addr = (T*)java_lang_ref_Reference::pending_list_addr();
  T old_pending_list_value = *pending_list_addr;
  ref->enqueue_discovered_reflists((HeapWord*)pending_list_addr, task_executor);

  oop_store(pending_list_addr, oopDesc::load_decode_heap_oop(pending_list_addr));

  ref->disable_discovery();

  return old_pending_list_value != *pending_list_addr;
}
pending_list_addr是Reference的私有静态(类)成员pending链表的首元素的地址,gc阶段当引用对象的可达状态变化时,会将引用加入到pending链表中,而Reference的私有静态(类)成员ReferenceHandler将不断地从pending链表中取出引用加入ReferenceQueue。
enqueue_discovered_reflists()根据是否使用多线程有着不同的处理方式,若采用多线程则会创建一个RefProcEnqueueTask交由AbstractRefProcTaskExecutor进行处理,这里我们分析单线程的串行处理情况:
这里,DiscoveredList数组_discoveredSoftRefs保存了最多_max_num_q*subclasses_of_ref个软引用的链表。在将引用链表处理后会将引用链表的起始引用置为哨兵引用,并设置引用链长度为0,表示该列表为空。
void ReferenceProcessor::enqueue_discovered_reflists(HeapWord* pending_list_addr,
  AbstractRefProcTaskExecutor* task_executor) {
  if (_processing_is_mt && task_executor != NULL) {
    // Parallel code
    RefProcEnqueueTask tsk(*this, _discoveredSoftRefs,
                           pending_list_addr, sentinel_ref(), _max_num_q);
    task_executor->execute(tsk);
  } else {
    // Serial code: call the parent class's implementation
    for (int i = 0; i < _max_num_q * subclasses_of_ref; i++) {
      enqueue_discovered_reflist(_discoveredSoftRefs[i], pending_list_addr);
      _discoveredSoftRefs[i].set_head(sentinel_ref());
      _discoveredSoftRefs[i].set_length(0);
    }
  }
}
enqueue_discovered_reflist()如下:
取出refs_list链上的首元素,next为discovered域所成链表上的下一个元素
  oop obj = refs_list.head();
  while (obj != sentinel_ref()) {
    assert(obj->is_instanceRef(), "should be reference object");
    oop next = java_lang_ref_Reference::discovered(obj);
如果next是最后的哨兵引用,那么,原子交换discovered域所成链表上的表尾元素与pending_list_addr的值,即将其加入到pending链表的表头,接下来根据插入到表头的链表的处理方式,当pending链表为空时,作为表尾元素其next域指向自身,否则,将其next域指向链表的原表头元素,这样就将该元素插入到pending链表的原表头位置,即:
if (next == sentinel_ref()) {  // obj is last
      // Swap refs_list into pendling_list_addr and
      // set obj's next to what we read from pending_list_addr.
      oop old = oopDesc::atomic_exchange_oop(refs_list.head(), pending_list_addr);
      // Need oop_check on pending_list_addr above;
      // see special oop-check code at the end of
      // enqueue_discovered_reflists() further below.
      if (old == NULL) {
        // obj should be made to point to itself, since
        // pending list was empty.
        java_lang_ref_Reference::set_next(obj, obj);
      } else {
        java_lang_ref_Reference::set_next(obj, old);
      }
否则若next不是最后的哨兵引用,设置引用对象的next域为next,即将从引用链表的表头元素开始,将虚拟机所使用的discovered域所成链表转化为Java层可使用的next域所成pending列表。
} else {
      java_lang_ref_Reference::set_next(obj, next);
    }
最后设置引用对象的discovered域为NULL,即切断当前引用在discovered域所成链表中的引用关系,并继续遍历引用链
java_lang_ref_Reference::set_discovered(obj, (oop) NULL);
    obj = next;
  }
综上所述,入队的操作就是通过原来的discovered域进行遍历,将引用链表用next域重新连接后切断discovered域的关系并将新链表附在pending链表的表头。
(9).回到GC完成后的处理:更新统计信息和进行GC后验证
3.输出一些GC的日志信息
    complete = complete || (max_level_collected == n_gens() - 1);

    if (complete) { // We did a "major" collection
      post_full_gc_dump();   // do any post full gc dumps
    }

    if (PrintGCDetails) {
      print_heap_change(gch_prev_used);

      // Print perm gen info for full GC with PrintGCDetails flag.
      if (complete) {
        print_perm_heap_change(perm_prev_used);
      }
    }
4.更新各内存代的大小
 for (int j = max_level_collected; j >= 0; j -= 1) {
      // Adjust generation sizes.
      _gens[j]->compute_new_size();
    }
5.FullGC后更新和调整永久代内存大小
if (complete) {
      // Ask the permanent generation to adjust size for full collections
      perm()->compute_new_size();
      update_full_collections_completed();
    }
6.若配置了ExitAfterGCNum,则当gc次数达到用户配置的最大GC计数时退出VM
 if (ExitAfterGCNum > 0 && total_collections() == ExitAfterGCNum) {
    tty->print_cr("Stopping after GC #%d", ExitAfterGCNum);
    vm_exit(-1);
  }
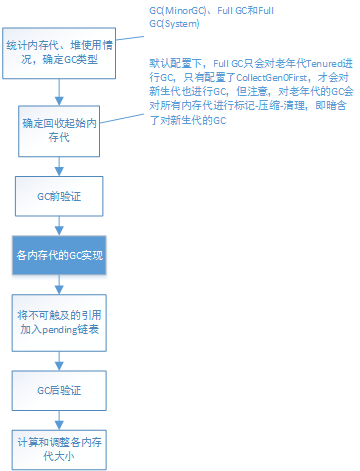
GC的内存代实现无关的流程图如下: