
Istio Polit-agent & Envoy 启动流程
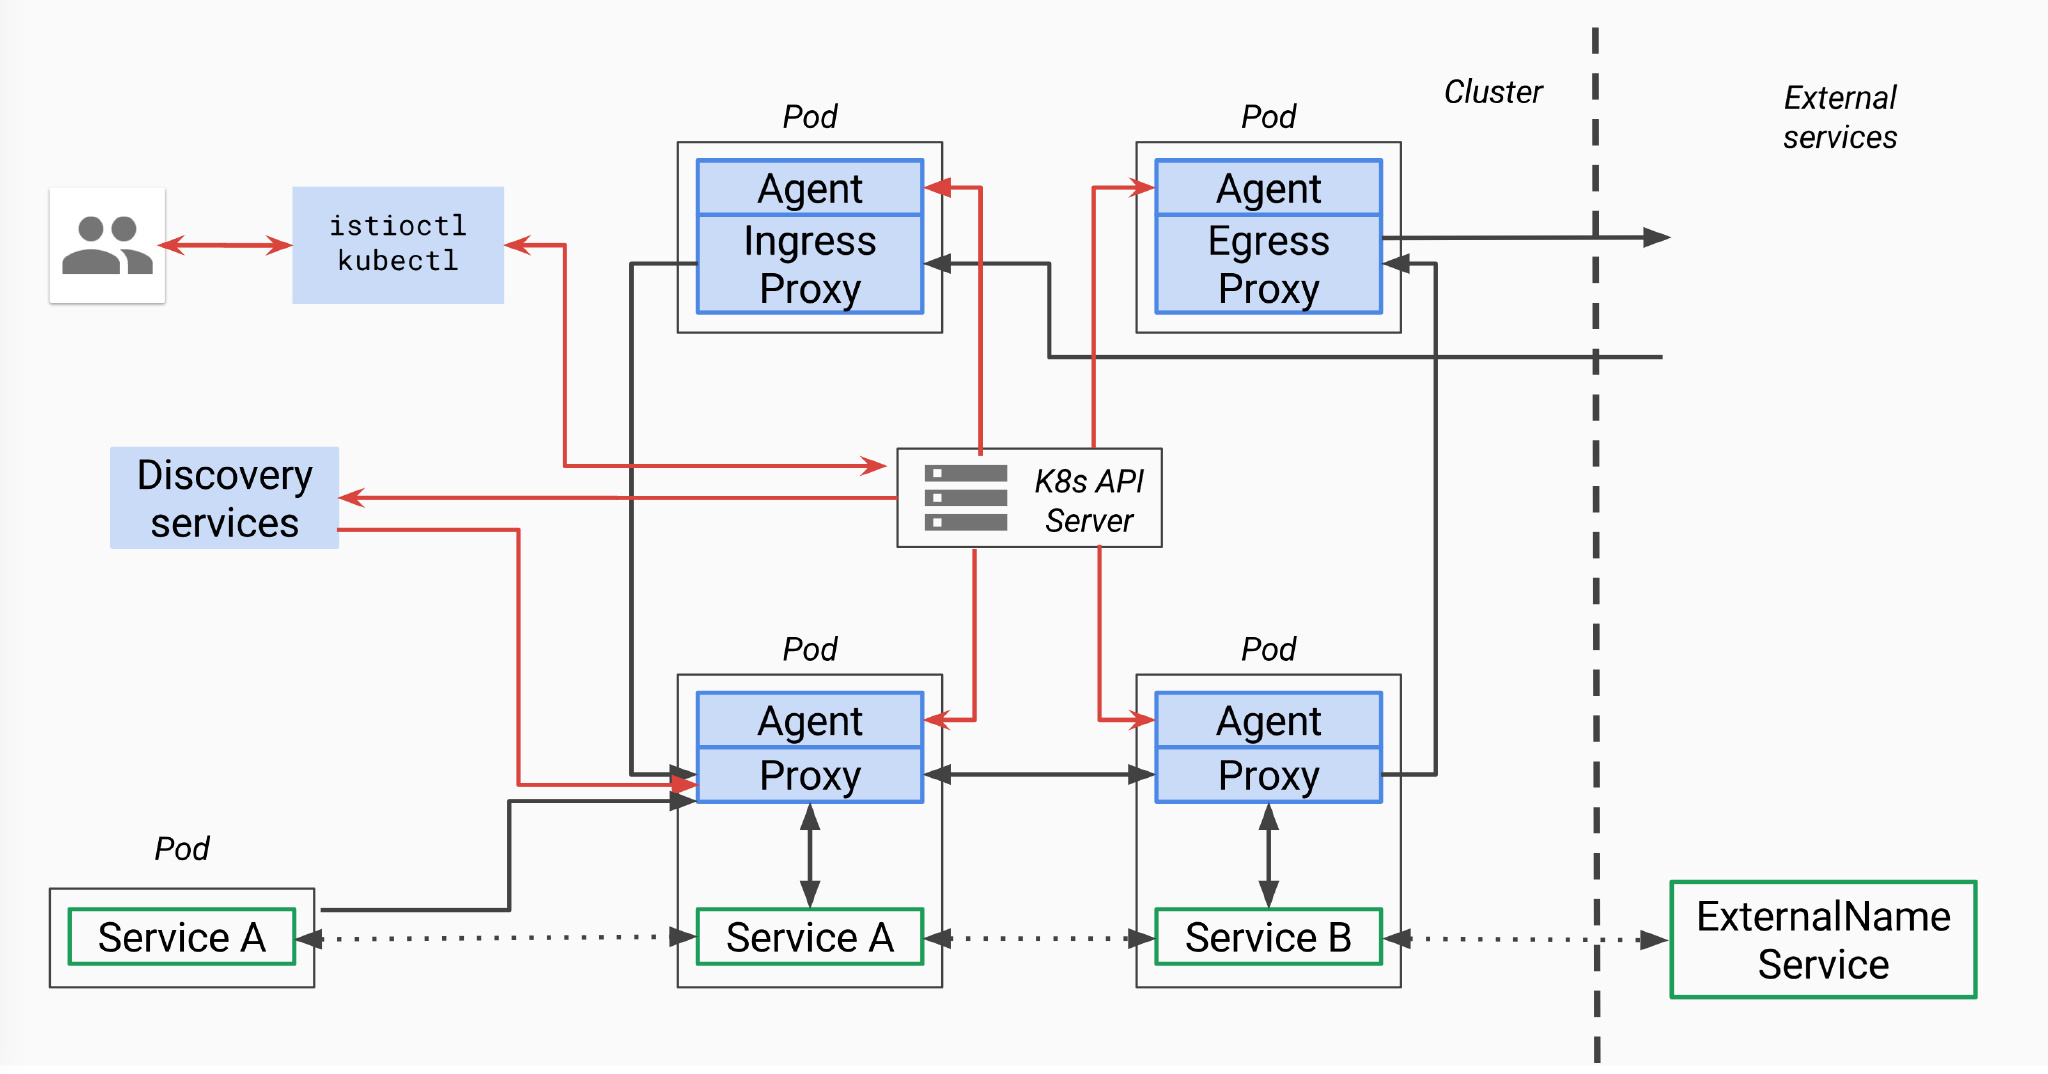 通过上一篇 Istio Sidecar注入原理 文章可以发现,在应用提交到kubernate部署时已经同时注入了Sidecar应用。
细心的话应该还可以发现,除了注入了istio-proxy应用外,另外还有注入一个istio-init的 Init Containers。接下来一起来看看在这两个注入的容器中分别都有做一些什么操作。
通过上一篇 Istio Sidecar注入原理 文章可以发现,在应用提交到kubernate部署时已经同时注入了Sidecar应用。
细心的话应该还可以发现,除了注入了istio-proxy应用外,另外还有注入一个istio-init的 Init Containers。接下来一起来看看在这两个注入的容器中分别都有做一些什么操作。
开篇
通过上一篇 Istio Sidecar注入原理 文章可以发现,在应用提交到kubernate部署时已经同时注入了Sidecar应用。
细心的话应该还可以发现,除了注入了istio-proxy应用外,另外还有注入一个istio-init的 Init Containers。接下来一起来看看在这两个注入的容器中分别都有做一些什么操作。
istio-init
istio-init init 容器用于设置 iptables 规则,以便将入站/出站流量通过 sidecar 代理。初始化容器与应用程序容器在以下方面有所不同:
- 它在启动应用容器之前运行,并一直运行直至完成。
- 如果有多个初始化容器,则每个容器都应在启动下一个容器之前成功完成
我们可以看下sleep对应的pod
kubectl describe pod sleep-54f94cbff5-jmwtf
Name:         sleep-54f94cbff5-jmwtf
Namespace:    default
Priority:     0
Node:         minikube/172.17.0.3
Start Time:   Wed, 27 May 2020 12:14:08 +0800
Labels:       app=sleep
              istio.io/rev=
              pod-template-hash=54f94cbff5
              security.istio.io/tlsMode=istio
Annotations:  sidecar.istio.io/interceptionMode: REDIRECT
              sidecar.istio.io/status:
                {"version":"d36ff46d2def0caba37f639f09514b17c4e80078f749a46aae84439790d2b560","initContainers":["istio-init"],"containers":["istio-proxy"]...
              traffic.sidecar.istio.io/excludeInboundPorts: 15020
              traffic.sidecar.istio.io/includeOutboundIPRanges: *
Status:       Running
IP:           172.18.0.11
IPs:
  IP:           172.18.0.11
Controlled By:  ReplicaSet/sleep-54f94cbff5
Init Containers:
  istio-init:
    Container ID:  docker://f5c88555b666c18e5aa343b3f452355f96d66dc4268fa306f93432e0f98c3950
    Image:         docker.io/istio/proxyv2:1.6.0
    Image ID:      docker-pullable://istio/proxyv2@sha256:821cc14ad9a29a2cafb9e351d42096455c868f3e628376f1d0e1763c3ce72ca6
    Port:          <none>
    Host Port:     <none>
    Args:
      istio-iptables
      -p
      15001
      -z
      15006
      -u
      1337
      -m
      REDIRECT
      -i
      *
      -x

      -b
      *
      -d
      15090,15021,15020
    State:          Terminated
      Reason:       Completed
      Exit Code:    0
      Started:      Wed, 27 May 2020 12:14:12 +0800
      Finished:     Wed, 27 May 2020 12:14:13 +0800
    Ready:          True
    Restart Count:  0
    Limits:
      cpu:     100m
      memory:  50Mi
    Requests:
      cpu:     10m
      memory:  10Mi
    Environment:
      DNS_AGENT:
    Mounts:
      /var/run/secrets/kubernetes.io/serviceaccount from sleep-token-zq2wv (ro)
Containers:
  sleep:
    Container ID:  docker://a5437e12f6ea25d828531ba0dc4fab78374d5e9f746b6a199c4ed03b5d53c8f7
    Image:         governmentpaas/curl-ssl
    Image ID:      docker-pullable://governmentpaas/curl-ssl@sha256:b8d0e024380e2a02b557601e370be6ceb8b56b64e80c3ce1c2bcbd24f5469a23
    Port:          <none>
    Host Port:     <none>
    Command:
      /bin/sleep
      3650d
    State:          Running
      Started:      Wed, 27 May 2020 12:14:14 +0800
    Ready:          True
    Restart Count:  0
    Environment:    <none>
    Mounts:
      /etc/sleep/tls from secret-volume (rw)
      /var/run/secrets/kubernetes.io/serviceaccount from sleep-token-zq2wv (ro)
  istio-proxy:
    Container ID:  docker://d03a43d3f257c057b664cf7ab03bcd301799a9e849da35fe54fdb0c9ea5516a4
    Image:         docker.io/istio/proxyv2:1.6.0
    Image ID:      docker-pullable://istio/proxyv2@sha256:821cc14ad9a29a2cafb9e351d42096455c868f3e628376f1d0e1763c3ce72ca6
    Port:          15090/TCP
    Host Port:     0/TCP
    Args:
      proxy
      sidecar
      --domain
      $(POD_NAMESPACE).svc.cluster.local
      --serviceCluster
      sleep.$(POD_NAMESPACE)
      --proxyLogLevel=warning
      --proxyComponentLogLevel=misc:error
      --trust-domain=cluster.local
      --concurrency
      2
    State:          Running
      Started:      Wed, 27 May 2020 12:14:17 +0800
    Ready:          True
    Restart Count:  0
从输出中可以看出,istio-init 容器的 State 为 Terminated,而 Reason 是 Completed。只有两个容器是运行的,主应用程序 curl-ssl 容器和 istio-proxyv2 容器。
让我们格式化istio-init 对应的 Args 参数,发现它执行了如下命令
istio-iptables -p 15001 -z 15006 -u 1337 -m REDIRECT -i * -x -b * -d 15090,15021,15020
可以看到 istio-init 容器的入口是 istio-iptables 命令行, 它是一个go编译出来的二进制文件,该二进制文件会调用iptables命令创建了一些列iptables规则来劫持Pod中的流量。命令行工具源码入口在 tools/istio-iptables/main.go 中。接下来我们看看它具体操作的iptables规则有哪些。
本文运行在minikube上,因为istio-init容器在初始化完成后就会退出,所以是没办法直接登入该容器的。但是它应用的iptables的规则会在同一Pod内其他容器上看到,我们可以登录该Pod其他容器查看对应的规则,执行命令如下:
进入 minikube 并切换为 root 用户
minikube ssh
sudo -i
查看sleep应用相关的容器
docker ps | grep sleep

d03a43d3f257        istio/proxyv2              "/usr/local/bin/pilo…"   2 hours ago         Up 2 hours                              k8s_istio-proxy_slee-54f94cbff5-jmwtf_default_70c72535-cbfb-4201-af07-feb0948cc0c6_0
a5437e12f6ea        8c797666f87b               "/bin/sleep 3650d"       2 hours ago         Up 2 hours                              k8s_sleep_sleep-54f94cbff5-jmwtf_default_70c72535-cbfb-4201-af07-feb0948cc0c6_0
efdbb69b77c0        k8s.gcr.io/pause:3.2       "/pause"                 2 hours ago         Up 2 hours                              k8s_POD_sleep-54f94cbff5-jmwtf_default_70c72535-cbfb-4201-af07-feb0948cc0c6_0
挑选上述容器中的其中一个,查看其进程ID,这里8533为其进程ID。这里如果直接进入其docker容器执行ssh是无法获取到其iptables规则的,因为其权限不足。
iptables -t nat -L -v

iptables v1.6.1: can't initialize iptables table `nat': Permission denied (you must be root)
Perhaps iptables or your kernel needs to be upgraded.
需要通过nsenter提权查看其对应规则,nsenter命令详解。
docker inspect efdbb69b77c0 --format '{{ .State.Pid }}'
8533

nsenter -t 8533 -n iptables -t nat -S

-P PREROUTING ACCEPT
-P INPUT ACCEPT
-P OUTPUT ACCEPT
-P POSTROUTING ACCEPT
-N ISTIO_INBOUND
-N ISTIO_IN_REDIRECT
-N ISTIO_OUTPUT
-N ISTIO_REDIRECT
-A PREROUTING -p tcp -j ISTIO_INBOUND
-A OUTPUT -p tcp -j ISTIO_OUTPUT
-A ISTIO_INBOUND -p tcp -m tcp --dport 22 -j RETURN
-A ISTIO_INBOUND -p tcp -m tcp --dport 15090 -j RETURN
-A ISTIO_INBOUND -p tcp -m tcp --dport 15021 -j RETURN
-A ISTIO_INBOUND -p tcp -m tcp --dport 15020 -j RETURN
-A ISTIO_INBOUND -p tcp -j ISTIO_IN_REDIRECT
-A ISTIO_IN_REDIRECT -p tcp -j REDIRECT --to-ports 15006
-A ISTIO_OUTPUT -s 127.0.0.6/32 -o lo -j RETURN
-A ISTIO_OUTPUT ! -d 127.0.0.1/32 -o lo -m owner --uid-owner 1337 -j ISTIO_IN_REDIRECT
-A ISTIO_OUTPUT -o lo -m owner ! --uid-owner 1337 -j RETURN
-A ISTIO_OUTPUT -m owner --uid-owner 1337 -j RETURN
-A ISTIO_OUTPUT ! -d 127.0.0.1/32 -o lo -m owner --gid-owner 1337 -j ISTIO_IN_REDIRECT
-A ISTIO_OUTPUT -o lo -m owner ! --gid-owner 1337 -j RETURN
-A ISTIO_OUTPUT -m owner --gid-owner 1337 -j RETURN
-A ISTIO_OUTPUT -d 127.0.0.1/32 -j RETURN
-A ISTIO_OUTPUT -j ISTIO_REDIRECT
-A ISTIO_REDIRECT -p tcp -j REDIRECT --to-ports 15001
查看 NAT 表中规则配置的详细信息
nsenter -t 8533 -n iptables -t nat -L -v
Chain PREROUTING (policy ACCEPT 3435 packets, 206K bytes)
 pkts bytes target     prot opt in     out     source               destination
 3435  206K ISTIO_INBOUND  tcp  --  any    any     anywhere             anywhere

Chain INPUT (policy ACCEPT 3435 packets, 206K bytes)
 pkts bytes target     prot opt in     out     source               destination

Chain OUTPUT (policy ACCEPT 599 packets, 54757 bytes)
 pkts bytes target     prot opt in     out     source               destination
   22  1320 ISTIO_OUTPUT  tcp  --  any    any     anywhere             anywhere

Chain POSTROUTING (policy ACCEPT 599 packets, 54757 bytes)
 pkts bytes target     prot opt in     out     source               destination

Chain ISTIO_INBOUND (1 references)
 pkts bytes target     prot opt in     out     source               destination
    0     0 RETURN     tcp  --  any    any     anywhere             anywhere             tcp dpt:22
    1    60 RETURN     tcp  --  any    any     anywhere             anywhere             tcp dpt:15090
 3434  206K RETURN     tcp  --  any    any     anywhere             anywhere             tcp dpt:15021
    0     0 RETURN     tcp  --  any    any     anywhere             anywhere             tcp dpt:15020
    0     0 ISTIO_IN_REDIRECT  tcp  --  any    any     anywhere             anywhere

Chain ISTIO_IN_REDIRECT (3 references)
 pkts bytes target     prot opt in     out     source               destination
    0     0 REDIRECT   tcp  --  any    any     anywhere             anywhere             redir ports 15006

Chain ISTIO_OUTPUT (1 references)
 pkts bytes target     prot opt in     out     source               destination
    0     0 RETURN     all  --  any    lo      127.0.0.6            anywhere
    0     0 ISTIO_IN_REDIRECT  all  --  any    lo      anywhere            !localhost            owner UID match 1337
    0     0 RETURN     all  --  any    lo      anywhere             anywhere             ! owner UID match 1337
   22  1320 RETURN     all  --  any    any     anywhere             anywhere             owner UID match 1337
    0     0 ISTIO_IN_REDIRECT  all  --  any    lo      anywhere            !localhost            owner GID match 1337
    0     0 RETURN     all  --  any    lo      anywhere             anywhere             ! owner GID match 1337
    0     0 RETURN     all  --  any    any     anywhere             anywhere             owner GID match 1337
    0     0 RETURN     all  --  any    any     anywhere             localhost
    0     0 ISTIO_REDIRECT  all  --  any    any     anywhere             anywhere

Chain ISTIO_REDIRECT (1 references)
 pkts bytes target     prot opt in     out     source               destination
    0     0 REDIRECT   tcp  --  any    any     anywhere             anywhere             redir ports 15001
关于 iptables 规则请参考 iptables 命令
回过头来看下对应go源码
tools/istio-iptables/pkg/constants/constants.go
// Constants for iptables commands
const (
	IPTABLES         = "iptables"
	IPTABLESRESTORE  = "iptables-restore"
	IPTABLESSAVE     = "iptables-save"
	IP6TABLES        = "ip6tables"
	IP6TABLESRESTORE = "ip6tables-restore"
	IP6TABLESSAVE    = "ip6tables-save"
	IP               = "ip"
)

// iptables tables
const (
	MANGLE = "mangle"
	NAT    = "nat"
	FILTER = "filter"
)

// Built-in iptables chains
const (
	INPUT       = "INPUT"
	OUTPUT      = "OUTPUT"
	FORWARD     = "FORWARD"
	PREROUTING  = "PREROUTING"
	POSTROUTING = "POSTROUTING"
)

......
tools/istio-iptables/pkg/cmd/root.go
var rootCmd = &cobra.Command{
	Use:   "istio-iptables",
	Short: "Set up iptables rules for Istio Sidecar",
	Long:  "Script responsible for setting up port forwarding for Istio sidecar.",
	Run: func(cmd *cobra.Command, args []string) {
		cfg := constructConfig()
		var ext dep.Dependencies
		if cfg.DryRun {
			ext = &dep.StdoutStubDependencies{}
		} else {
			ext = &dep.RealDependencies{}
		}

		iptConfigurator := NewIptablesConfigurator(cfg, ext)
		if !cfg.SkipRuleApply {
            // 规则执行的入口
			iptConfigurator.run()
		}
	}
}
func (iptConfigurator *IptablesConfigurator) run() {

	iptConfigurator.logConfig()

	// ...此处省略1万字...

	// Create a new chain for redirecting outbound traffic to the common Envoy port.
	// In both chains, '-j RETURN' bypasses Envoy and '-j ISTIOREDIRECT'
	// redirects to Envoy.
	iptConfigurator.iptables.AppendRuleV4(
		constants.ISTIOREDIRECT, constants.NAT, "-p", constants.TCP, "-j", constants.REDIRECT, "--to-ports", iptConfigurator.cfg.ProxyPort)
	// Use this chain also for redirecting inbound traffic to the common Envoy port
	// when not using TPROXY.

	iptConfigurator.iptables.AppendRuleV4(constants.ISTIOINREDIRECT, constants.NAT, "-p", constants.TCP, "-j", constants.REDIRECT,
		"--to-ports", iptConfigurator.cfg.InboundCapturePort)

	iptConfigurator.handleInboundPortsInclude()

	// TODO: change the default behavior to not intercept any output - user may use http_proxy or another
	// iptablesOrFail wrapper (like ufw). Current default is similar with 0.1
	// Jump to the ISTIOOUTPUT chain from OUTPUT chain for all tcp traffic.
	iptConfigurator.iptables.AppendRuleV4(constants.OUTPUT, constants.NAT, "-p", constants.TCP, "-j", constants.ISTIOOUTPUT)
	// Apply port based exclusions. Must be applied before connections back to self are redirected.
	if iptConfigurator.cfg.OutboundPortsExclude != "" {
		for _, port := range split(iptConfigurator.cfg.OutboundPortsExclude) {
			iptConfigurator.iptables.AppendRuleV4(constants.ISTIOOUTPUT, constants.NAT, "-p", constants.TCP, "--dport", port, "-j", constants.RETURN)
		}
	}

	// 127.0.0.6 is bind connect from inbound passthrough cluster
	iptConfigurator.iptables.AppendRuleV4(constants.ISTIOOUTPUT, constants.NAT, "-o", "lo", "-s", "127.0.0.6/32", "-j", constants.RETURN)


	// Skip redirection for Envoy-aware applications and
	// container-to-container traffic both of which explicitly use
	// localhost.
	iptConfigurator.iptables.AppendRuleV4(constants.ISTIOOUTPUT, constants.NAT, "-d", "127.0.0.1/32", "-j", constants.RETURN)
	// Apply outbound IPv4 exclusions. Must be applied before inclusions.
	for _, cidr := range ipv4RangesExclude.IPNets {
		iptConfigurator.iptables.AppendRuleV4(constants.ISTIOOUTPUT, constants.NAT, "-d", cidr.String(), "-j", constants.RETURN)
	}

    // ...此处省略1万字...

    // 真正执行iptables的方法
	iptConfigurator.executeCommands()
}
iptConfigurator.executeCommands() 方法执行最终可以跟踪到tools/istio-iptables/pkg/dependencies/implementation.go中,可以看到就是利用的go 的命令行执行工具exec.Command来执行的os系统命令。
func (r *RealDependencies) execute(cmd string, redirectStdout bool, args ...string) error {
	//执行真正的iptables命令
	externalCommand := exec.Command(cmd, args...)
	externalCommand.Stdout = os.Stdout
	//TODO Check naming and redirection logic
	if !redirectStdout {
		externalCommand.Stderr = os.Stderr
	}
	return externalCommand.Run()
}
执行此命令后,istio-init就完成了它的使命。
iptables 进行流量拦截的部分单独一篇文章来写。
istio-proxy
通过开篇我们可以看到还有istio-proxy这个容器
 Image:         docker.io/istio/proxyv2:1.6.0
    Image ID:      docker-pullable://istio/proxyv2@sha256:821cc14ad9a29a2cafb9e351d42096455c868f3e628376f1d0e1763c3ce72ca6
    Port:          15090/TCP
    Host Port:     0/TCP
    Args:
      proxy
      sidecar
      --domain
      $(POD_NAMESPACE).svc.cluster.local
      --serviceCluster
      sleep.$(POD_NAMESPACE)
      --proxyLogLevel=warning
      --proxyComponentLogLevel=misc:error
      --trust-domain=cluster.local
      --concurrency
      2
    State:          Running
我们可以通过dockerhub 查看改镜像的内容 https://hub.docker.com/r/istio/proxyv2/tags
这里我们一起看看对应镜像1.6.0版本对应的Dockerfile传送门 . 它在istio源码的位置在pilot/docker/Dockerfile.proxyv2
ADD file:c3e6bb316dfa6b81dd4478aaa310df532883b1c0a14edeec3f63d641980c1789 in /

/bin/sh -c [ -z "$(apt-get indextargets)" ]
/bin/sh -c mkdir -p /run/systemd && echo 'docker' > /run/systemd/container
CMD ["/bin/bash"]
ENV DEBIAN_FRONTEND=noninteractive

// ...此处省略1万字...
COPY envoy /usr/local/bin/envoy
COPY pilot-agent /usr/local/bin/pilot-agent

ENTRYPOINT ["/usr/local/bin/pilot-agent"]
我们看到里面将envoy,pilot-agent程序添加进proxyv2容器,并执行pilot-agent作为启动命令,我们合并器执行参数,得出如下命令:
pilot-agent proxy sidecar --domain default.svc.cluster.local --serviceCluster sleep.default --proxyLogLevel=warning --proxyComponentLogLevel=misc:error --trust-domain=cluster.local --concurrency 2
那么我们接着看看该命令执行后会做什么操作呢?参考上面的操作步骤
minikube ssh
sudo -i
docker ps |grep sleep

d03a43d3f257        istio/proxyv2              "/usr/local/bin/pilo…"   3 hours ago         Up 3 hours                              k8s_istio-proxy_slee-54f94cbff5-jmwtf_default_70c72535-cbfb-4201-af07-feb0948cc0c6_0
a5437e12f6ea        8c797666f87b               "/bin/sleep 3650d"       3 hours ago         Up 3 hours                              k8s_sleep_sleep-54f94cbff5-jmwtf_default_70c72535-cbfb-4201-af07-feb0948cc0c6_0
efdbb69b77c0        k8s.gcr.io/pause:3.2       "/pause"                 3 hours ago         Up 3 hours                              k8s_POD_sleep-54f94cbff5-jmwtf_default_70c72535-cbfb-4201-af07-feb0948cc0c6_0
这次我们需要制定进入proxyv2容器d03a43d3f257并查看其内部运行的进程
docker exec -it d03a43d3f257 /bin/bash
ps -ef | grep sleep

UID        PID  PPID  C STIME TTY          TIME CMD
istio-p+     1     0  0 04:14 ?        00:00:06 /usr/local/bin/pilot-agent proxy sidecar --domain default.svc.cluster.local --serviceCluster sleep.default --proxyLogLevel=warning --proxyComponentLogLevel=misc:error --trust-domain=cluster.local --concurrency 2

istio-p+    17     1  0 04:14 ?        00:00:26 /usr/local/bin/envoy -c etc/istio/proxy/envoy-rev0.json --restart-epoch 0 --drain-time-s 45 --parent-shutdown-time-s 60 --service-cluster sleep.default --service-node sidecar~172.18.0.11~sleep-54f94cbff5-jmwtf.default~default.svc.cluster.local --max-obj-name-len 189 --local-address-ip-version v4 --log-format %Y-%m-%dT%T.%fZ.%l.envoy %n.%v -l warning --component-log-level misc:error --concurrency 2
观察PID与PPID可以发现,pilot-agent执行后启动了envoy程序。
pilot-agent命令源码入口在pilot/cmd/pilot-agent/main.go,该命令的用法可以查阅pilot-agent命令。
proxyCmd = &cobra.Command{
		Use:   "proxy",
		Short: "Envoy proxy agent",
		RunE: func(c *cobra.Command, args []string) error {
			// ...此处省略1万字...

			proxyConfig, err := constructProxyConfig()
			if out, err := gogoprotomarshal.ToYAML(&proxyConfig); err != nil {
				log.Infof("Failed to serialize to YAML: %v", err)

			// ...此处省略1万字...

			envoyProxy := envoy.NewProxy(envoy.ProxyConfig{
				Config:              proxyConfig,
				Node:                role.ServiceNode(),
				LogLevel:            proxyLogLevel,
				ComponentLogLevel:   proxyComponentLogLevel,
				PilotSubjectAltName: pilotSAN,
				MixerSubjectAltName: mixerSAN,
				NodeIPs:             role.IPAddresses,
				PodName:             podName,
				PodNamespace:        podNamespace,
				PodIP:               podIP,
				STSPort:             stsPort,
				ControlPlaneAuth:    proxyConfig.ControlPlaneAuthPolicy == meshconfig.AuthenticationPolicy_MUTUAL_TLS,
				DisableReportCalls:  disableInternalTelemetry,
				OutlierLogPath:      outlierLogPath,
				PilotCertProvider:   pilotCertProvider,
				ProvCert:            citadel.ProvCert,
			})

			agent := envoy.NewAgent(envoyProxy, features.TerminationDrainDuration())

			// 监控envoy启动直至启动成功,启动逻辑在`agent.Restart`中
			watcher := envoy.NewWatcher(tlsCerts, agent.Restart)
			go watcher.Run(ctx)

			return agent.Run(ctx)
		},
	}
)
agent.Restart方法
func (a *agent) Restart(config interface{}) {
	// 同一时刻只允许一个envoy agent执行启动
	a.restartMutex.Lock()
	defer a.restartMutex.Unlock()

	if reflect.DeepEqual(a.currentConfig, config) {
		// 如果配置文件没有发生变更那么什么都不用做,直接退出
		a.mutex.Unlock()
		return
	}

	// 如果监控到配置文件发生了变更,那么epoch版本号+1,创建新的envoy 实例
	epoch := a.currentEpoch + 1
	log.Infof("Received new config, creating new Envoy epoch %d", epoch)

    // 启动一个新的协程启动envoy
	go a.runWait(config, epoch, abortCh)
}
go a.runWait(config, epoch, abortCh)方法
func (a *agent) runWait(config interface{}, epoch int, abortCh <-chan error) {
	// 直接调用proxy实例启动,等待proxy启动完成
	err := a.proxy.Run(config, epoch, abortCh)
	a.proxy.Cleanup(epoch)
	a.statusCh <- exitStatus{epoch: epoch, err: err}
}
proxy.Run 方法
func (e *envoy) Run(config interface{}, epoch int, abort <-chan error) error {
	var fname string
	// 如果启动参数指定了自定义的配置文件那么使用自定义的配置文件,否则使用默认的配置
	if len(e.Config.CustomConfigFile) > 0 {
		fname = e.Config.CustomConfigFile
	} else {
        // 这里创建envoy 启动需要的/etc/istio/proxy/envoy-rev0.json 配置文件
        // 其中的0这个参数会随着重启的次数跟着+1变动,但仅仅是文件名发生变动,里面的配置内容还是一样
		out, err := bootstrap.New(bootstrap.Config{
			Node:                e.Node,
			Proxy:               &e.Config,
			PilotSubjectAltName: e.PilotSubjectAltName,
			MixerSubjectAltName: e.MixerSubjectAltName,
			LocalEnv:            os.Environ(),
			NodeIPs:             e.NodeIPs,
			PodName:             e.PodName,
			PodNamespace:        e.PodNamespace,
			PodIP:               e.PodIP,
			STSPort:             e.STSPort,
			ControlPlaneAuth:    e.ControlPlaneAuth,
			DisableReportCalls:  e.DisableReportCalls,
			OutlierLogPath:      e.OutlierLogPath,
			PilotCertProvider:   e.PilotCertProvider,
			ProvCert:            e.ProvCert,
		}).CreateFileForEpoch(epoch)
		fname = out
	}

    // ...此处省略1万字...

	// envoy 启动需要的参数
    // 也就是 --restart-epoch 0 --drain-time-s 45 --parent-shutdown-time-s 60...这部分内容
	args := e.args(fname, epoch, istioBootstrapOverrideVar.Get())

	// 很熟悉的味道,调用系统命令启动envoy
    // e.Config.BinaryPath 参数值为 /usr/local/bin/envoy,
	// 相关默认常量值可以查阅 pkg/config/constants/constants.go 这个源文件
	cmd := exec.Command(e.Config.BinaryPath, args...)

    // ...此处省略1万字...
}
整个启动过程其实挺复杂的,这里只是分析了最基础的启动envoy的流程。如果细看里面还包括
-
SDS的启动
-
polit 度量指标服务启动
-
监控配置更新后热启动envoy的流程
-
收到系统kill命令优雅退出envoy的流程
应用容器
至于应用容器的启动,该咋启动就咋启动,除了协议的限制外没有其他对Istio任何依赖,只要应用使用的是Istio支持的协议,都可以被Istio拦截并管理流量。这也就是Istio的强大之处。目前Istio支持为HTTP、gRPC、WebSocket 和 TCP 流量自动负载均衡。
参考文献
https://jimmysong.io/blog/sidecar-injection-iptables-and-traffic-routing/
https://preliminary.istio.io/zh/docs/reference/commands/pilot-agent/

