
上一篇讲了使用JavaMail发送普通邮件(【Mail】JavaMail介绍及发送邮件(一)),本例讲发送复杂的邮件(带有附件的邮件)
生成一封复杂的邮件
- 新建一个JavaWeb的Maven工程,引入javamail.jar包,maven引用如下:
1 <!-- javamail -->
2 <dependency>
3     <groupId>javax.mail</groupId>
4     <artifactId>mail</artifactId>
5     <version>1.4.7</version>
6 </dependency>
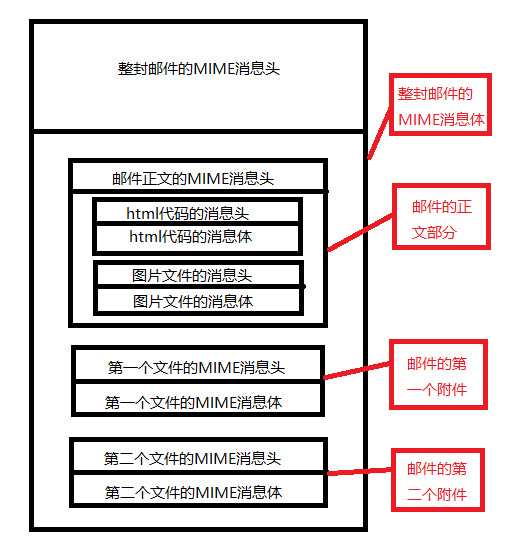
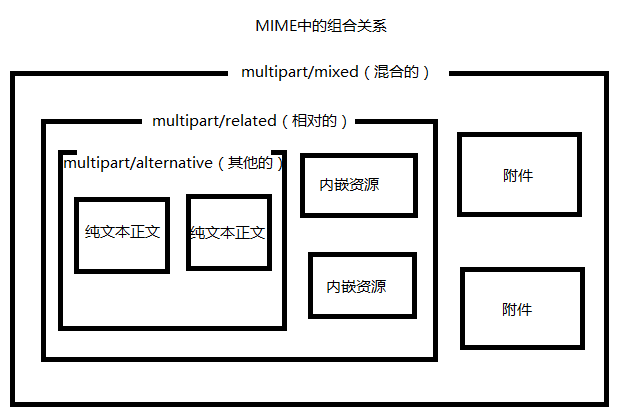
- 新建邮件的结构图,以及邮件MIME关系图如下
- 新建一个Demo3.java,如下:
  1 package com.hd.javamail;
  2
  3 import java.io.File;
  4 import java.io.FileOutputStream;
  5 import java.io.IOException;
  6 import java.io.OutputStream;
  7 import java.util.Properties;
  8
  9 import javax.activation.DataHandler;
 10 import javax.activation.DataSource;
 11 import javax.activation.FileDataSource;
 12 import javax.mail.Address;
 13 import javax.mail.MessagingException;
 14 import javax.mail.Multipart;
 15 import javax.mail.Session;
 16 import javax.mail.internet.InternetAddress;
 17 import javax.mail.internet.MimeBodyPart;
 18 import javax.mail.internet.MimeMessage;
 19 import javax.mail.internet.MimeMultipart;
 20 import javax.mail.internet.MimeUtility;
 21
 22 import com.sun.mail.util.MimeUtil;
 23
 24 /**
 25  *
 26  * @author H__D
 27  * @date 2016年12月6日 下午7:38:33
 28  *
 29  */
 30 public class Demo3 {
 31
 32     /**
 33      * 生成一份本地的邮件
 34      * @param args
 35      * @throws MessagingException
 36      * @throws IOException
 37      */
 38     public static void main(String[] args) throws MessagingException, IOException {
 39         //环境
 40         Session session = Session.getDefaultInstance(new Properties());
 41
 42         //邮件
 43         MimeMessage msg = new MimeMessage(session);
 44         //设置主题
 45         msg.setSubject("test123456");
 46         //发件人,注意中文的处理
 47         msg.setFrom(new InternetAddress("\"" + MimeUtility.encodeText( "某某") + "\"<xxxxxx@163.com>"));
 48         //设置邮件回复人
 49         msg.setReplyTo(new Address[]{new InternetAddress("123456@163.com")});
 50
 51         //整封邮件的MINE消息体
 52         MimeMultipart msgMultipart = new MimeMultipart("mixed");//混合的组合关系
 53         //设置邮件的MINE消息体
 54         msg.setContent(msgMultipart);
 55
 56         //附件1
 57         MimeBodyPart attch1 = new MimeBodyPart();
 58         //附件2
 59         MimeBodyPart attch2 = new MimeBodyPart();
 60         //正文内容
 61         MimeBodyPart content = new MimeBodyPart();
 62
 63         //把内容,附件1,附件2加入到 MINE消息体中
 64         msgMultipart.addBodyPart(attch1);
 65         msgMultipart.addBodyPart(attch2);
 66         msgMultipart.addBodyPart(content);
 67
 68         //把文件,添加到附件1中
 69         //数据源
 70         DataSource ds1 = new FileDataSource(new File("C:/Users/H__D/Desktop/1.txt"));
 71         //数据处理器
 72         DataHandler dh1 = new DataHandler(ds1 );
 73         //设置第一个附件的数据
 74         attch1.setDataHandler(dh1);
 75         //设置第一个附件的文件名
 76         attch1.setFileName("file1.jpg");
 77
 78         //把文件,添加到附件2中
 79         DataSource ds2 = new FileDataSource(new File("C:/Users/H__D/Desktop/2.txt"));
 80         DataHandler dh2 = new DataHandler(ds2 );
 81         attch2.setDataHandler(dh2);
 82         attch2.setFileName(MimeUtility.encodeText( "文件2.jpg"));
 83
 84         //正文(图片和文字部分)
 85         MimeMultipart bodyMultipart  = new MimeMultipart("related");
 86         //设置内容为正文
 87         content.setContent(bodyMultipart);
 88
 89         //html代码部分
 90         MimeBodyPart htmlPart = new MimeBodyPart();
 91         //html中嵌套的图片部分
 92         MimeBodyPart imgPart = new MimeBodyPart();
 93
 94         //正文添加图片和html代码
 95         bodyMultipart.addBodyPart(htmlPart);
 96         bodyMultipart.addBodyPart(imgPart);
 97
 98         //把文件,添加到图片中
 99         DataSource imgds = new FileDataSource(new File("C:/Users/H__D/Desktop/logo.png"));
100         DataHandler imgdh = new DataHandler(imgds );
101         imgPart.setDataHandler(imgdh);
102         //说明html中的img标签的src,引用的是此图片
103         imgPart.setHeader("Content-Location", "http://sunteam.cc/logo.jsg");
104
105         //html代码
106         htmlPart.setContent("<span style='color:red'>中文呵呵</span><img src=\"http://sunteam.cc/logo.jsg\">","text/html;charset=utf-8");
107
108         //生成文件邮件
109         msg.saveChanges();
110
111         //输出
112         OutputStream os = new FileOutputStream("C:/Users/H__D/Desktop/demo.eml");
113         msg.writeTo(os);
114         os.close();
115     }
116
117 }
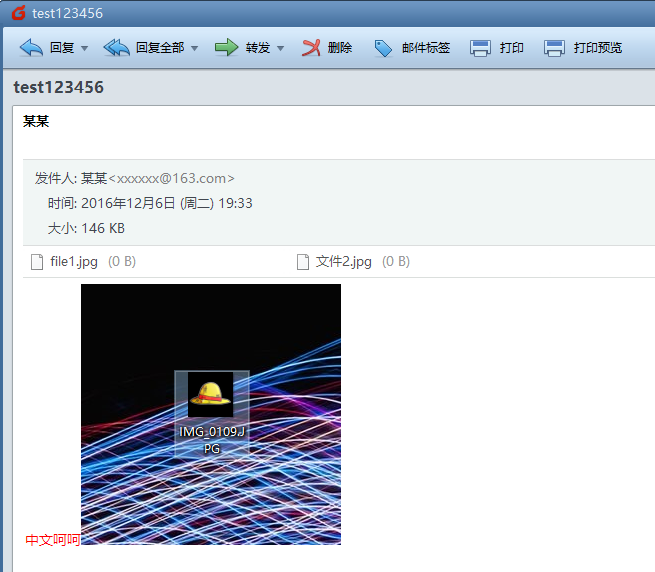
- 运行main方法,等到邮件文件。可以使用记事本和Foxmail打开效果如下:
记事本效果: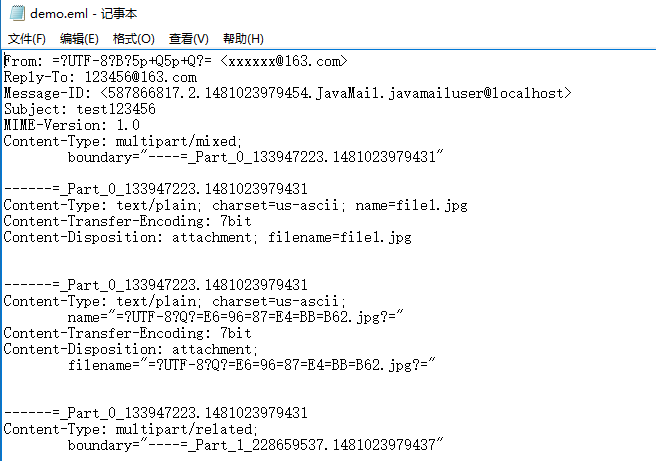
Foxmai效果:
发送本地邮件文件
- 新建一个Demo4.类,如下:
 1 package com.hd.javamail;
 2
 3 import java.io.File;
 4 import java.io.FileInputStream;
 5 import java.io.FileNotFoundException;
 6 import java.util.Properties;
 7
 8 import javax.mail.Authenticator;
 9 import javax.mail.Message;
10 import javax.mail.MessagingException;
11 import javax.mail.PasswordAuthentication;
12 import javax.mail.Session;
13 import javax.mail.Transport;
14 import javax.mail.internet.InternetAddress;
15 import javax.mail.internet.MimeMessage;
16
17 /**
18  *
19  * @author H__D
20  * @date 2016年12月6日 下午7:51:43
21  *
22  */
23 public class Demo4 {
24     public static void main(String[] args) throws FileNotFoundException, MessagingException {
25         // 属性对象
26         Properties properties = new Properties();
27         // 开启debug调试 ,打印信息
28         properties.setProperty("mail.debug", "true");
29         // 发送服务器需要身份验证
30         properties.setProperty("mail.smtp.auth", "true");
31         // 发送服务器端口,可以不设置,默认是25
32         properties.setProperty("mail.smtp.port", "25");
33         // 发送邮件协议名称
34         properties.setProperty("mail.transport.protocol", "smtp");
35         // 设置邮件服务器主机名
36         properties.setProperty("mail.host", "smtp.163.com");
37         // 环境信息
38         Session session = Session.getInstance(properties, new Authenticator() {
39             @Override
40             protected PasswordAuthentication getPasswordAuthentication() {
41                 // 在session中设置账户信息,Transport发送邮件时会使用
42                 return new PasswordAuthentication( "xxxx@163.com", "xxxxx");
43             }
44         });
45
46         //读取本地邮件
47         Message message = new MimeMessage(session, new FileInputStream(new File("C:/Users/H__D/Desktop/demo.eml")));
48
49         //发送邮件
50         Transport.send(message, InternetAddress.parse("123456@qq.cn") );
51     }
52 }


