
Nginx+uWsgi+Django+Python+MongoDB+mySQL服务器搭建
搭建目标如下:
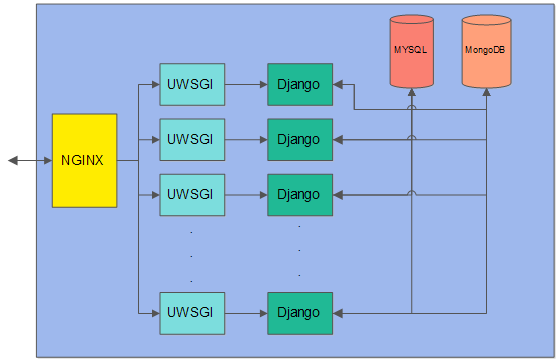
图:系统架构图
这个系统可以提供web服务及其它查询应用服务,我用其做一个二手房信息搜集、处理及分发的系统,可以通过浏览器访问,也可以通过定制的客户端进行访问。
一、安装篇
1、下载安装python
# wget http://www.python.org/ftp/python/2.7.3/Python-2.7.3.tgz
#
# tar xvfz Python-2.7.3.tgz
# cd Python-2.7.3
#./configure
# make
# sudo make install
下面是一些python安装工具,可以方便的安装所缺模块
python的包管理setuptools安装
# wget http://peak.telecommunity.com/dist/ez_setup.py
# python ez_setup.py
python的包管理pip安装(需要先安装setuptools)
# wget http://python-distribute.org/distribute_setup.py
# python distribute_setup.py
# wget https://github.com/pypa/pip/raw/master/contrib/get-pip.py
# python get-pip.py
下面使用pip 安装readline
# sudo pip install readline
2、下载安装Django
# wget https://www.djangoproject.com/download/1.4.3/tarball/
#
# tar xvfz Django-1.4.3.tar.gz
# cd Django-1.4.3
# sudo python setup.py install
3、下载安装MongoDB
l 先下载安装scons
# wget http://sourceforge.net/projects/scons/files/scons/2.1.0.alpha.20101125/scons-2.1.0.alpha.20101125.tar.gz/download
#
# tar xvfz scons-2.1.0.alpha.20101125.tar.gz
# cd scons-2.1.0.alpha.20101125
# sudo python setup.py install
l 下载安装MongoDB
# wget http://downloads.mongodb.org/src/mongodb-src-r2.2.2.tar.gz
#
# tar xvfz mongodb-src-r2.2.2.tar.gz
# cd mongodb-src-r2.2.2
# scons all
# sudo scons --prefix=/usr/local/mongodb --full install
l 下载安装pyMongo
# wget wget http://pypi.python.org/packages/source/p/pymongo/pymongo-2.4.2.tar.gz
#
# tar xvfz pymongo-2.4.2.tar.gz
# cd pymondo-2.4.2
# sudo python setup.py install
测试pyMongo是否安装成功
# python
> import pymongo
如果没有返回错误,则表明安装成功。
l 下载安装mongoengine【暂时没有用到】
# wget http://github.com/mongoengine/mongoengine/tarball/v0.6.20 --no-check-certificate
#
# tar xvfz v0.6.20
# cd MongoEngine-mongoengine-9cc6164
# sudo python setup.py install
测试mongoengine是否安装成功
# python
> from mongoengine import connect
如果没有返回错误,则表明安装成功。
4、下载安装MySQL
l 先下载安装cmake:
# wget http://www.cmake.org/files/v2.8/cmake-2.8.8.tar.gz
#
# tar xvfz cmake-2.8.8.tar.gz
# cd cmake-2.8.8
#./configure
# make
# sudo make install
l 下载安装mysql
# wget http://cdn.mysql.com/Downloads/MySQL-5.5/mysql-5.5.29.tar.gz
#
# tar xvfz mysql-5.5.29.tar.gz
# cd mysql-5.5.29
# cmake . -DCMAKE_INSTALL_PREFIX=/usr/local/mysql -DMYSQL_DATADIR=/usr/localmysql/data/ -DMYSQL_UNIX_ADDR=/usr/localmysql/data/mysqld.sock -DWITH_INNOBASE_STORAGE_ENGINE=1 -DSYSCONFDIR=/etc -DEXTRA_CHARSETS=all -DDEFAULT_CHARSET=utf8 -DDEFAULT_COLLATION=utf8_unicode_ci -DWITH_DEBUG=0
# make
# sudo make install
l 下载安装mysql-python
# wget http://sourceforge.net/projects/mysql-python/files/mysql-python/1.2.3/MySQL-python-1.2.3.tar.gz
#
# tar xvfz MySQL-python-1.2.3.tar.gz
# cd MySQL-python-1.2.3
在安装前,需要修改site.py中mysql_config的路径(为mysql安装路径下的/bin/mysql_config),
# site.py
mysql_config = /usr/local/mysql/bin/mysql_config
更改完后,可以进行编译和安装了
# python setup.py build
# sudo python setup.py install
通过测试import MySQLdb来判断是否安装成功,这里还需要将mysql安装路径下的lib加入到环境变量LD_LIBRARY_PATH中。
# export LD_LIBRARY_PATH=/usr/local/mysql/lib/:$LD_LIBRARY_PATH
注:cmake选项说明
|
选项 |
说明 |
|
-DCMAKE_INSTALL_PREFIX |
mysql安装的主目录。默认为/usr/local/mysql |
|
-DMYSQL_DATADIR |
mysql数据保存的路径自定义 |
|
-DMYSQL_UNIX_ADDR |
系统Socket文件(.sock)设置基于该文件路径进行Socket连接必要为绝对路径 |
|
-DWITH_INNOBASE_STORAGE_ENGINE |
存储引擎设置 |
|
-DSYSCONFDIR |
mysql配置文件my.cnf地址默认/etc下 |
|
-DMYSQL_TCP_PORT |
数据库服务器TCP/IP连接的监听端口默认为3306 |
|
-DEXTRA_CHARSETS -DDEFAULT_CHARSET -DDEFAULT_COLLATION |
数据库编码设置 |
|
-DENABLED_LOCAL_INFILE |
默认为关闭这里开启 |
|
-DWITH_DEBUG |
DEBUG开关,默认为关 |
5、下载安装uWsgi
# wget http://projects.unbit.it/downloads/uwsgi-1.2.3.tar.gz
#
# tar xvfz uwsgi-1.2.3.tar.gz
# cd uwsgi-1.2.3
# python uwsgiconfig.py --build
二、配置篇
1、配置nginx(配置nginx.conf)
server {
        listen        8080;
        server_name django;

        location / {
            root  /data/htdocs/django;
            include uwsgi_params;
            uwsgi_pass 127.0.0.1:8000;
        }

        access_log  /data/htdocs/django/access.log;
    }
2、配置uWsgi
可以将uwsgi的配置文件做成ini格式的,也可以直接在命令行进行输入,下面给出了ini文件形式的配置
#uwsgi.ini
[uwsgi]
socket = 127.0.0.1:8000
file=/data/htdocs/django/django_uwsgi.py
pidfile = /data/htdocs/django/django_uwsgi.pid
master = true
workers = 4
daemonize = /data/htdocs/django/django_uwsgi.log
其中django.py是我们需要自己定义的,它是用来将uwsgi与django进行连接的。
#django_uwsgi.py
#!/usr/bin/python

import os, sys
from django.core.handlers.wsgi import WSGIHandler

if not os.path.dirname(__file__) in sys.path[:1]:
    sys.path.insert(0, os.path.dirname(__file__))

os.environ['DJANGO_SETTINGS_MODULE'] = 'mysites.settings'    #设置配置文件

application = WSGIHandler()                      #调用django的处理函数WSGIHandler
3、配置mySQL
在安装完成后,创建mysql用户,并将mysql的目录拥有者换成mysql和mysql所属的group,并设置数据库的用户名和data的路径。
# groupadd mysql
# useradd -g mysql mysql
# chown mysql.mysql -R /service/mysql/
# /usr/local/mysql/scripts/mysql_install_db --user=mysql --basedir=/usr/local/mysql --datadir=/usr/local/mysql/data
将配置文件拷贝到/etc/下,并重命名为my.conf
# cp /usr/local/mysql/support-files/my-medium.cnf /etc/my.cnf
4、配置Django连接MySQL
在安装完成后,需要创建运行环境
# python manage.py startproject
执行后,会在创建一个文件manage.py和一个目录mysite,mysite目录中有urls.py,__init__.py,settings.py和wsgi.py文件。我们通过修改settings.py文件中的部分配置来连接mysql数据库。
假设在mysql中,创建了一个数据库test_python,并添加了一个用户名python_user且密码为python_user,而我们连接地址为192.168.1.2的mysql服务器,端口为3306(默认),则更改settings.py如下:
...
DATABASES = {
    'default': {
        'ENGINE': 'django.db.backends.mysql', # Add 'postgresql_psycopg2', 'mysql', 'sqlite3' or 'oracle'.
        'NAME': 'test_python',                      # Or path to database file if using sqlite3.
        'USER': 'python_user',                      # Not used with sqlite3.
        'PASSWORD': 'python_user',                  # Not used with sqlite3.
        'HOST': '192.168.1.2',                      # Set to empty string for localhost. Not used with sqlite3.
        'PORT': '3306',                      # Set to empty string for default. Not used with sqlite3.
    }
}
...
通过django中的manage.py进行验证
# python manage.py shell
>> from django.db import connection
>> cursor = connection.cursor()
如果成功,则表明连接数据库成功,其余的关于django的使用在此不多介绍。
5、配置Django连接MongoDB
这里可以直接使用PyMongo模块,也可以使用第三方的中间件mongoengine,PyMongo使用方法的介绍有很多,可以直接查看官方文档http://api.mongodb.org/python/current/api/pymongo/connection.html。
这里主要介绍mongoengine的配置方法
首先,要在settings中设置一个包含数据库信息的别名,在连接时会用到
DATABASES = {
...
'MongoDB': {
        'ENGINE': 'django_mongodb_engine',
        'NAME':'test',
    }
}
...
其中NAME指的是database的名字。
如果你想使用 django 的 session 和 authentication 这两个框架, 还要加入
# add session
SESSION_ENGINE = 'mongoengine.django.sessions'

# add authentication
AUTHENTICATION_BACKENDS = ('mongoengine.django.auth.MongoEngineBackend',
             )
然后就可以使用mongoengine了。
from mongoengine import *
from mysite.settings import DATABASES
conn = connect('MongoDB', ip="127.0.0.1", port=27017)
这里使用了settings中定义的别名'MongoDB'。
三、启动篇
1、启动Django服务
启动Django服务进程
# python manage.py runserver 0.0.0.0:8000
2、启动mongoDB服务进程
# /usr/local/mongodb/bin/mongod --port=27000 --dbpath=$HOME/data/ --logpath=$HOME/data/mongo.log
3、启动mysql服务
# /etc/init.d/mysqld start
四、实例篇
1、通过django的模板和mysql数据库中的数据,生成一个包含人名及信息表格的html页面
首先,我们先在数据库中建立一个表peoples,并插入三条数据
mysql> create table peoples (id int auto_increment primary key, name char(30), age int, birth date);
mysql>
mysql> insert into peoples(name, age, birth) values('zhangsan', 30,' 1983-1-1'),('lisi', 29, '1984-1-1'), ('wangwu', 28, '1985-1-1');
然后做一个html页面模板,名为peoples_list.html,内容如下:
<html>
<meta http-equiv="Content-Type" content="text/html; charset=utf-8"/>
<head>Peoples List</head>
<body>
<br><br>
<table border="1">
<tr>
<th>Name</th><th>Age</th><th>Birth</th>
</tr>
{% for people in peoples_list %}
<tr>
      <td>{{ people.0 }}</td>
      <td>{{ people.1 }}</td>
      <td>{{ people.2 }}</td>
</tr>
{% endfor %}
</table>
</body>
</html>
接下来是完成业务逻辑,保存在文件peoples.py中(使用了django自带的数据库管理模块)
#!/bin/python

#!/bin/python2
# -*- coding: utf-8 -*-

from django.db import connection
from django.shortcuts import render_to_response

def peoples_list(request):
    cursor = connection.cursor()
    cursor.execute('select name,age,birth from peoples')
    peoples = cursor.fetchall()
return render_to_response('peoples_list.html', {'peoples_list':peoples})
最后修改urls.py中的配置,标红的就是修改的内容
from django.conf.urls import patterns, include, url

from peoples import peoples_list

# Uncomment the next two lines to enable the admin:
# from django.contrib import admin
# admin.autodiscover()

urlpatterns = patterns('',
    # Examples:
    # url(r'^$', 'mysite.views.home', name='home'),
    # url(r'^mysite/', include('mysite.foo.urls')),

    # Uncomment the admin/doc line below to enable admin documentation:
    # url(r'^admin/doc/', include('django.contrib.admindocs.urls')),

    # Uncomment the next line to enable the admin:
    # url(r'^admin/', include(admin.site.urls)),
    url(r'peoples_list/$', peoples_list),
)
通过浏览器访问对应的地址就能看到最终的结果

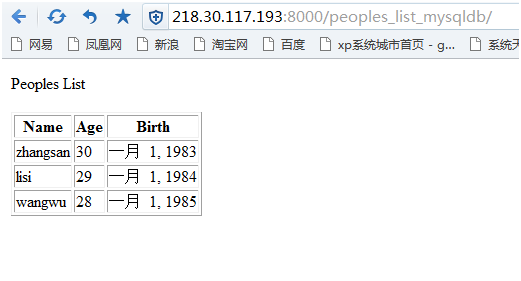
2、使用MySQLdb来完成上面的业务逻辑
业务逻辑保存在peoples_mysqldb.py中
#!/bin/python
# -*- coding: utf8 -*-

from django.shortcuts import render_to_response
import MySQLdb

def peoples_list_mysqldb(request):
    conn = MySQLdb.connect(host='127.0.0.1', port=3306, user='python_user', passwd='python_user', db='test_python', charset='utf8')
    cursor = conn.cursor()
    sqlComm = "select name, age, birth from peoples"
    cursor.execute(sqlComm)
    peoples = cursor.fetchall()
    cursor.close()
    conn.close()
return render_to_response('peoples_list.html', {'peoples_list':peoples})
修改urls.py
from django.conf.urls import patterns, include, url


#from view import current_datetimefrom peoples_mysqldb import peoples_list_mysqldb

# Uncomment the next two lines to enable the admin:
# from django.contrib import admin
# admin.autodiscover()

urlpatterns = patterns('',
    # Examples:
    # url(r'^$', 'mysite.views.home', name='home'),
    # url(r'^mysite/', include('mysite.foo.urls')),

    # Uncomment the admin/doc line below to enable admin documentation:
    # url(r'^admin/doc/', include('django.contrib.admindocs.urls')),

    # Uncomment the next line to enable the admin:
    # url(r'^admin/', include(admin.site.urls)),
    url(r'peoples_list_mysqldb/$', peoples_list_mysqldb)
)
最终的结果为:
3、将数据库数据以json形式返回
主要是业务逻辑代码的编写:test_json.py
# coding: utf-8
#!/bin/python

from django.utils import simplejson
from django.http import HttpResponse
from django.db import connection


def json_peoples(request):
    cursor = connection.cursor()
    cursor.execute('select name, age, birth from peoples')
    peoples = cursor.fetchall()
    i = 0
    json_peoples = {}
    names = locals()
    for people in peoples:
        tag = 'person%s' % i
        names[tag] = {'name':people[0], 'age':people[1], 'birth':str(people[2])}
        json_peoples[tag] = names[tag]
        i = ((i+1))

    json = {'person':i}

    json['person_info'] = json_peoples
    cursor.close()

    return HttpResponse(simplejson.dumps(json, ensure_ascii=False, sort_keys=True))
向urls中添加该对应关系
from django.conf.urls import patterns, include, url

#from view import current_datetime
from json_test import json_peoples

# Uncomment the next two lines to enable the admin:
# from django.contrib import admin
# admin.autodiscover()

urlpatterns = patterns('',
    # Examples:
    # url(r'^$', 'mysite.views.home', name='home'),
    # url(r'^mysite/', include('mysite.foo.urls')),

    # Uncomment the admin/doc line below to enable admin documentation:
    # url(r'^admin/doc/', include('django.contrib.admindocs.urls')),

    # Uncomment the next line to enable the admin:
    # url(r'^admin/', include(admin.site.urls)),
    url(r'peoples_json/$', json_peoples)
)
最终效果为:

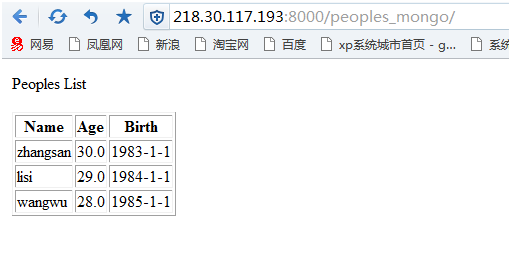
4、通过pymongo模块访问mongodb,将结果返回成一个页面
模板还是使用第一个例子的,只要重新写一个业务逻辑即可mongodb_test.py
#!/bin/python2
# -*- coding: utf-8 -*-

from django.db import connection
from django.shortcuts import render_to_response

def peoples_list(request):
    cursor = connection.cursor()
    cursor.execute('select name,age,birth from peoples')
    peoples = cursor.fetchall()
    print peoples
return render_to_response('peoples_list.html', {'peoples_list':peoples})
向urls.py中添加对应关系
from django.conf.urls import patterns, include, url

#from view import current_datetime
from mongodb_test import mongodb_peoples

# Uncomment the next two lines to enable the admin:
# from django.contrib import admin
# admin.autodiscover()

urlpatterns = patterns('',
    # Examples:
    # url(r'^$', 'mysite.views.home', name='home'),
    # url(r'^mysite/', include('mysite.foo.urls')),

    # Uncomment the admin/doc line below to enable admin documentation:
    # url(r'^admin/doc/', include('django.contrib.admindocs.urls')),

    # Uncomment the next line to enable the admin:
    # url(r'^admin/', include(admin.site.urls)),
    url(r'peoples_mongo/$', mongodb_peoples)
)
最终结果为
五、性能
由于系统中有nginx,uwsgi,django,mysql和mongodb模块,所以分别对几种情况下做了一下简单的性能测试。
测试工具使用了SuperWebBench,具体介绍可以查看http://www.oschina.net/p/superwebbench上的介绍。
测试环境:2核Intel(R) Xeon(R) CPU E5645,4G内存,上述所有模块在一台服务器上运行。
采用了并发500,持续30秒的测试压力。
测试nginx:
./superwebbench -c 500 -t 30 http://127.0.0.1:8000/

SuperWebBench - Advanced Simple Web Benchmark 0.1
Copyright (c) Radim Kolar 1997-2004, GPL Open Source Software.
Modified By Davelv 2011-11-03

Benchmarking:GET http://127.0.0.1:8000/ (using HTTP/1.1)

500 clients, running 30 sec.

Speed=6080 pages/sec, 4998280 bytes/sec.
Requests: 182419 ok, 0 http error, 0 failed.
测试nginx+uwsgi:(将uwsgi的文件指向一个直接返回http响应的python脚本)
用于返回包含当前时间的HTML页面的Python脚本:
# coding: utf-8
#!/usr/local/bin/python

import datetime

def application(environ, start_response):
    cur = datetime.datetime.now()
    response_body = """<html>
<meta http-equiv="Content-Type" content="text/html; charset=utf-8"/>
<head>Current Datetime</head>
<body>It is now %s</body>
</html>""" % cur
    status = '200 OK'
    response_headers = [('Content-Type', 'text/plain'), ('Content-Length', str(len(response_body)))]

    start_response(status, response_headers)
return [response_body]
结果:
./superwebbench -c 500 -t 30 http://127.0.0.1:8000/

SuperWebBench - Advanced Simple Web Benchmark 0.1
Copyright (c) Radim Kolar 1997-2004, GPL Open Source Software.
Modified By Davelv 2011-11-03

Benchmarking:GET http://127.0.0.1:8000/ (using HTTP/1.1)

500 clients, running 30 sec.

Speed=4417 pages/sec, 1351734 bytes/sec.
Requests: 132523 ok, 0 http error, 0 failed.
测试nginx+uwsgi+mysql:
用于返回包含mysql数据的HTML页面的Python脚本:
# coding: utf-8
#!/usr/local/bin/python

import datetime
import MySQLdb

def application(environ, start_response):
    conn = MySQLdb.connect(host='127.0.0.1', port=3306, user='python_user', passwd='python_user', db='test_python', charset='utf8')
    cursor = conn.cursor()
    sqlComm = "select name, age, birth from peoples"
    cursor.execute(sqlComm)
    peoples = cursor.fetchall()
    cursor.close()
    conn.close()
    body = "<table border=\"1\"><tr><th>Name</th><th>Age</th><th>Birth</th></tr>"
    for people in peoples:
        person = "<tr><td>%s</td><td>%s</td><td>%s</td></tr>" % (str(people[0]), str(people[1]), str(people[2]))
        body = body + person
    body = body +"</table>"
    response_body = """<html>
<meta http-equiv="Content-Type" content="text/html; charset=utf-8"/>
<head>People List</head>
<body>%s</body></html>""" % body

    status = '200 OK'
    print response_body
    response_headers = [('Content-Type', 'text/plain'), ('Content-Length', str(len(response_body)))]
    print response_headers
    start_response(status, response_headers)
    return [response_body]
结果
./superwebbench -c 500 -t 30 http://127.0.0.1:8000/

SuperWebBench - Advanced Simple Web Benchmark 0.1
Copyright (c) Radim Kolar 1997-2004, GPL Open Source Software.
Modified By Davelv 2011-11-03

Benchmarking:GET http://127.0.0.1:8000/ (using HTTP/1.1)

500 clients, running 30 sec.

Speed=1078 pages/sec, 539381 bytes/sec.
Requests: 32345 ok, 13 http error, 0 failed.
测试nginx+uwsgi+django:
./superwebbench -c 500 -t 30 http://127.0.0.1:8000/time/

SuperWebBench - Advanced Simple Web Benchmark 0.1
Copyright (c) Radim Kolar 1997-2004, GPL Open Source Software.
Modified By Davelv 2011-11-03

Benchmarking:GET http://127.0.0.1:8000/time/ (using HTTP/1.1)

500 clients, running 30 sec.

Speed=652 pages/sec, 176182 bytes/sec.
Requests: 19558 ok, 7 http error, 0 failed.
测试nginx+uwsgi+django+mysql:
./superwebbench -c 500 -t 30 http://127.0.0.1:8000/peoples_list/

SuperWebBench - Advanced Simple Web Benchmark 0.1
Copyright (c) Radim Kolar 1997-2004, GPL Open Source Software.
Modified By Davelv 2011-11-03

Benchmarking:GET http://127.0.0.1:8000/peoples_list/ (using HTTP/1.1)

500 clients, running 30 sec.

Speed=321 pages/sec, 204044 bytes/sec.
Requests: 9615 ok, 23 http error, 0 failed.
测试nginx+uwsgi+django+mongodb:
./superwebbench -c 500 -t 30 http://127.0.0.1:8000/peoples_mongo/

SuperWebBench - Advanced Simple Web Benchmark 0.1
Copyright (c) Radim Kolar 1997-2004, GPL Open Source Software.
Modified By Davelv 2011-11-03

Benchmarking:GET http://127.0.0.1:8000/peoples_mongo/ (using HTTP/1.1)

500 clients, running 30 sec.

Speed=355 pages/sec, 221449 bytes/sec.
Requests: 10648 ok, 15 http error, 0 failed.
总结一下,可以看出nginx的处理速度极快,而uwsgi同样也不慢,最大的瓶颈在于django,效率大概下降了70%多,而数据库查询(无论是mysql还是mongodb)也对效率有一定影响。
当然,这只是把所有服务都部署在一台服务器上,对资源的抢占也影响了系统的效率。
六、其它介绍
1、编码问题
需要注意编码问题,否则会出现乱码或者执行错误。
有四个部分需要统一编码格式(以utf8为例):
(1) mysql数据库的编码设置(charset = ‘utf8’)
(2) python文件的编码设置(# -*- coding:utf8 -*-)
(3) 连接mysql数据库时要加上参数charset=’utf8’
(4) 如果使用django,则需要在settings.py中添加DEFAULT_CHARSET = 'utf8'。
2、Python通过MySQLdb对MySQL的操作
导入MySQLdb模块
import MySQLdb
与数据库建立连接
conn=MySQLdb.connect([host="localhost",][port=3306,] user="root", passwd="passwd",db="database_name"[, charset=’utf8’])
其中host为mysql主机名,port为端口号,user为用户名,passwd为密码,db为数据库名,charset为编码类型
获取游标
cursor = conn.cursor()
数据库命令
插入命令
insertComm = ‘insert into table_name(...) values(...)’
cursor.execute(insertComm,...)
如:(注意最后要调用commit来提交这次命令)
insertComm = 'insert into peoples(name, age, birth) values(%s, %s, %s)'
param = ('zhengliu', 27, '1986-1-1')
cursor.execute(insertComm, param)
conn.commit()
更新命令
updateComm = ‘update table_name set column1=value1[,...] where column=value[,...]’
cursor.execute(updateComm)
如:(注意最后要调用commit来提交这次命令)
updateComm = "update peoples set age=%s,birth=%s where name='zhengliu'"
param = (26, '1987-1-1')
cursor.execute(updateComm, param)
conn.commit()
删除命令
deleteComm = ‘delete from table_name where column1=value1[,...]’
cursor.execute(deleteComm)
如:(注意最后要调用commit来提交这次命令)
deleteComm = "delete from peoples where name=%s"
param=('zhengliu')
cursor.execute(deleteComm, param)
conn.commit()
查询命令
selectComm = ‘select name, age, birth from peoples [where column1=values1,...]’
cursor.execute(selectComm)
result = cursor.fetchall()
如:
queryComm = 'select name, age, birth from peoples'
cursor.execute(queryComm)
peoples = cursor.fetchall()
提交和回滚
在对数据库进行修改操作时,需要进行commit命令来最终提交数据库,如果想要取消这次操作,则要在commit前先调用rollback进行回滚操作。
conn.commit()
conn.rollback()
关闭命令
关闭游标
cursor.close()
关闭连接
conn.close()
cursor游标对象属性及方法
|
属性方法 |
描述 |
|
arraysize |
使用fetchmany()方法时一次取出的记录数,默认为1 |
|
connection |
创建此游标的连接(可选) |
|
discription |
返回游标的活动状态,包括(7元素):(name,type_code, display_size,internal_size,precision,scale,null_ok) 其中name,type_code是必须的。 |
|
lastrowid |
返回最后更新行的ID(可选),如果数据库不支持,返回None |
|
rowcount |
最后一次execute()返回或影响的行数 |
|
callproc(func[,args]) |
调用一个存储过程 |
|
close() |
关闭游标 |
|
execute(op[,args]) |
执行sql语句或数据库命令 |
|
executemany(op,args) |
一次执行多条sql语句,执行的条数由arraysize给出 |
|
fetchone() |
匹配结果的下一行 |
|
fetchall() |
匹配所有剩余结果 |
|
fetchmany(size-cursor,arraysize) |
匹配结果的下几行 |
|
__iter__() |
创建迭代对象(可选,参考next()) |
|
messages |
游标执行好数据库返回的信息列表(元组集合) |
|
next() |
使用迭代对象得到结果的下一行 |
|
nextset() |
移动到下一个结果集(如果支持的话) |
|
rownumber |
当前结果集中游标的索引(从0行开始) |
|
setinput-size(sizes) |
设置输入最大值 |
|
setoutput-size(sizes[,col]) |
设置列输出的缓冲值 |

