

nexus私服搭建及maven生命周期
一、maven找库流程
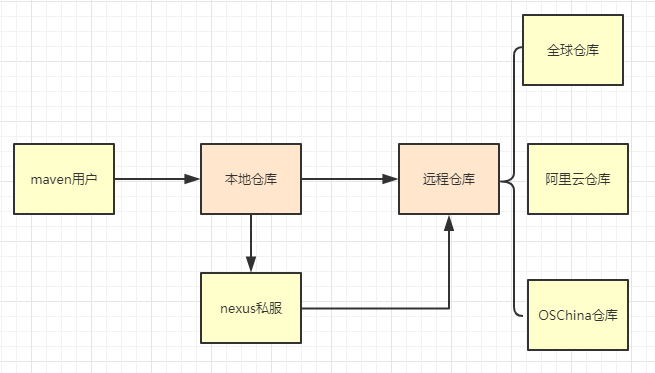
从流程上看创建nexus私服,能够优化流程,而且更加快速
二、nexus下载、安装
1、nexus下载地址
https://sonatype-download.global.ssl.fastly.net/nexus/oss/nexus-2.14.5-02-bundle.tar.gz
2、nexus解压并安装环境
#解压
tar -zxif nexus-2.14.5-02-bundle.tar.gz
#在环境变量中设置启动用户
vim /etc/profile
#安全起见不建议使用root用户,如果使用其它用户需要加相应权限
RUN_AS_USER=root
3、配置启动参数
#${nexusBase}为nexus的安装路径
vim ${nexusBase}/conf/nexus.properties
#端口号
applicatiom-port=8081
#仓库地址
nexus-work=${bundleBasedir}/../sonatype-work/nexus
#启动nexus
${nexusBase}/bin/nexus start
#停止nexus
${nexusBase}/bin/nexus stop
4、登录nexus界面
地址:http://{ip}:8081/nexus/

默认用户名:admin

默认密码:admin123
5、手动更新索引
前往maven中央仓库下载indexer-cli-5.1.1.jar
http://search.maven.org/#search%7Cgav%7C1%7Cg%3A%22org.apache.maven.indexer%22%20AND%20a%3A%22indexer-cli%22
6、下载索引文件
http://repo.maven.apache.org/maven2/.index/
nexus-maven-repository-index.gz
nexus-maven-repository-index.properties
7、解压索引文件
java -jar indexer-cli-5.1.1.jar -u nexus-maven-repository-index.gz -d indexer
8、拷贝索引文件至目录
{nexus-home}/sonatype-work/nexus/indexer/central-ctx
9、重启nexus
注意:觉得麻烦可以直接下载:https://pan.baidu.com/s/1qzllVcr5nqiX2EKVlof5Wg,里面包含所有需要的文件
三、maven配置优化及设置
1、优化maven里的setting配置
#设置maven本地仓库地址
<localRepository>F:\maven</localRepository>
#设置快照版本服务
<servers>
      #对应exclipe/idea项目中parent,pom.xml里的distributionManagement
      <id>nexusSnapshot</id>
      <username>deployment</username>
      <password>deployment123</password>
    </server>
</servers>
#设置镜像
<mirrors>
	<mirror>
		<id>nexusSnapshot</id>
                #全部走nexus私服
		<mirrorOf>*</mirrorOf>
		<name>nexus</name>
		<url>http://192.168.1.32:8082/nexus/content/groups/public/</url>
     </mirror>
 </mirrors>
#配置仓库地址
<profiles>
	<profile>
	  <id>common</id>
      <repositories>
        <repository>
          <id>nexusSnapshot</id>
          <name>snapshots</name>
          <url>http://*</url>
        </repository>
		<repository>
          <id>nexusCentral</id>
          <name>nexusCentral</name>
          <url>http://*</url>
        </repository>
		<repository>
          <id>nexusReleases</id>
          <name>nexusReleases</name>
          <url>http://*</url>
        </repository>
      </repositories>
        #配置编译的jdk
	  <properties>
		  <maven.compiler.source>1.8</maven.compiler.source>
		  <maven.compiler.target>1.8</maven.compiler.target>
		      <maven.compiler.compilerVersion>1.8</maven.compiler.compilerVersion>
	  </properties>
	</profile>
  </profiles>

<activeProfiles>
    <activeProfile>common</activeProfile>
  </activeProfiles>
2、修改pom.xml
<distributionManagement>
		<repository>
			<id>nexusSnapshot</id>
			<name>nexusSnapshot</name>
			<url>http://192.168.1.32:8082/nexus/content/repositories/snapshots/</url>
		</repository>
	</distributionManagement>
四、nexus仓库与仓库组
1、nexus内置仓库
登陆用户,单击Nexus界面左边导航栏中的Repositories链接,就可以看到内置的仓库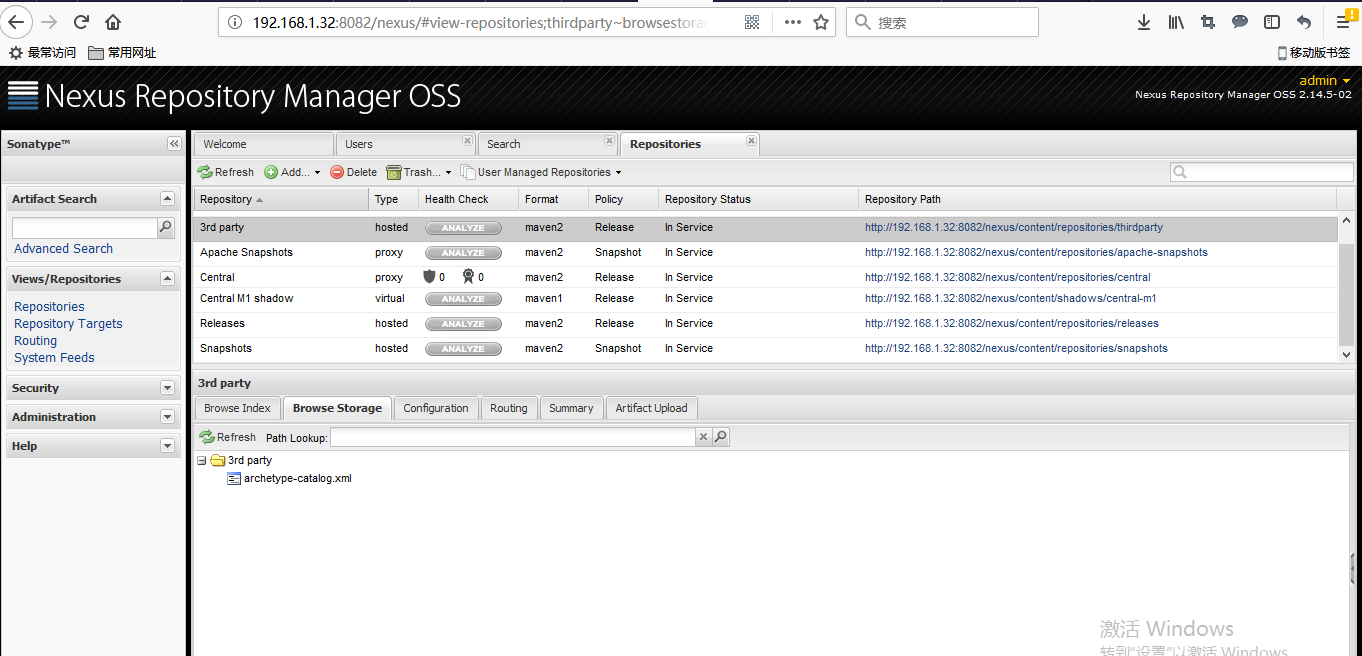
2、从中可以看到仓库有四种类型:
- group(仓库组)
- hosted(宿主)
- proxy(代理)
- virtual(虚拟)
3、每个仓库的格式为maven2或者maven1。此外,仓库还有一个属性为Policy(策略),表示该仓库为发布(Release)版本仓库还是快照(Snapshot)版本仓库。最后两列的值为仓库的状态和路径。
    Maven Central:该仓库代理Maven中央仓库,其策略为Release,因此只会下载和缓存中央仓库中的发布版本构件。
    Releases:这是一个策略为Release的宿主类型仓库,用来部署组织内部的发布版本构件。
    Snapshots:这是一个策略为Snapshot的宿主类型仓库,用来部署组织内部的快照版本构件。
    3rd party:这是一个策略为Release的宿主类型仓库,用来部署无法从公共仓库获得的第三方发布版本构件。
    Apache Snapshots:这是一个策略为Snapshot的代理仓库,用来代理Apache Maven仓库的快照版本构件。
    Codehaus Snapshots:这是一个策略为Snapshot的代理仓库,用来代理Codehaus Maven仓库的快照版本构件。
    Google Code:这是一个策略为Release的代理仓库,用来代理Google Code Maven仓库的发布版本构件。
    java.net-Maven 2:这是一个策略为Release的代理仓库,用来代理java.net Maven仓库的发布版本构件。
    Public Repositories:该仓库组将上述所有策略为Release的仓库聚合并通过一致的地址提供服务。
    Public Snapshot Repositories:该仓库组将上述所有策略为Snapshot的仓库聚合并通过一致的地址提供服务。
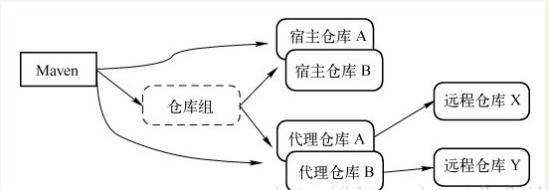
4、Nexus仓库分类的概念
五、maven生命周期
clean lifecycle : 构建前的清理工作
•	pre-clean 执行一些需要在clean之前完成的工作
•	clean 移除所有上一次构建生成的文件
•	post-clean 执行一些需要在clean之后立刻完成的工作
Default lifecycle: 构建的核心部分,编译、打包、部署、上传
•	validate 项目及所必须的环境验证
•	initialize 初始化构建状态,例如设置属性或创建目录。
•	generate-sources 生成次源包
•	process-sources
•	generate-resources
•	process-resources 复制并处理资源文件,至目标目录,准备打包。
•	compile 编译项目的源代码。
•	process-classes
•	generate-test-sources
•	process-test-sources
•	generate-test-resources
•	process-test-resources 复制并处理资源文件,至目标测试目录。
•	test-compile 编译测试源代码。
•	process-test-classes
•	test 使用合适的单元测试框架运行测试。这些测试代码不会被打包或部署。
•	prepare-package
•	package 接受编译好的代码,打包成可发布的格式,如 JAR 。
•	pre-integration-test
•	integration-test
•	post-integration-test
•	verify
•	install 将包安装至本地仓库,以让其它项目依赖。
•	deploy 将最终的包复制到远程的仓库,以让其它开发人员与项目共享。
site lifecycle:项目报告生成,站点文档生成
•	pre-site 执行一些需要在生成站点文档之前完成的工作
•	site 生成项目的站点文档
•	post-site 执行一些需要在生成站点文档之后完成的工作,并且为部署做准备
•	site-deploy 将生成的站点文档部署到特定的服务器上
我的博客即将搬运同步至腾讯云+社区,邀请大家一同入驻:https://cloud.tencent.com/developer/support-plan?invite_code=ej6dteqjfixd

