
android 插件化框架speed-tools
项目介绍:
speed-tools 是一款基于代理模式的动态部署apk热更新框架、插件化开发框架;
speed-tools这个名字主要指的快速迭代开发工具集的意思。
功能与特性:
1、支持Android 2.3 以上版本
2、支持R文件资源直接调用
3、开发过程中无发射调用
4、apk无需安装直接调用
5、代理模式对代码侵入性少
6、使用简单,只需要继承简单的类即可
使用方法
添加依赖:
compile 'com.liyihangjson:speed_tools:1.0.3'
首先看看项目结构:
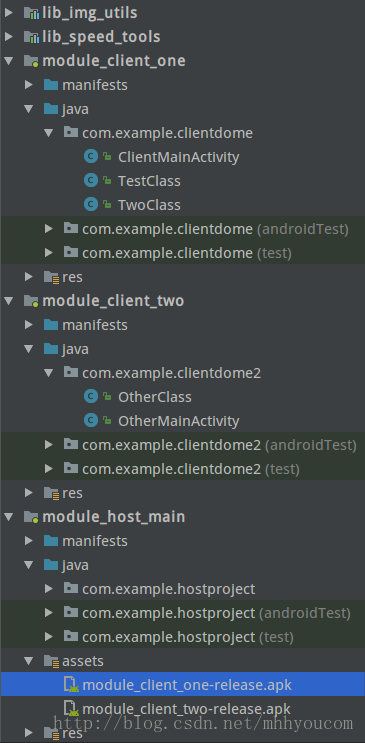
lib_speed_tools: 插件化核心功能library
module_host_main:宿主工程主工程,负责加载部署apk
module_client_one:测试业务apk 1
module_client_two:测试业务apk 2
lib_img_utils:测试imageloader图片框架
注意:需要使用speed tools 只需要依赖lib_speed_tools即可,然后开始配置插件化步骤:
首先在module_client_one中创建业务逻辑类:TestClass.java
/**
 *  by liyihang
 */
public class TestClass extends SpeedBaseInterfaceImp {

    private Activity activity;

    @Override
    public void onCreate(Bundle savedInstanceState, final Activity activity) {
        this.activity=activity;

        activity.setContentView(R.layout.activity_client_main);

        activity.findViewById(R.id.jump).setOnClickListener(new View.OnClickListener() {
            @Override
            public void onClick(View v) {
                SpeedUtils.goActivity(activity,"first_apk", "two_class");
            }
        });

        ImageView imageView= (ImageView) activity.findViewById(R.id.img_view);
        imageView.setVisibility(View.VISIBLE);
        ImgUtils.getInstance(activity).showImg("//img-my.csdn.net/uploads/201309/01/1378037235_3453.jpg", imageView);

    }
}
SpeedBaseInterfaceImp业务组件中业务activity代理类,他是实现了主要的生命周期方法,相当于组件的activity类。
然后创建hock类每个业务组件中只创建一个:ClientMainActivity.java
public class ClientMainActivity extends SpeedClientBaseActivity {

    @Override
    public SpeedBaseInterface getProxyBase() {
        return new TestClass();
    }


}
这个类在组件中是唯一的,作用就是hock在独立测试时候使用。
接下来配置配置组件的AndroidManifest.xml
    <application
        android:allowBackup="true"
        android:icon="@mipmap/ic_launcher"
        android:label="@string/app_name"
        android:supportsRtl="true"
        android:theme="@style/SpeedTheme">

        <!--必须设置root_class-->
        <meta-data
            android:name="root_class"
            android:value="com.example.clientdome.TestClass" />

        <meta-data
            android:name="two_class"
            android:value="com.example.clientdome.TwoClass" />

        <activity
            android:name=".ClientMainActivity"
            android:theme="@style/SpeedTheme">
            <intent-filter>
                <action android:name="android.intent.action.MAIN" />

                <category android:name="android.intent.category.LAUNCHER" />
            </intent-filter>

            <!--组件意图-->
            <intent-filter>
                <data android:scheme="speed_tools" android:host="sijienet.com" android:path="/find_class"/>
                <action android:name="android.intent.action.VIEW"/>
                <category android:name="android.intent.category.DEFAULT"/>
            </intent-filter>
        </activity>
    </application>
组件意图写死保持一直,root_class 是调用死后使用对于配置的com.example.clientdome.TestClass业务类。这样业务组件配置完成。
接下来配置宿主工程module_host_main;
创建宿主工程唯一hock类:ApkActivity.java
/**
 *  by liyihang
 *  blog http://sijienet.com/
 */
public class ApkActivity extends SpeedHostBaseActivity {


    @Override
    public String getApkKeyName() {
        return HostMainActivity.FIRST_APK_KEY;
    }

    @Override
    public String getClassTag() {
        return null;
    }
}
整个宿主工程创建一个类即可,用户是hock activity;然后创建一个开屏页apk第一次加载时候需要一些时间,放入开屏等待页面是非常合适的。
HostMainActivity.java
/**
 *  by liyihang
 *  blog http://sijienet.com/
 */
public class HostMainActivity extends AppCompatActivity implements Runnable,Handler.Callback, View.OnClickListener {


    public static final String FIRST_APK_KEY="first_apk";
    public static final String TWO_APK_KEY="other_apk";

    private Handler handler;

    private TextView showFont;
    private ProgressBar progressBar;
    private Button openOneApk;
    private Button openTwoApk;

    @Override
    protected void onCreate(Bundle savedInstanceState) {
        super.onCreate(savedInstanceState);
        setContentView(R.layout.activity_host_main);

        showFont= (TextView) findViewById(R.id.show_font);
        progressBar= (ProgressBar) findViewById(R.id.progressbar);
        openOneApk= (Button) findViewById(R.id.open_one_apk);
        openTwoApk= (Button) findViewById(R.id.open_two_apk);

        handler=new Handler(this);
        new Thread(this).start();
    }

    @Override
    public void run() {
        String s = "module_client_one-release.apk";
        String dexOutPath="dex_output2";
        File nativeApkPath = SpeedUtils.getNativeApkPath(getApplicationContext(), s);
        SpeedApkManager.getInstance().loadApk(FIRST_APK_KEY, nativeApkPath.getAbsolutePath(), dexOutPath, this);

        String s2 = "module_client_two-release.apk";
        String dexOutPath2="dex_output3";
        File nativeApkPath1 = SpeedUtils.getNativeApkPath(getApplicationContext(), s2);
        SpeedApkManager.getInstance().loadApk(TWO_APK_KEY, nativeApkPath1.getAbsolutePath(), dexOutPath2, this);

        handler.sendEmptyMessage(0x78);
    }

    @Override
    public boolean handleMessage(Message message) {
        showFont.setText("当前是主宿主apk\n插件apk完毕");
        progressBar.setVisibility(View.GONE);
        openOneApk.setVisibility(View.VISIBLE);
        openTwoApk.setVisibility(View.VISIBLE);
        openOneApk.setOnClickListener(this);
        openTwoApk.setOnClickListener(this);
        return false;
    }

    @Override
    public void onClick(View v) {
        if (v.getId()==R.id.open_one_apk)
        {
            SpeedUtils.goActivity(this, FIRST_APK_KEY, null);
        }
        if (v.getId()==R.id.open_two_apk)
        {
            SpeedUtils.goActivity(this, TWO_APK_KEY, null);
        }
    }
}
加载apk核心代码是:
        String s = "module_client_one-release.apk";
        String dexOutPath="dex_output2";
        File nativeApkPath = SpeedUtils.getNativeApkPath(getApplicationContext(), s);
        SpeedApkManager.getInstance().loadApk(FIRST_APK_KEY, nativeApkPath.getAbsolutePath(), dexOutPath, this);
业务apk都是放在assets目录中。最后配置AndroidManifest.xml文件:
<?xml version="1.0" encoding="utf-8"?>
<manifest xmlns:android="http://schemas.android.com/apk/res/android"
    package="com.example.hostproject">


    <uses-permission android:name="android.permission.INTERNET"/>
    <uses-permission android:name="android.permission.WRITE_EXTERNAL_STORAGE"/>


    <application
        android:allowBackup="true"
        android:icon="@mipmap/ic_launcher"
        android:label="@string/app_name"
        android:supportsRtl="true"
        android:theme="@style/SpeedTheme">

        <!--启动activity 加载apk-->
        <activity android:name=".HostMainActivity">
            <intent-filter>
                <action android:name="android.intent.action.MAIN" />

                <category android:name="android.intent.category.LAUNCHER" />
            </intent-filter>
        </activity>


        <!--组件hack-->
        <activity
            android:name=".ApkActivity"
            android:label="@string/app_name"
            android:theme="@style/SpeedTheme" >
            <intent-filter>
                <data android:scheme="speed_tools" android:host="sijienet.com" android:path="/find_class"/>
                <action android:name="android.intent.action.VIEW"/>
                <category android:name="android.intent.category.DEFAULT"/>
            </intent-filter>
        </activity>
    </application>

</manifest>
这样所有配置结束,插件化实现。
github: https://github.com/jasonliyihang/speed_tools
作者:一航

