
[转]How to Create an Add-in for Microsoft Outlook
本文转自:https://www.codeproject.com/Articles/1112815/How-to-Create-an-Add-in-for-Microsoft-Outlook
1. Introduction
Visual Studio Tool for Office (VSTO) Add-in is a toolset available in .NET Framework that lets us extend and customize the Microsoft Office products in (versions 2003 and later).
In this tutorial, we are going use Outlook 2013 as a case study and Visual Studio 2015.
2. Outlook Object Model
This is the starting point when we want to create an Outlook Add-in and it's important to understand the meaning of these objects.
Outlook Object Model:
Application: It represents the Outlook application and is the highest-level object in the model. This object is the starting point to reach the other objects of the model.Explorer: It represents a window to display the folder's contents, such as emails, message, tasks, appointments, etc.Inspector: It represents a window to display an item, such as an email message, a task, an appointment, etc.MAPIFolder: It represents a folder that contains emails, contacts, appointments, etc.
Remark: This object is obsoleted and, in substitution, you should use Folder object instance ofMAPIFolder.MailItem: It represents an email message.AppointmentItem: It represents a meeting, a one-time appointment, schedule appointment or a meeting in the Calendar folder.TaskItem: It represents a task to be performed within a specified time frame.ContactItem: It represents a contact in the Contact folder.
3. How to Start
In the following section, we are going to start in this type of applications.
3.1. How to Create the Project
- Start Visual Studio.
- File menu / New / Project.
- In the template panel of the project, open Visual C#, Office/SharePoint, Office Add-ins.
- Select Outlook 2013 and 2016 VSTO Add-in template.
- Complete the project name and click OK.
3.2. Project Layout
Actually, the project layout generated for Visual Studio is very intuitive and simple.
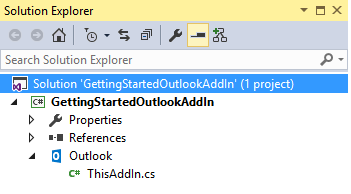
The main class is ThisAddIn and is like this:
public partial class ThisAddIn
{
    private void ThisAddIn_Startup(object sender, System.EventArgs e)
    {
    }

    private void ThisAddIn_Shutdown(object sender, System.EventArgs e)
    {
        // Note: Outlook no longer raises this event. If you have code that
        //    must run when Outlook shuts down, see
        //    http://go.microsoft.com/fwlink/?LinkId=506785
    }

    #region VSTO generated code

    /// <summary>
    /// Required method for Designer support - do not modify
    /// the contents of this method with the code editor.
    /// </summary>
    private void InternalStartup()
    {
        this.Startup += new System.EventHandler(ThisAddIn_Startup);
        this.Shutdown += new System.EventHandler(ThisAddIn_Shutdown);
    }

    #endregion
}
It's a very simple class. The ThisAddIn_Startup method is the application starting point. In this method, we can get the object Application and the other objects model. Also, we can perform our initialization processes such as configurations and access to a database.
The ThisAddIn_Shutdown method is executed when the user closes the Outlook. But it is important to say that in the current version, this method is not being called due to performance issues. However, if it's needed to perform some code when the Outlook is being closed, you can check this link for an alternative.
3.3. Application Object and the Others Model Objects
Next, we are going to see how to get others objects model. For this, we require to use the needed namespace:
using Outlook = Microsoft.Office.Interop.Outlook;
And it would be like this:
private void ThisAddIn_Startup(object sender, System.EventArgs e)
{
    // Get the Application object
    Outlook.Application application = this.Application;

    // Get the Inspector object
    Outlook.Inspectors inspectors = application.Inspectors;

    // Get the active Inspector object
    Outlook.Inspector activeInspector = application.ActiveInspector();
    if (activeInspector != null)
    {
        // Get the title of the active item when the Outlook start.
        MessageBox.Show("Active inspector: " + activeInspector.Caption);
    }

    // Get the Explorer objects
    Outlook.Explorers explorers = application.Explorers;

    // Get the active Explorer object
    Outlook.Explorer activeExplorer = application.ActiveExplorer();
    if (activeExplorer != null)
    {
        // Get the title of the active folder when the Outlook start.
        MessageBox.Show("Active explorer: " + activeExplorer.Caption);
    }
}
The other objects model can be obtained using the Inspector and Explorer objects. The how-to do it is generally event-based, for this reason, is necessary to subscribe to the events triggered by these two objects. It would be like this:
private void ThisAddIn_Startup(object sender, System.EventArgs e)
{
    // ...
    // Add a new Inspector to the application
    inspectors.NewInspector +=
        new Outlook.InspectorsEvents_NewInspectorEventHandler(
            Inspectors_AddTextToNewMail);
}
The Inspectors_AddTextToNewMail method is where would take place our functionality and it would be like this:
void Inspectors_AddTextToNewMail(Outlook.Inspector inspector)
{
}
The inspector param should be a reference to an email message or a contact, depending on the user action in the Outlook.
3.4. At the Project Ending
At the project ending, to remove the add-in from Outlook on the development computer, go to Build menu in Visual Studio and click on Clean Solution option.
3.5. How to Make An Installer
In Visual Studio, go to Build menu / "Publish...".
Remark: Sometimes, the installer generated by Visual Studio may fail when it is being installed in the user computer and you should get the following error message:
Quote:“The value of the property 'type' cannot be parsed. The error is: Could not load file or assembly …“.
To solve this error, check out this link and this link.
4. Basic Examples
In the following section, we are going to see some examples about creating a VSTO Add-in for Outlook 2013.
4.1. How to Handle a New Email Message
The following example takes place when the user creates a new email message and in this case, we'll put a custom text in the email subject and body. To accomplish it, in the ThisAddIn_Startup method, we need to register a new Inspector that when the user creates or open an email, this will call the Inspectors_AddTextToNewMail method.
private void ThisAddIn_Startup(object sender, System.EventArgs e)
{
    // Get the Application object
    Outlook.Application application = this.Application;

    // Add a new Inspector
    inspectors.NewInspector +=
        new Outlook.InspectorsEvents_NewInspectorEventHandler(
            Inspectors_AddTextToNewMail);
}

void Inspectors_AddTextToNewMail(Outlook.Inspector inspector)
{
    // Get the current item for this Inspecto object and check if is type
    // of MailItem
    Outlook.MailItem mailItem = inspector.CurrentItem as Outlook.MailItem;
    if (mailItem != null)
    {
        if (mailItem.EntryID == null)
        {
            mailItem.Subject = "My subject text";
            mailItem.Body = "My body text";
        }
    }
}
Remark: It's needed to check if the mailItem object is a type of MailItem class because when this event is triggered, by a user action in Outlook, we don't know which Inspector object will have been executed.
4.2. How to Handle an Email When It's Sent
The following example allows us to update an email message when it's sent, which is a very interesting and applicable functionality. There are Outlook add-ins that perform these type of operations, for example, the antivirus when they include a signature in the emails sent.
To accomplish it, we are going to subscribe our code to the ItemSend event, that it's triggered when an element is sent by the user or by a schedule operation.
private void ThisAddIn_Startup(object sender, System.EventArgs e)
{
    // Get the Application object
    Outlook.Application application = this.Application;

    // Subscribe to the ItemSend event, that it's triggered when an email is sent
    application.ItemSend +=
        new Outlook.ApplicationEvents_11_ItemSendEventHandler(
            ItemSend_BeforeSend);
}

void ItemSend_BeforeSend(object item, ref bool cancel)
{
    Outlook.MailItem mailItem = (Outlook.MailItem) item;
    if (mailItem != null)
    {
        mailItem.Body += "Modified by GettingStartedOutlookAddIn";
    }
    cancel = false;
}
4.3. How to Add a Control to the Ribbon Toolbar
In the following example, we'll see how to add controls to the ribbon (the toolbar) in Outlook. Specifically, how to add a button to the ribbon when the user edits or reads an email message.
Do the following:
- Add a new item to the project. In my case, I named it
RibbonDemo.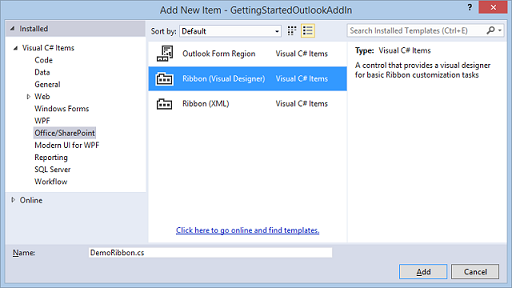
- In the ribbon designer, select the ribbon component and go to the Properties Window.
- Look for
RibbonTypeproperty and select the valuesMicrosoft.Outlook.Mail.ComposeandMicrosoft.Outlook.Mail.Read, which it refers to the ribbons of creating and reading email messages. - Let's set an appropriate name to the group. To accomplish it, select it and look for the
Labelproperty in the Property Window and type a name for it.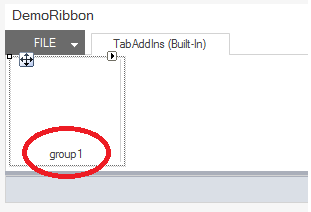
- Next, we add the button from the
ToolBoxand ready. - Optionally, using the
ControlSizeandShowImageproperties of the button, we can accomplish the Microsoft Office products' appearance.
What comes next is like any C# desktop application. Let's program the OnClick event of the button ButtonDemo and handle the email message.
private void buttonDemo_Click(object sender, RibbonControlEventArgs e)
{
    // Get the Application object
    Outlook.Application application = Globals.ThisAddIn.Application;

    // Get the active Inspector object and check if is type of MailItem
    Outlook.Inspector inspector = application.ActiveInspector();
    Outlook.MailItem mailItem = inspector.CurrentItem as Outlook.MailItem;
    if (mailItem != null)
    {
        MessageBox.Show("Subject: " + mailItem.Subject);
    }
}
5. Examples With Other Models
In the following section, we'll see examples where access is needed to other models.
Placing ourselves in context, when we are working with an email body, there are just a few functionalities we can perform using the Outlook objects, for example, accessing the Body properties of the MailItem object. But if it's needed to get more control over the email body, it's necessary to work with it as a Word document. Next, we'll see some examples about it.
Before Starting
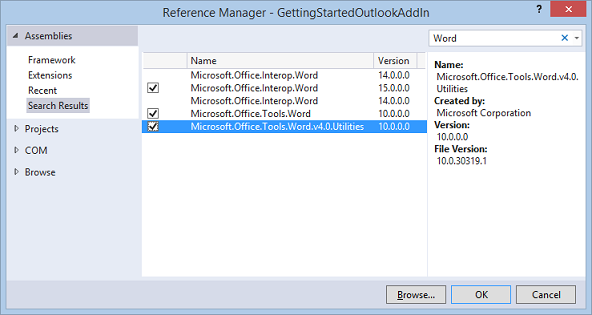
First, we'll see how to include the references to the Word Object Model from "Outlook 2013 and 2016 VSTO Add-in". It's important to select the same versions you're using in the Outlook application and also, select the references of tools and utilities.
In my case, I'm using the version 15.0.0.0 for Outlook.
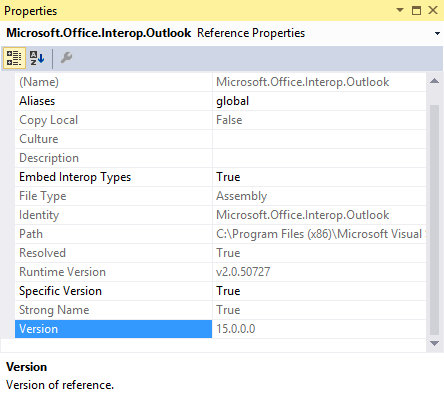
Therefore, we'll select the same versions of the Word references.
5.1. How to Get the Selected Text in an Email Message from a Button on the Ribbon
The following example takes place in the OnClick event of a button added to the Ribbon (see previous section 4.3. How to add a control to the Ribbon toolbar).
private void button2Demo_Click(object sender, RibbonControlEventArgs e)
{
    // Get the Application object
    Outlook.Application application = Globals.ThisAddIn.Application;

    // Get the active Inspector object and check if is type of MailItem
    Outlook.Inspector inspector = application.ActiveInspector();
    Outlook.MailItem mailItem = inspector.CurrentItem as Outlook.MailItem;
    if (mailItem != null)
    {
        Word.Document document = (Word.Document) inspector.WordEditor;
        string selectedText = document.Application.Selection.Text;
        MessageBox.Show(selectedText);
    }
}
The following picture takes place when the user is creating a new email. In this, we can see that the application shows a message with the text where the user has selected and clicked on the "Get text selected" button.

5.2. How to Subscribe to Events Over the Email Body
In the following example, we'll demonstrate how to subscribe our application to the mouse's events that the user performs over an email body. Specifically, we'll subscribe to events from the Word document (that it represent the email body) and when the user performs a double-click on the text, we'll get the word where the click was done.
We'll start from the application entry point and we'll create an Inspector object to monitor when the user creates/edits an email.
private void ThisAddIn_Startup(object sender, System.EventArgs e)
{
    // Get the Application object
    Outlook.Application application = this.Application;

    // Add a new Inspector
    inspectors.NewInspector +=
        new Outlook.InspectorsEvents_NewInspectorEventHandler(
            Inspectors_RegisterEventWordDocument);
}
With this Inspector, let's execute our code when the email editor is opened. At this time, we'll check that the Inspector object is a MailItem. Next, we'll check that the email editor is a Word editor (sometimes it is of another type) and, at last, we'll get the Word document object.
void Inspectors_RegisterEventWordDocument(Outlook.Inspector inspector)
{
    Outlook.MailItem mailItem = inspector.CurrentItem as Outlook.MailItem;
    if (mailItem != null)
    {
        // Check that the email editor is Word editor
        // Although "always" is a Word editor in Outlook 2013, it's best done perform this check
        if (inspector.EditorType == Outlook.OlEditorType.olEditorWord
            && inspector.IsWordMail())
        {
            // Get the Word document
            Word.Document document = inspector.WordEditor;
            if (document != null)
            {
                // Subscribe to the BeforeDoubleClick event of the Word document
                document.Application.WindowBeforeDoubleClick +=
                    new Word.ApplicationEvents4_WindowBeforeDoubleClickEventHandler(
                        ApplicationOnWindowBeforeDoubleClick);
            }
        }
    }
}
Next, we're going to subscribe to the BeforeDoubleClick event of the Word document that we got (in previous code) and when the event is triggered, we'll select the word where the user has clicked.
private void ApplicationOnWindowBeforeDoubleClick(Word.Selection selection,
ref bool cancel)
{
// Get the selected word
Word.Words words = selection.Words;
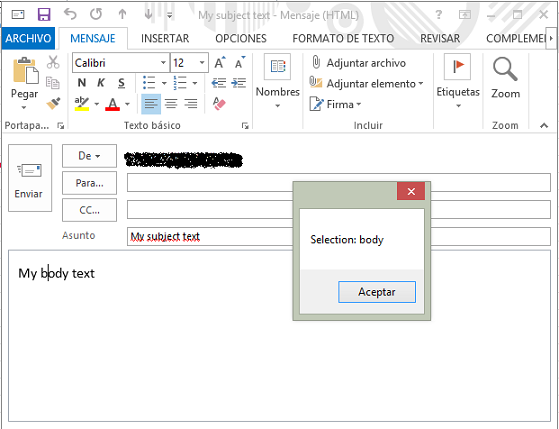
MessageBox.Show("Selection: " + words.First.Text);
}
We can get access to the user selected words by the selection object, which it has a lot of functionalities. In our example, using the Word property, we get a collection of all the selected words by the user and, the Firstproperty is where the user has clicked.
The following picture takes place when the user is creating a new email. In this, we can see that the application shows a message with the text where the user has done a double-click.
6. Conclusion
As can be seen, we can extend the Outlook functionalities in many ways and easily, using the VSTO Add-in tools. In my opinion, there're many requirements to this type of application in the enterprise sectors that resolve some kind of problems in a quick way, and also, usually the office users feel comfortable with Microsoft Office products than others applications. With VSTO Add-in, we can query databases to get employee's contacts, product list to include on emails, synchronize appointments between an enterprise application and the Outlook, and so on.
7. References
License
This article, along with any associated source code and files, is licensed under The Code Project Open License (CPOL)
posted on 2018-04-21 21:43 freeliver54 阅读(361) 评论(0) 编辑 收藏 举报


