
MoleHill Getting Started AGAL(转)
1.The OpCode
This is what AGAL looks like:
//vertex shader

m44 op, va0, vc0 // pos to clipspace

mov v0, va1 // copy uv

//pixel shader

tex ft1, v0, fs0 <2d,linear,nomip>

mov oc, ft1
Doesn’t it look like hieroglyphics? What’s the key to access it?
The problem is that AGAL is very little documented at this stage. Let me try to cast some light on this mysterious shading language.
Every line of the shader is a command, specified by a 3 character string called “opcode”.
The syntax of an AGAL code line is the following:
<opcode> <destination> <source 1> <source 2 or sampler>
This is the key. Keep this syntax in mind and AGAL will suddenly stop looking like an unreadable blob.
Following the opcode, depending on the command there can also be a destination, and one or two sources. The destination and the sources are “registers”: small memory areas in the GPU for use by shaders (more on registers below).
AGAL features about 30 different opcodes. The full list of available opcodes can be found in the Molehill documentation. Here are some of the most common opcodes.
mov move data from source1 to destination, component-wise
add destination = source1 + source2, component-wise
sub destination = source1 – source2, component-wise
mul destination = source1 * source2, component-wise
div destination = source1 / source2, component-wise
dp3 dot product (3 components) between source1 and source2
dp4 dot product (4 components) between source1 and source2
m44 multiplication between 4 components vector in source1 and 4×4 matrix in source2
tex texture sample. Load from texture at source2 at coordinates source1.
2.AGAL Registers
Registers are small memory areas in the GPU that AGAL programs (shaders) can use during their execution. Registers are used both for the sources and for the destination of AGAL commands.
You can also pass parameters to your shaders through these registers.
Each register is 128 bits wide, meaning it contains 4 floating point values. Each of these values is called a “component” of the register.
Register components can be accessed both with through the “coordinate” accessors (xyzw), and through the color accessors (rgba).
So, the first component of a register, can be accessed both with:
<register name>.x
and with:
<register name>.r
Some of the opcodes above, like “add”, perform their operations “component wise”. This means that the addition operation is performed component by component.
These are six types of registers available.
1. Attribute Registers
These registers reference to the input VertexBuffer of the vertex shader. Therefore they are only available in vertex shaders.
In order to assign a VertexBuffer to a specific attribute register, use the function Context3D:setVertexBufferAt(), with the proper index.
Then from the shader, access the attribute register with the syntax: va<n>, where <n> is the index number of the attribute register.
There are a total of 8 attribute registers available to vertex shaders.
2. Constant Registers
These registers serve the purpose of passing parameters from Actionscript to the shaders. This is done through the Context3D::setProgramConstants() family of functions.
These registers are accessed from the shader with the syntax: vc<n>, for vertex shaders, and fc<n> for pixel shaders, where <n> is the index number of the constant register.
There are 128 constant registers available to vertex shaders, and 28 constant registers for pixel shaders.
3. Temporary Registers
These registers are available to shaders, that can use them for temporary calculations.
They are accessed with the syntax vt<n> (vertex) and ft<n> (pixel) where <n> is the register number.
There are 8 of these available for vertex shaders, and 8 for pixel shaders.
4. Output Registers
The Output Registers are where vertex and pixel shaders store the output of their calculation. For vertex shaders this output is a clip space position of the vertex. For pixel shaders it is the color of the pixel.
These registers are accessed with the syntax op, for vertex shaders, and oc, for pixel shaders.
There is obviously only one output register for vertex and for pixel shaders.
5. Varying Registers
These registers are used to pass data from vertex shaders to pixel shaders. The data that is passed gets properly interpolated by the GPU, so that the pixel shader receives the correct value for the pixel that is being processed.
Typical data that gets passed in this way is the vertex color, or the UV coordinates for texturing.
These registers can be accessed with the syntax v<n>, where <n> is the register number.
There are 8 varying registers available.
6. Texture Samplers
The texture sampler register are used to pick color values from textures, based on UV coordinates.
The texture to be used is specified through Actionscript with the call Context3D::setTextureAt().
The syntax for using texture samples is: fs<n> <flags>, where <n> is the sampler index, and <flags> is a set of one or more flags that specifies how the sampling should be made.
<flags> is a comma separated set of strings, that defines:
texture dimension. Can be: 2d, 3d, cube
mip mapping. Can be: nomip, mipnone, mipnearest, mipnone
texture filtering. Can be: nearest, linear
texture repeat. Can be: repeat, wrap, clamp.
So, for example, a standard 2d texture without mip mapping, and linear filtering could be sampled into temporary register ft1, with the following line:
“tex ft1, v0, fs0 <2d,linear,nomip> “
where the varying register v0 would hold the interpolated texture UVs.
3.Basic Parts Of Molehill:
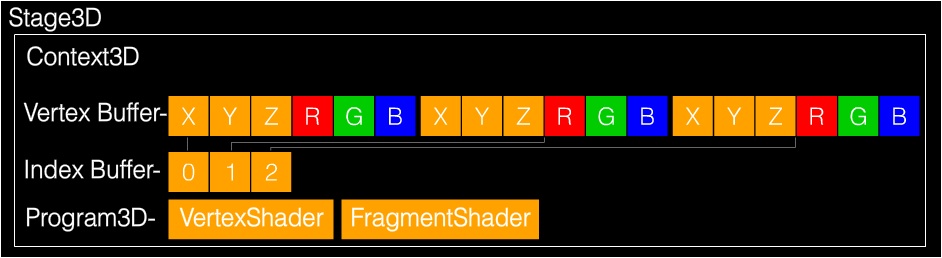
3.1.Stage3D
Stage3D is the part that sits in-between Flash and all the GPU goodness. Stage3D does not sit in the display list (you cannot do a addChild on a Stage3D object). Stage3D just exists in the same way that stage just exists. Stage3D sits behind all your regular flash content but in front for the new StageVideo.
3.2.Context3D
A Stage3D will contain a Context3D. Think of it this way... It’s almost the same as Bitmap contains BitmapData. You do not draw to Bitmap in the same way as you do not render stuff in Stage3D. All the work is done with BitmapData the same as Context3D
3.3.VertextBuffer3D
Context3D will contain VertexBuffer3D objects. Think of VertexBuffer3D as being “instructions” on what to draw and what it should look like. VertexBuffer3D will contain a Vector.<Number> (array of type Number) that will define vertex position and colour for each vertex. (more on that in a bit)
3.4.IndexBuffer3D
The IndexBuffer3D just like the VertexBuffer3D will contain a Vector. But instead of a Vector.<Number> it contains a Vector.<uint> which defines triangles in VertexBuffer3D. Think of it this way... VertexBuffer3D will contain a bunch of positions but IndexBuffer3D will determine what order those positions should be drawn. As a real world example VertexBuffer3D defines cities on a map then IndexBuffer3D will define what order to visit those cities.
3.5.Program3D
Program3D is a “program” that will run through the data in your VertexBuffer3D and “modify it”. Program3D contains two shaders (smaller programs) that will modify the position of every vertex and figure out what every pixel within a triangle should look like. The two smaller shaders or “programs” are called VertexShader and FragmentShader.
3.6.AGAL
AGAL is a very low level language. It’s used to write your VertexShaders and FragmentShaders. It’s the heart of MoleHill.
3.7.VertexShader
The VertexShader is a small program written in AGAL that will modify the Vertex positions within a triangle. For instance if you wanted to scale, rotate, or move your triangle you would use the VertexShader to do this.
3.8.FragmentShader
The FragmentShader is another small program written in AGAL that will modify the pixels in your triangle. For instance if you want to tint your entire triangle red you would write a small FragmentShader to do that
3.9.Quick diagram on how all the parts interrelate:
4. Using Molehill
When you use Molehill there are really two parts to your program:
* Setup
* Render
4.1.Things we want to do during Setup:
1. Get a Context3D instance from Stage3D
2. Setup the Context3D
3. Create an VertexBuffer
4. Create an IndexBuffer
5. Upload Initial Vertex Data to the VertexBuffer
6. Upload Initial Index Data to the IndexBuffer
7. “Compile” a VertexShader
8. “Compile” a FragmentShader
9. Create a Program3D which will use the above shaders
10. Add a ENTER_FRAME loop which will send data to the GPU
I know that’s a lot of stuff just to get this sucker setup but it’s not as bad as it sounds. Setup is WAY more complicated in my mind then the actual rendering.
4.2.Things we want to do during Render (ENTER_FRAME):
1. Clear the Context3D
2. Set the Program3D that will be using
3. Send the Vertex Buffer to Context3D
4. Setup data for you your shaders (variables)
5. Draw some triangles
6. Update the screen with your drawn triangles
5.Now let’s dig into source code.
The setup part described above is done in the function “onGotContext”. This is because in order to get the Context3D we have to request it and when it’s available Flash will send it to us.
The render part happens in the ENTER_FRAME function listener “onRenderLoop”.
Enjoy... I tried to write as many comments as possible in the code so you can follow along. I should note that this source code is based on Thibault Imbert’s blog post and this video.
import com.adobe.utils.*;

import flash.display.Bitmap;
import flash.display.Sprite;
import flash.display.StageAlign;
import flash.display.StageScaleMode;
import flash.display3D.*;
import flash.display3D.textures.Texture;
import flash.events.*;
import flash.events.Event;
import flash.geom.Matrix3D;
import flash.geom.Rectangle;
import flash.geom.Vector3D;
import flash.utils.Timer;
import flash.utils.getTimer;

[SWF(width="800", height="600", frameRate="60", backgroundColor="#FFFFFF")]
public class AgalSample extends Sprite
{
    [Embed( source = "RockSmooth.jpg" )]
    protected const TextureBitmap:Class;

    protected var context3D:Context3D;
    protected var vertexbuffer:VertexBuffer3D;
    protected var indexBuffer:IndexBuffer3D;
    protected var program:Program3D;
    protected var texture:Texture;

    public function AgalSample()
    {
        stage.stage3Ds[0].addEventListener( Event.CONTEXT3D_CREATE, initMolehill );
        stage.stage3Ds[0].requestContext3D();

        stage.scaleMode = StageScaleMode.NO_SCALE;
        stage.align = StageAlign.TOP_LEFT;

        addEventListener(Event.ENTER_FRAME, onRender);
    }

    protected function initMolehill(e:Event):void
    {
        context3D = stage.stage3Ds[0].context3D;

        context3D.configureBackBuffer(800, 600, 1, true);

        var vertices:Vector.<Number> = Vector.<Number>([
                                                -0.5,-0.5,0, 0, 0, // x, y, z, u, v
                                                -0.5, 0.5, 0, 0, 1,
                                                0.5, 0.5, 0, 1, 1,
                                                0.5, -0.5, 0, 1, 0]);

        // 4 vertices, of 5 Numbers each
        vertexbuffer = context3D.createVertexBuffer(4, 5);
        // offset 0, 4 vertices
        vertexbuffer.uploadFromVector(vertices, 0, 4);

        // total of 6 indices. 2 triangles by 3 vertices each
        indexBuffer = context3D.createIndexBuffer(6);

        // offset 0, count 6
        indexBuffer.uploadFromVector (Vector.<uint>([0, 1, 2, 2, 3, 0]), 0, 6);

        var bitmap:Bitmap = new TextureBitmap();

        texture=context3D.createTexture(bitmap.bitmapData.width, bitmap.bitmapData.height, Context3DTextureFormat.BGRA, false);
        texture.uploadFromBitmapData(bitmap.bitmapData);

        var vertexShaderAssembler : AGALMiniAssembler = new AGALMiniAssembler();
        vertexShaderAssembler.assemble( Context3DProgramType.VERTEX,
                                                "m44 op, va0, vc0\n" + // pos to clipspace
                                                "mov v0, va1" // copy uv
        );
        var fragmentShaderAssembler : AGALMiniAssembler= new AGALMiniAssembler();
        fragmentShaderAssembler.assemble( Context3DProgramType.FRAGMENT,
                                                "tex ft1, v0, fs0 <2d,linear,nomip>\n" +
                                                "mov oc, ft1"
        );

        program = context3D.createProgram();
        program.upload(vertexShaderAssembler.agalcode, fragmentShaderAssembler.agalcode);

    }

    protected function onRender(e:Event):void
    {
        if ( !context3D )
            return;

        context3D.clear ( 1, 1, 1, 1 );

        // vertex position to attribute register 0
        context3D.setVertexBufferAt (0, vertexbuffer, 0, Context3DVertexBufferFormat.FLOAT_3);
        // uv coordinates to attribute register 1
        context3D.setVertexBufferAt(1, vertexbuffer, 3, Context3DVertexBufferFormat.FLOAT_2);
        // assign texture to texture sampler 0
        context3D.setTextureAt(0, texture);
        // assign shader program
        context3D.setProgram(program);

        var m:Matrix3D = new Matrix3D();
        m.appendRotation( getTimer()/50, Vector3D.Z_AXIS);
        context3D.setProgramConstantsFromMatrix(Context3DProgramType.VERTEX, 0, m, true);

        context3D.drawTriangles(indexBuffer);

        context3D.present();
    }
}
原文:http://labs.jam3.ca/2011/03/molehill-getting-started/

