Spring 注入
- Spring注入
Spring Bean生命周期

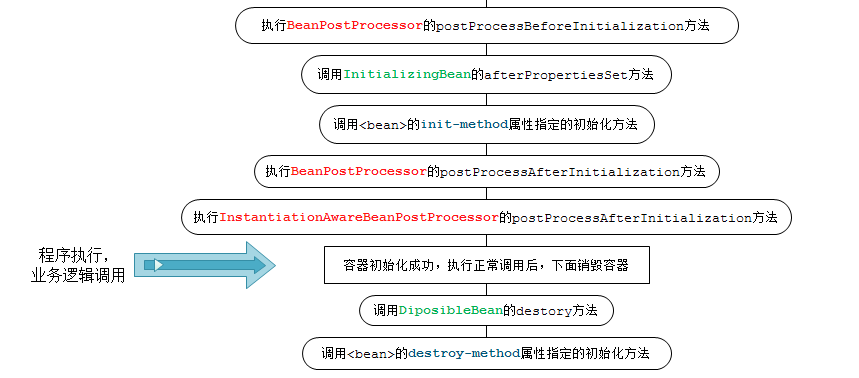
在Spring容器(BeanFactory)创建后,就需要开始了Bean创建。Bean创建又分为两个阶段:
1) 准备Bean定义
在所有的Bean创建之前,由BeanFactoryPostProcessor创建一个PlaceholderConfiguer(3.1之前是PropertyPlaceholderConfiguer,之后是PropertySourcesPlaceholderConfigurer)。这个PlaceholderConfiguer用于将Bean定义中引用的属性${}进行替换。
这个过程是在BeanFactoryPostProcessor#postProcessBeforeInstantation()中完成。
2)创建Bean并使用BeanPostProcessor对Bean进行注入
2.1在此阶段,因为需要对每一个新创建的Bean进行属性注入,所以 要先创建BeanPostProcessor对象,因为Spring要支持自动注入,所以最终创建的是一个AutowiredAnnotationBeanPostProcessor对象。
2.2接下来根据Bean定义一个一个的创建Bean。
2.2.1 在Bean对象创建完后,就使用AutowiredAnnotationBeanPostProcessor # postProcessPropertyValues() 进行注入。
这个过程其实是根据类中的@Autowired,@Value,@Inject,@Resource 进行注入。
注入的时候,必然会从BeanFactory中获取依赖,获取属性配置等。特别是在使用@Value的注入,还会触发Spring EL 解析,取值操作。
获取依赖值后,使用反射方式注入。
2.2.2 BeanPostProcessor#postProcessBeforeInitialization()
该过程调用的是 @PostConstruct
2.2.2 InitializingBean#afterProperties()
2.2.3 XML(init-method)
PlaceholderConfigurer
在Bean定义的准备阶段,会使用PlaceholderConfigurer对Bean定义中的占位符进行替换。
PlaceholderConfigurer目前有两个版本:Spring 3.1之前使用的是PropertyPlaceholderConfiguer,之后使用的是PropertySourcesPlaceholderConfigurer,后者比前者更具扩展性。
当你在applicationContext.xml中使用了<context:property-placeholder>时,Spring就会自动的根据applicationContext.xml中引用的spring-context-VERSION.xsd版本来自动创建实现。此外,不论使用哪种实现,都只会创建一个实例,所以配置多个会无效的。

PropertyPlaceholderConfigurer
PropertyPlaceholderConfigurer
    postProcessBeanFactory:
        // 把多个配置文件合并到一个Properties集合中。
        Properties mergedProps = mergeProperties();
        // Convert the merged properties, if necessary.
        convertProperties(mergedProps);
        // Let the subclass process the properties.
        processProperties(beanFactory, mergedProps):
            replace bean define 's placeholder
            当替换placeholder时,会从mergedProps 和(或)systemProperties中找对应的值。
            虽然默认是会从systemProperties找的,但是从systemProperties中找并不是必须的,
            如果不想从systemProperties中找,需要调用PropertyPlaceholderConfigurer#setSearchSystemEnvironment(false)
            如果会从systemProperties中找的话,
            顺序是:
            protected String resolvePlaceholder(String placeholder, Properties props, int systemPropertiesMode) {
                String propVal = null;
                if (systemPropertiesMode == 2) {
                    propVal = resolveSystemProperty(placeholder);
                }
                if (propVal == null) {
                    propVal = resolvePlaceholder(placeholder, props);
                }
                if (propVal == null && systemPropertiesMode == 1) {
                    propVal = resolveSystemProperty(placeholder); // 从系统属性找,不包含操作系统的环境变量
                }
                return propVal;
            }

            systemPropertiesMode 的默认值是1,即默认是 配置文件优先,然后才是systemProperties
支持:指定location, system properties, OS environment variables。
PropertySourcePlaceholderConfigurer
从3.1开始,在applicationContext.xml中指定<context:property-placeholder>,不会再生成PropertyPlaceholderConfigurer对象了,而是生成
PropertySourcesPlaceholderConfigurer对象。
这两个类的作用是一样的,都是用来替换 bean define中的占位符的。而PropertySourcesPlaceholderConfigurer的大概结构是:
class PropertySourcesPlaceholderConfigurer {
    private Properties localProperties;
    private Resource[] locations;
    private boolean localOverride = false; // 默认是false
    private Environment environment;
    private PropertySources propertySources;

    public void postProcessBeanFactory(ConfigurableListableBeanFactory beanFactory) throws BeansException {
        if (this.propertySources == null) {
                // 创建propertySources
            this.propertySources = new MutablePropertySources();
            // 把Environment添加到 propertySources
            // Environment 默认包括:command line arguments, systemProperties, environment variables
            if (this.environment != null) {
                this.propertySources.addLast(
                    new PropertySource<Environment>(ENVIRONMENT_PROPERTIES_PROPERTY_SOURCE_NAME, this.environment) {
                        @Override
                        public String getProperty(String key) {
                            return this.source.getProperty(key);
                        }
                    }
                );
            }
            try {
                // localPropertySource 是  localProperties 与 locations 合并的产物,具体参见mergeProperties()
                // 如果localOverride ==true, 则 localPropertySource 优先于 Environment ,
                // 否则 Environment 优先于 localPropertySource,
                PropertySource<?> localPropertySource =
                    new PropertiesPropertySource(LOCAL_PROPERTIES_PROPERTY_SOURCE_NAME, mergeProperties());
                if (this.localOverride) {
                    this.propertySources.addFirst(localPropertySource);
                }
                else {
                    this.propertySources.addLast(localPropertySource);
                }
            }
            catch (IOException ex) {
                throw new BeanInitializationException("Could not load properties", ex);
            }
        }

        // 替换占位符
        processProperties(beanFactory, new PropertySourcesPropertyResolver(this.propertySources));
    }

    protected Properties mergeProperties() throws IOException {
        Properties result = new Properties();

        if (this.localOverride) {
            // Load properties from file upfront, to let local properties override.
            loadProperties(result);
        }

        if (this.localProperties != null) {
            for (Properties localProp : this.localProperties) {
                CollectionUtils.mergePropertiesIntoMap(localProp, result);
            }
        }

        if (!this.localOverride) {
            // Load properties from file afterwards, to let those properties override.
            loadProperties(result);
        }

        return result;
    }
}
引入了PropertySource, Environment的概念。一个PropertySource可以是一个Properties对象,可以是一个.properties文件等,java的系统属性、操作系统的环境变量、Java程序的command line 参数等,都可以视为一个PropertSource。
每一个PropertySource都有一个名字,作为整个PropertySource的标识。
Environment提供了一个运行环境的概念,特别是在Spring Boot中,将其运用的出神入化。它其实又是多个PropertySource的集合。
StandardEnvironment中,会将系统属性和操作系统环境分别转换为一个PropertySource,作为内置。
其中系统属性被转为名为systemProperties的PropertySource,环境变量被转为systemEnvironment的PropertySource。
SpringEL访问
Spring中的表达式可以分为两大类:\${}, #{}。其中 \${}就是上面通过PlaceholerConfiger进行替换的。而#{}则是Spring的EL系统,它类似于OGNL等。
SpringEL是建立在Spring容器之上的,所以在解析SpringEL时,必然会支持要对容器、环境配置的访问。
一个Spring EL的解析是由StandardBeanExpressionResolver来完成的:
StandardBeanExpressionResolver#evaluate :
    它内部由一堆的PropertyAccessor, 由这些属性访问器来从对象导航读取值
    取值顺序:
        1)ReflectivePropertyAccessor ,且它是优先使用getter, setter, 找不到才是 通过field反射。可以对对象的字段进行read-write
        2)BeanExpressionContextAccessor 从Spring EL的 context(也就是BeanExpressionContext)获取, read-only
        3)BeanFactoryAccessor    从BeanFactory(Spring Bean 容器)获取依赖等
        4)MapAccessor 访问Java.util.Map 对象,基于key来读取值
        5)EnvironmentAccessor 访问Spring Environment ,从Environment读取值
和${}一样,#{}既可以在xml中使用,也可以在@Value中使用。
上面已经说了@Value会在Bean创建后注入属性时使用到,那么也就是说在注入属性时会触发Spring EL的解析。
想要了解更多SpEL,参见:
https://docs.spring.io/spring/docs/4.3.19.BUILD-SNAPSHOT/spring-framework-reference/htmlsingle/#expressions
作者: 房继诺
出处:http://www.cnblogs.com/f1194361820
版权:本文版权归作者和博客园共有
欢迎转载,转载请需要注明博客出处
技术交流QQ:1194361820,加好友请注明:来自博客园,不要说你是博客园,也可以扫描图像二维码直接加我。