

Dubbo实现RPC调用使用入门
使用Dubbo进行远程调用实现服务交互,它支持多种协议,如Hessian、HTTP、RMI、Memcached、Redis、Thrift等等。由于Dubbo将这些协议的实现进行了封装了,无论是服务端(开发服务)还是客户端(调用服务),都不需要关心协议的细节,只需要在配置中指定使用的协议即可,从而保证了服务提供方与服务消费方之间的透明。
另外,如果我们使用Dubbo的服务注册中心组件,这样服务提供方将服务发布到注册的中心,只是将服务的名称暴露给外部,而服务消费方只需要知道注册中心和服务提供方提供的服务名称,就能够透明地调用服务,后面我们会看到具体提供服务和消费服务的配置内容,使得双方之间交互的透明化。
示例场景
我们给出一个示例的应用场景:
服务方提供一个搜索服务,对服务方来说,它基于SolrCloud构建了搜索服务,包含两个集群,ZooKeeper集群和Solr集群,然后在前端通过Nginx来进行反向代理,达到负载均衡的目的。
服务消费方就是调用服务进行查询,给出查询条件(满足Solr的REST-like接口)。
应用设计
基于上面的示例场景,我们打算使用ZooKeeper集群作为服务注册中心。注册中心会暴露给服务提供方和服务消费方,所以注册服务的时候,服务先提供方只需要提供Nginx的地址给注册中心,但是注册中心并不会把这个地址暴露给服务消费方,如图所示:
我们先定义一下,通信双方需要使用的接口,如下所示:
package org.shirdrn.platform.dubbo.service.rpc.api;
public interface SolrSearchService {
    String search(String collection, String q, ResponseType type, int start, int rows);

    public enum ResponseType {
        JSON,
        XML
    }
}
基于上图中的设计,下面我们分别详细说明Provider和Consumer的设计及实现。
- Provider服务设计
Provider所发布的服务组件,包含了一个SolrCloud集群,在SolrCloud集群前端又加了一个反向代理层,使用Nginx来均衡负载。Provider的搜索服务系统,设计如下图所示: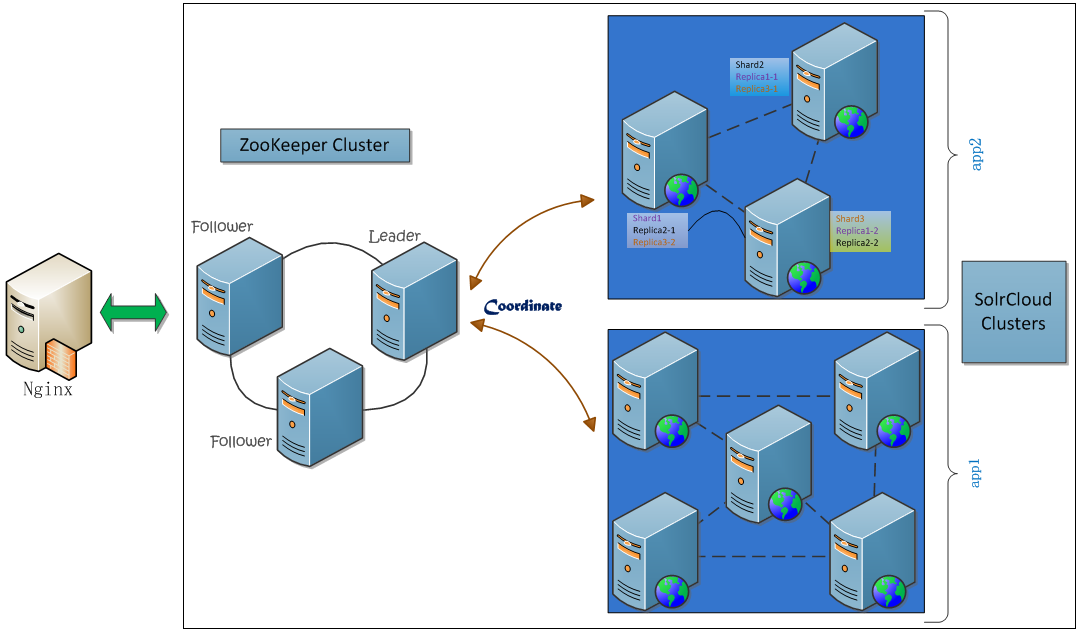
上图中,实际Nginx中将请求直接转发内部的Web Servers上,在这个过程中,使用ZooKeeper来进行协调:从多个分片(Shard)服务器上并行搜索,最后合并结果。我们看一下Nginx配置的内容片段:
user  nginx;
worker_processes  4;
error_log  /var/log/nginx/error.log warn;
pid        /var/run/nginx.pid;
events {
   worker_connections  1024;
}

http {
  include       /etc/nginx/mime.types;
  default_type  application/octet-stream;
  log_format  main  '$remote_addr - $remote_user [$time_local] "$request" '
                    '$status $body_bytes_sent "$http_referer" '
                    '"$http_user_agent" "$http_x_forwarded_for"';

  access_log  /var/log/nginx/access.log  main;

  sendfile        on;
  #tcp_nopush     on;
  keepalive_timeout  65;

  #gzip  on;

  upstream master {
      server slave1:8888 weight=1;
      server slave4:8888 weight=1;
      server slave6:8888 weight=1;
  }

  server {
      listen 80;
      server_name master;
      location / {
          root /usr/share/nginx/html/solr-cloud;
          index  index.html index.htm;
          proxy_pass   http://master;
          include /home/hadoop/servers/nginx/conf/proxy.conf;
      }
  }

}
一共配置了3台Solr服务器,因为SolrCloud集群中每一个节点都可以接收搜索请求,然后由整个集群去并行搜索。最后,我们要通过Dubbo服务框架来基于已有的系统来开发搜索服务,并通过Dubbo的注册中心来发布服务。
首先需要实现服务接口,实现代码如下所示:
package org.shirdrn.platform.dubbo.service.rpc.server;

import java.io.IOException;
import java.util.HashMap;
import java.util.Map;
import org.apache.commons.logging.Log;
import org.apache.commons.logging.LogFactory;
import org.shirdrn.platform.dubbo.service.rpc.api.SolrSearchService;
import org.shirdrn.platform.dubbo.service.rpc.utils.QueryPostClient;
import org.springframework.context.support.ClassPathXmlApplicationContext;
public class SolrSearchServer implements SolrSearchService {
  private static final Log LOG = LogFactory.getLog(SolrSearchServer.class);
  private String baseUrl;
  private final QueryPostClient postClient;
  private static final Map<ResponseType, FormatHandler> handlers = new HashMap<ResponseType, FormatHandler>(0);

  static {
      handlers.put(ResponseType.XML, new FormatHandler() {
          public String format() {
              return "&wt=xml";
          }
      });

      handlers.put(ResponseType.JSON, new FormatHandler() {
          public String format() {
              return "&wt=json";
          }
      });
  }


  public SolrSearchServer() {
      super();
      postClient = QueryPostClient.newIndexingClient(null);
  }

  public void setBaseUrl(String baseUrl) {
     this.baseUrl = baseUrl;
  }

  public String search(String collection, String q, ResponseType type,
          int start, int rows) {
      StringBuffer url = new StringBuffer();
      url.append(baseUrl).append(collection).append("/select?").append(q);
      url.append("&start=").append(start).append("&rows=").append(rows);
      url.append(handlers.get(type).format());
      LOG.info("[REQ] " + url.toString());
      return postClient.request(url.toString());
  }


  interface FormatHandler {
      String format();
  }


  public static void main(String[] args) throws IOException {
      String config = SolrSearchServer.class.getPackage().getName().replace('.', '/') + "/search-provider.xml";
      ClassPathXmlApplicationContext context = new ClassPathXmlApplicationContext(config);
      context.start();
      System.in.read();

  }

}
对应的Dubbo配置文件为search-provider.xml,内容如下所示:
<?xml version="1.0" encoding="UTF-8"?>
<beans xmlns="http://www.springframework.org/schema/beans"
    xmlns:xsi="http://www.w3.org/2001/XMLSchema-instance" xmlns:dubbo="http://code.alibabatech.com/schema/dubbo"

  xsi:schemaLocation="http://www.springframework.org/schema/beans http://www.springframework.org/schema/beans/spring-beans-2.5.xsd

  http://code.alibabatech.com/schema/dubbo http://code.alibabatech.com/schema/dubbo/dubbo.xsd">

  <dubbo:application name="search-provider" />
  <dubbo:registry address="zookeeper://slave1:2188?backup=slave3:2188,slave4:2188" />
  <dubbo:protocol name="dubbo" port="20880" />
  <bean id="searchService" class="org.shirdrn.platform.dubbo.service.rpc.server.SolrSearchServer">
      <property name="baseUrl" value="http://nginx-lbserver/solr-cloud/" />
  </bean>
  <dubbo:service interface="org.shirdrn.platform.dubbo.service.rpc.api.SolrSearchService" ref="searchService" />

</beans>
上面,Dubbo服务注册中心指定ZooKeeper的地址:zookeeper://slave1:2188?backup=slave3:2188,slave4:2188,使用Dubbo协议。配置服务接口的时候,可以按照Spring的Bean的配置方式来配置,注入需要的内容,我们这里指定了搜索集群的Nginx反向代理地址http://nginx-lbserver/solr-cloud/。
- Consumer调用服务设计
这个就比较简单了,拷贝服务接口,同时要配置一下Dubbo的配置文件,写个简单的客户端调用就可以实现。客户端实现的Java代码如下所示:
package org.shirdrn.platform.dubbo.service.rpc.client;

import java.util.concurrent.Callable;
import java.util.concurrent.Future;
import org.shirdrn.platform.dubbo.service.rpc.api.SolrSearchService;
import org.shirdrn.platform.dubbo.service.rpc.api.SolrSearchService.ResponseType;
import org.springframework.beans.BeansException;
import org.springframework.context.support.AbstractXmlApplicationContext;
import org.springframework.context.support.ClassPathXmlApplicationContext;
import com.alibaba.dubbo.rpc.RpcContext;

public class SearchConsumer {


  private final String collection;

  private AbstractXmlApplicationContext context;

  private SolrSearchService searchService;

  public SearchConsumer(String collection, Callable<AbstractXmlApplicationContext> call) {
      super();
      this.collection = collection;
      try {
          context = call.call();
          context.start();
          searchService = (SolrSearchService) context.getBean("searchService");
      } catch (BeansException e) {
          e.printStackTrace();
      } catch (Exception e) {
          e.printStackTrace();
      }
  }

  public Future<String> asyncCall(final String q, final ResponseType type, final int start, final int rows) {
      Future<String> future = RpcContext.getContext().asyncCall(new Callable<String>() {
          public String call() throws Exception {
              return search(q, type, start, rows);
          }
      });

      return future;
  }


  public String syncCall(final String q, final ResponseType type, final int start, final int rows) {
      return search(q, type, start, rows);
  }

  private String search(final String q, final ResponseType type, final int start, final int rows) {
      return searchService.search(collection, q, type, start, rows);
  }


  public static void main(String[] args) throws Exception {
      final String collection = "tinycollection";
      final String beanXML = "search-consumer.xml";
      final String config = SearchConsumer.class.getPackage().getName().replace('.', '/') + "/" + beanXML;
      SearchConsumer consumer = new SearchConsumer(collection, new Callable<AbstractXmlApplicationContext>() {
          public AbstractXmlApplicationContext call() throws Exception {
              final AbstractXmlApplicationContext context = new ClassPathXmlApplicationContext(config);
              return context;
          }
      });

      String q = "q=上海&fl=*&fq=building_type:1";
      int start = 0;
      int rows = 10;
      ResponseType type  = ResponseType.XML;
      for (int k = 0; k < 10; k++) {
          for (int i = 0; i < 10; i++) {
              start = 1 * 10 * i;
              if(i % 2 == 0) {
                  type = ResponseType.XML;
              } else {
                  type = ResponseType.JSON;
              }
              String result = consumer.syncCall(q, type, start, rows);
              System.out.println(result);
              Future<String> future = consumer.asyncCall(q, type, start, rows);
              System.out.println(future.get());
          }
      }
  }

}
查询的时候,需要提供查询字符串,符合Solr语法,例如“q=上海&fl=*&fq=building_type:1”。配置文件,我们使用search-consumer.xml,内容如下所示:
<?xml version="1.0" encoding="UTF-8"?>
<beans xmlns="http://www.springframework.org/schema/beans"
  xmlns:xsi="http://www.w3.org/2001/XMLSchema-instance" xmlns:dubbo="http://code.alibabatech.com/schema/dubbo"
  xsi:schemaLocation="http://www.springframework.org/schema/beans http://www.springframework.org/schema/beans/spring-beans-2.5.xsd
  http://code.alibabatech.com/schema/dubbo http://code.alibabatech.com/schema/dubbo/dubbo.xsd">

  <dubbo:application name="search-consumer" />
  <dubbo:registry address="zookeeper://slave1:2188?backup=slave3:2188,slave4:2188" />
  <dubbo:reference id="searchService" interface="org.shirdrn.platform.dubbo.service.rpc.api.SolrSearchService" />
</beans>
运行说明
首先保证服务注册中心的ZooKeeper集群正常运行,然后启动SolrSearchServer,启动的时候直接将服务注册到ZooKeeper集群存储中,可以通过ZooKeeper的客户端脚本来查看注册的服务数据。一切正常以后,可以启动运行客户端SearchConsumer,调用SolrSearchServer所实现的远程搜索服务。
http://shiyanjun.cn/archives/341.html

