iOS动画案例(1) 仿qq账号信息里的一个动画
受人所托,模仿qq账号信息里的一个动画,感觉挺有意思,也没感觉有多难,就开始做了,结果才发现学的数学知识都还给体育老师了,研究了大半天才做出来。
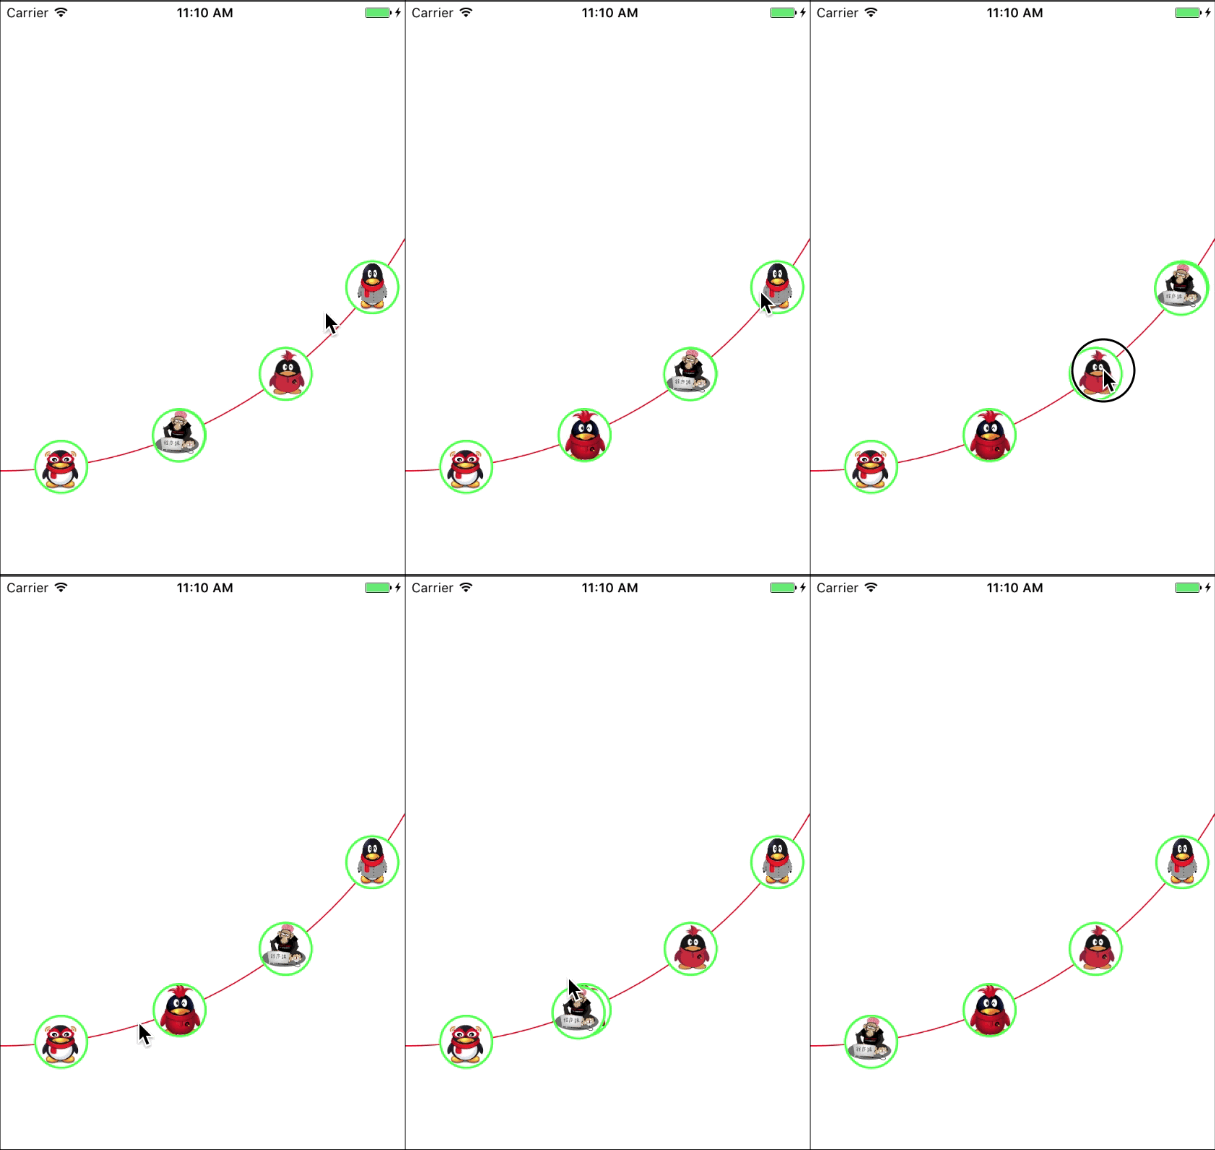
先看一下动画效果:

用到的知识点:
(1)三角函数
(2)CALayer
(3)CATransaction
(4)UIBezierPath
(5)CAKeyframeAnimation
(6)CAAnimationGroup

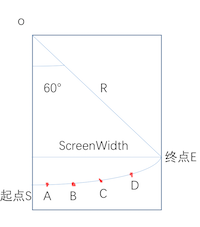
如图,这明显是一段圆弧,那么要确定这段一段圆弧的位置,就得确定这段圆弧的圆心和圆心角。我规定圆心在手机屏幕的左顶点,也就是(0,0),圆心角为60°。别问我为什么这么确定,我也是一点点尝试的。我们先设手机屏幕的宽度为 ScreenWidth,圆弧半径为R;那么R = ScreenWidth/cos(60°);知道了这些开始画圆弧。
    // 屏幕的宽度
    CGFloat width = [UIScreen mainScreen].bounds.size.width;
    // 圆半径
    float r = 2 * width / sqrt(3);
    // 画曲线
    UIColor *color = [UIColor redColor];
    [color set];
    UIBezierPath *path = [UIBezierPath bezierPathWithArcCenter:CGPointMake(0, 0) radius:r startAngle:M_PI / 2 endAngle:M_PI / 6 clockwise:NO];
    path.lineWidth = 1.0;
    path.lineCapStyle = kCGLineCapRound;
    path.lineJoinStyle = kCGLineJoinRound;
    [path stroke];
确定了圆心角和半径就要确定ABCD四个点的坐标了,分别作为四张图片的圆心。圆弧SA和圆弧DE的圆心角一样,设定为7.5°,那么弧AB、弧BC、弧CD的圆心角设定为相等,分别为(60 - 7.5 * 2)/ 3 = 15°。那么A点的坐标就等于(R * sin7.5,R * cos7.5°);B,C,D点的坐标一样用三角函数求,分别为(R * sin22.5,R * cos22.5°),(R * sin37.5,R * cos37.5°),(R * sin52.5,R * cos52.5°)。ABCD其实都是一个按钮,下面开始放按钮。
// 放图片
    for (int i = 0; i < 4; i++) {

        // 一共四个按钮 从左到右index分别为0,1,2,3
        UIButton *button = [UIButton buttonWithType:UIButtonTypeCustom];
        button.frame = [self getButtonFrame:i];
        button.tag = i + 1;
        [button addTarget:self action:@selector(buttonClick:) forControlEvents:UIControlEventTouchUpInside];
        [button setImage:[UIImage imageNamed:[NSString stringWithFormat:@"%d",i + 1]] forState:UIControlStateNormal];
        // 设置按钮为圆
        button.layer.cornerRadius = 25;
        button.layer.borderColor = [UIColor greenColor].CGColor;
        button.layer.masksToBounds = YES;
        button.layer.borderWidth = 2.0f;
        [self addSubview:button];
    }
    // 根据Index确定按钮的坐标
    - (CGRect)getButtonFrame: (int) index {

    float radians = M_PI * (7.5 + 15 * index) / 180;
    CGFloat width = [UIScreen mainScreen].bounds.size.width;
    float r = 2 * width / sqrt(3);
    CGRect frame = CGRectMake(sin(radians) * r, cos(radians) * r, 50, 50);
    frame.origin.x = frame.origin.x - 25;
    frame.origin.y = frame.origin.y - 25;
    return frame;
 }
头像默认放第一个。
    self.head = [[UIImageView alloc] initWithFrame:[self getButtonFrame:0]];
    self.head.image = [UIImage imageNamed:@"myHead"];
    self.head.layer.borderColor = [UIColor greenColor].CGColor;
    self.head.layer.masksToBounds = YES;
    self.head.layer.cornerRadius = 25;
    self.head.layer.borderWidth = 2.0f;
    [self addSubview:self.head];
之后按钮点击之后,头像移动到按钮点击的地方。
// 按钮点击事件
- (void)buttonClick:(UIButton *)button {

    // 原来图片所在按钮的index
    int preIndex = [self getPreviousIndexByFrame:self.head.frame];
    int buttonIndex = (int)button.tag - 1;
    // 点击图片所在按钮 不做任何操作
    if (preIndex == buttonIndex) {
        return;
    }
    CGFloat width = [UIScreen mainScreen].bounds.size.width;
    float r = 2 * width / sqrt(3);
    //加入动画效果
    CALayer *transitionLayer = [[CALayer alloc] init];
    //显式事务默认开启动画效果,kCFBooleanTrue关闭 保证begin和commit 之间的属性修改同时进行
    transitionLayer.contents = self.head.layer.contents;
    transitionLayer.borderColor = [UIColor greenColor].CGColor;
    transitionLayer.masksToBounds = YES;
    transitionLayer.cornerRadius = 25;
    transitionLayer.borderWidth = 2.0f;
    transitionLayer.frame = self.head.frame;
    transitionLayer.backgroundColor=[UIColor blueColor].CGColor;
    [self.layer addSublayer:transitionLayer];

    self.head.hidden = YES;

    UIBezierPath *movePath;
    //路径曲线 贝塞尔曲线
    if (buttonIndex > preIndex) {
        // 向上滑 逆时针
        movePath = [UIBezierPath bezierPathWithArcCenter:CGPointMake(0, 0) radius:r startAngle:[self getAnticlockwiseByIndex:preIndex] endAngle:[self getAnticlockwiseByIndex:buttonIndex] clockwise:NO];
        [movePath moveToPoint:transitionLayer.position];
    }else {
        // 向下滑 顺时针
        movePath = [UIBezierPath bezierPathWithArcCenter:CGPointMake(0, 0) radius:r startAngle:[self getClockwiseAngleByIndex:preIndex] endAngle:[self getClockwiseAngleByIndex:buttonIndex] clockwise:YES];
        [movePath moveToPoint:transitionLayer.position];
    }
    //关键帧动画效果
    CAKeyframeAnimation *positionAnimation = [CAKeyframeAnimation animationWithKeyPath:@"position"];
    // 动画轨迹
    positionAnimation.path = movePath.CGPath;
    // 动画完成之后是否删除动画效果
    positionAnimation.removedOnCompletion = NO;
    // 设置开始的时间
    positionAnimation.beginTime = CACurrentMediaTime();
    CGFloat time =  0.7;
    if (labs(buttonIndex - preIndex) > 1) {
        time = 0.4 * labs(buttonIndex - preIndex);

    }
    //动画总时间
    positionAnimation.duration = time;
    // 动画的方式 淡入淡出
    positionAnimation.timingFunction=[CAMediaTimingFunction functionWithName:kCAMediaTimingFunctionEaseOut];
    // 执行完之后保存最新的状态
    positionAnimation.fillMode = kCAFillModeForwards;
    // 动画完成之后,是否回到原来的地方
    positionAnimation.autoreverses= NO;

    [transitionLayer addAnimation:positionAnimation forKey:@"opacity"];
    [CATransaction setCompletionBlock:^{
        [NSThread sleepForTimeInterval:time];
        self.head.hidden = NO;
        self.head.frame = button.frame;
        [transitionLayer removeFromSuperlayer];
    }];
}
// 根据Index获得顺时针的弧度
- (float)getAnticlockwiseByIndex: (NSInteger)index {

    return M_PI * (0.5  - (7.5 + 15 * index) / 180);
}
// 根据Index获得逆时针的弧度
- (float)getClockwiseAngleByIndex: (NSInteger)index {

    index = 3 - index;
    return M_PI * (30 + 7.5 + 15 * index) / 180;
}
这个动画的难点其实是确定四个按钮的坐标以及圆弧的半径,主要是学的数学都忘的差不多了,还好重新捡起来还算不难。GitHub下载地址,欢迎下载。
作者:豆丶浆油条
本文版权归作者和博客园共有,欢迎转载,但未经作者同意必须保留此段声明,且在文章页面明显位置给出原文连接,否则保留追究法律责任的权利。


