使用react全家桶制作博客后台管理系统 网站PWA升级 移动端常见问题处理 循序渐进学.Net Core Web Api开发系列【4】:前端访问WebApi [Abp 源码分析]四、模块配置 [Abp 源码分析]三、依赖注入
使用react全家桶制作博客后台管理系统

前面的话
笔者在做一个完整的博客上线项目,包括前台、后台、后端接口和服务器配置。本文将详细介绍使用react全家桶制作的博客后台管理系统
概述
该项目是基于react全家桶(React、React-router-dom、redux、styled-components)开发的一套博客后台管理系统,用于前端小站的管理,主要功能包括游客浏览、文章管理、类别管理、评论通知、推荐设置和用户管理
【访问地址】
域名:https://admin.xiaohuochai.cc
Github: https://github.com/littlematch0123/blog-admin
或者可以直接扫描二维码访问

采用移动优先的响应式布局,移动端、桌面端均可适配;字体大小使用em单位,桌面端的文字相应变大;移动端大量使用滑屏操作,桌面端通过光标设置、自定义滚动条、回车确定等,提升交互体验
根据HTML标签内容模型,使用语义化标签,尽量减少标签层级,尽量使用React.Fragment来代替div
采用统一的色调处理,除了黑白两色外,所有页面共使用了8种颜色,保证了页面颜色素雅、统一
使用service worker实现了离线缓存,配置了robots,禁止搜索引擎抓取页面
使用styled-components插件,实现css in JS。所有图标资源均采用svg格式,并存储到common/BaseImg组件中,方便管理,图片资源均上传到七牛云图床,使用外链访问。最终,html、css、image都使用js管理
没有引用第三方组件库,如bootstrap或蚂蚁设计,而是自己开发了项目中所需的公共组件。在common目录下,封装了头像、筛选框、全屏、loading、遮罩、搜索框、滑屏、联动选择等组件,方便开发
功能组件按照功能(Post、Comment...)而不是角色(controllers、models、views)分类,将展示组件component和容器组件container整合为一个文件
状态管理借鉴了vuex的管理模式,action-types、action、reducer、selecter、state整合到每个模块目录的module.js文件下。为了方便扩展,所有的state都设置了filter字段
使用配置数据,实现了数据和应用分离,配置数据包括API调用地址和颜色值,以常量的形式存储在constants目录下
使用esLint规范JS代码,代码风格参照airbnb规范,所有命名采用驼峰写法,公共组件以Base为前缀,函数大多以get或set为前缀,事件函数以on为前缀,异步函数以async为后缀,布尔值基本以do或is为前缀
使用styleLint规范CSS代码,按照布局类属性、盒模型属性、文本类属性、修饰类属性的顺序编写代码,并使用order插件进行校验
使用react最新版本的方法,包括createRef()、getDerivedStateFromProps生命周期、 React.Fragment语法糖等
进行了代码优化,包括减少请求数量(文件合并 、小图片使用Base64、使用301而不是302重定向、静态资源使用强缓存、接口资源使用协商缓存、使用离线缓存、长缓存优化、CSS内联),减小资源大小(文件压缩、andriod下使用webp格式图片、开启gzip),优化网络连接(使用DNS预解析、使用keep-alive持久连接、使用HTTP2管道化连接),优化资源加载(优化资源加载位置、图片懒加载),减少重绘回流(减少兄弟选择器、动画元素硬件渲染、使用函数节流、及时清理环境)
该项目的一个隐藏彩蛋是摇一摇功能,可以直接摇到前台页面,当然也可以再摇回来
最终优化评分如下所示

功能演示
功能主要包括游客浏览、评论通知、用户管理、推荐设置、文章管理和类别管理
【游客浏览】
在没有管理员帐号的情况下,可以点击游客浏览进入后台。但是,游客只有浏览权限,没有操作权限

【评论通知】
有新评论未查看时,右上角快捷菜单上会出现评论通知的按钮。查看评论后,通知按钮消失

【用户管理】
用户管理包括查看所有用户信息、查看用户点赞情况、查看用户评论情况、按用户名拼音排序、按点赞数排序、按评论数排序以及设置用户状态

【推荐管理】
推荐管理包括文章推荐和专题推荐两类
1、文章推荐
文章推荐的功能包括更改推荐文章、更改背景图和更改次序

2、专题推荐
专题推荐的功能包括更改推荐专题、更改专题说明和更改次序

【文章管理】
文章管理包括文章筛选、文章搜索、新建文章、编辑文章、删除文章、设置配图、查看点赞等功能
1、文章筛选
初始页显示全部文章,设置类别后,只显示筛选后的文章,文章查阅完成后,可返回文章筛选页

2、文章搜索
初始页只显示搜索框,设置搜索词后,显示出相关文章,但每次只显示16篇,下拉刷新后,可继续显示。文章查阅完成后,可返回文章搜索页

3、新建文章

4、编辑文章

5、设置配图

6、查看点赞和评论并删除文章

【类别管理】
类别管理包括查看类别、添加类别、编辑类别、删除类别

目录结构
src目录下,包括assets(静态资源)、common(公共组件)、components(功能组件)、constants(常量配置)、store(redux)和utils(工具方法)这6个目录

- assets // 存放静态资源,包括通用CSS和图片
    global.css // 全局CSS
    login_bg.jpg // 登录框背景图
- common // 存放公共组件
    BaseArticle.js // 文章组件
    BaseAvatar.js // 头像组件
    ...
- components // 存放功能组件
    Category // 类别组件
      AddCategory.js // 类别添加组件
      DeleteCategory.js // 类别删除组件
      UpdateCategory.js // 类别更新组件
      Category.js // 类别路由组件
      CategoryForm.js // 类别基础组件
      CategoryItem.js // 类别项组件
      CategoryItemList.js // 类别列表组件
      CategoryRootList.js // 类别根列表组件
      module.js //类别状态管理
      ...
- constants // 存放常量配置
    API.js // 存放API调用地址
    Colors.js // 存放颜色值
- store // 存放redux
    index.js
- utils // 存放工具方法
    async.js // fetch方法
    history.js // 路由方法
    util.js // 其他工具方法
【公共组件】
没有引用第三方组件库,如bootstrap或蚂蚁设计,而是自己开发了项目中所需的公共组件
封装了文章组件、头像组件、返回组件、徽章组件、按钮组件、卡片组件、筛选框组件、全屏组件、图片组件、输入框组件、loading组件、遮罩组件、搜索框组件、滑屏组件、多行输入框组件、标题组件、面包屑组件、按钮组组件、反色按钮组件、自适应按钮组件、密码框组件和联动选择组件
BaseArticle.js  // 文章组件
BaseAvatar.js // 头像组件
BaseBack.js // 返回组件
BaseBadge.js  // 徽章组件
BaseButton.js // 按钮组件
BaseCard.js // 卡片组件
BaseFilterList.js // 筛选框组件
BaseFullScreen.js // 全屏组件
BaseImg.js  // 图片组件
BaseInput.js  // 输入框组件
BaseLoading.js  // loading组件
BaseMask.js // 遮罩组件
BaseSearchBox.js  // 搜索框组件
BaseSwipeItem.js  // 滑屏组件
BaseTextArea.js // 多行输入框组件
BaseTitle.js  // 标题组件
BreadCrumb.js // 面包屑组件
ButtonBox.js  // 按钮组组件
ButtonInverted.js // 反色按钮组件
ButtonWithAutoWidth.js  // 自适应按钮组件
InputPassword.js  // 密码框组件
LinkageSelector.js // 联动选择组件
【功能组件】
按照功能来设置目录,如下所示
弹出框(Alert)
登录框(Auth)
类别管理(Category)
评论管理(Comment)
主页(Home)
点赞管理(Like)
文章管理(Post)
七牛传图(Qiniu)
推荐设置(Recommend)
页面尺寸(Size)
用户管理(User)
整体思路
【全屏布局】
使用设置高度的全屏布局方式,主要通过calc来实现
  <section style={{ height: `${wrapHeight}px` }}>
    <HomeHeader />
    <Inner>
        ...
    </Inner>
    <HomeNav />
  </section>
const Header = styled.header`
  height: 50px;
`
const Inner = styled.main`
  height: calc(100% - 100px);
  background: ${PRIMARY_BG_COLOR};
`
const List = styled.nav`
  height: 50px;
`
【层级管理】
项目的层级z-index,只使用0-3
全屏的弹出框优化级最高,设置为3;侧边栏设置为2;页面元素默认为0,如有需要,要设置为1
【全局弹出层】
在入口文件app.js中设置全局的弹出层和loading,所有组件都可以共用
// app.js
  render() {
    const { doShowLoading, alertText, hideAlertText } = this.props
    return (
      <React.Fragment>
        { doShowLoading && <AlertWithLoading /> }
        { !!alertText && <AlertWithText text={alertText} onExit={hideAlertText} />}
        <Router history={history} >
            ...
        </Router>
      </React.Fragment>
    )
  }
【路由管理】
react-router-dom第四版采用了动态路由,在组件目录内,以组件同名文件保存该组件内的路由
// category.js
const Category = () =>
  (
    <Switch>
      <Route exact path="/categories" component={CategoryRootList} />
      <Route exact path="/categories/:id" component={CategoryItemList} />
      <Route path="/categories/:id/add" component={AddCategory} />
      <Route path="/categories/:id/update" component={UpdateCategory} />
      <Route path="/categories/:id/delete" component={DeleteCategory} />
    </Switch>
  )
【状态管理】
参照vuex的状态管理方式,将每个组件的状态管理命名为module.js,保存在当前组件目录下
import auth from '@/components/Auth/module'
import size from '@/components/Size/module'
import alert from '@/components/Alert/module'
import categories from '@/components/Category/module'
import posts from '@/components/Post/PostsModule'
import post from '@/components/Post/PostModule'
import comments from '@/components/Comment/module'
import likes from '@/components/Like/module'
import qiniu from '@/components/Qiniu/module'
import users from '@/components/User/module'

const rootReducer = combineReducers({
  auth, size, alert, categories, posts, post, comments, likes, qiniu, users
})
每个模块的状态都设置有filter字段,方便扩展
// action-types
export const SET_COMMENTS_FILTER = 'SET_COMMENTS_FILTER'

// state
const initialState = {
  filter: null,
  docs: []
}

// action
export const setCommentsFilter = filter => dispatch => new Promise(resolve => {
  resolve()
  dispatch({ type: SET_COMMENTS_FILTER, filter })
})

// reducer
const comments = (state = initialState, action) => {
  switch (action.type) {
  case SET_COMMENTS_FILTER:
    return { ...state, filter: action.filter }

}
export default comments

// selector
export const getCommentsFilter = state => state.comments.filter
【数据传递】
组件间的数据传递方式一般有三种,一种是使用react中的函数传参,另一种是使用路由的location属性,还有一种是通过redux
1、函数传参
// PostRecommendItem
<BaseSearchBox
  searchText={title}
  datas={posts}
  onInput={this.onInput}
  onBack={() => { this.setState({ doShowSearchBox: false }) }}
/>

  onInput = data => {
    this.setState({ doShowSearchBox: false })
    const { updatePostAsync, showAlertText } = this.props
    const { prevData, datas } = this.statethis.setState({
        datas: datas.map(t => {
          if (t.number === data.number) return data
          return t
        })
      })
    ...
  }

// BaseSearchBox
<List innerRef={this.scrollRef}>
  {resultDatas.map(t =>
    <Item key={t._id} onClick={() => { onInput && onInput(t) }}>{t.title}</Item>)}
  {resultDatas.length >= limitNumber && !doNeedMoreDatas &&
    <ExtendedItem>已经到底了...</ExtendedItem>}
</List>
2、location传递state
// CommentForm
  constructor(props) {
    super(props)
    const { operate, location } = props
    if (operate === 'update' && location.state) {
      const { content } = location.state.comment
      this.state = { content }
    } else {
      this.state = { content: '' }
    }
  }

// CommentList
history.push({ pathname: `${BasePostUrl}/comments/${t._id}/update`, state: { comment: t } })
3、使用redux
//CategoryForm.js
  componentDidMount() {
    const { operate, match, setCategoriesFilter } = this.props
    setCategoriesFilter(Number(match.params.id)).then(() => {
      if (operate === 'update') {
        const { category } = this.props
        const { name, description } = category
        if (name) {
          this.setState({ name, description })
        } else {
          history.push(`/categories/${getParentNumber(Number(match.params.id))}`)
        }
      }
    })
  }
const mapStateToProps = state => ({
  category: getCategoryByFilter(state)
})
export default connect(mapStateToProps, { setCategoriesFilter })(CategoryForm)
项目优化
【子页面刷新】
子页面刷新时,可能会出现得不到从父级传递过来的数据的情况,笔者的处理是跳转到父级页面
  componentDidMount() {
    const { operate, location, match } = this.props
    if (operate === 'update' && !location.state) {
      history.push(`/posts/${match.params.postId}/comments`)
    }
  }
【reselect】
通过reselect来保存状态,减少状态查询,提升性能
export const getRecommendedCategories = createSelector(getCategories,
  datas => datas.filter(t => t.recommend).sort((a, b) => a.index - b.index))
【promise】
为action添加Promise,方便状态改变后的处理
export const setCategoriesFilter = filter => dispatch => new Promise(resolve => {
  resolve()
  dispatch({ type: SET_CATEGORIES_FILTER, filter })
})
【组件共用】
由于编辑和新建组件用到的元素是一样的,只不过,新建组件时内容为空,编辑组件时需要添加内容,这时就可以复用组件
const AddCategory = ({ match }) => <CategoryForm match={match} operate="add" />
const UpdateCategory = ({ match }) => <CategoryForm match={match} operate="update" />
【清理环境】
如果使用addEventListener绑定了事件处理函数,在组件销毁的时候,要及时清理环境
  componentDidMount() {
    this.scrollRef.current.addEventListener('scroll', throttle(this.onScroll))
  }
  componentWillUnmount() {
    this.scrollRef.current.removeEventListener('scroll', throttle(this.onScroll))
  }
【生命周期函数】
1、使用getDerivedStateFromProps生命周期函数时,如果不设置constructor,会有如下警告
Did not properly initialize state during construction. Expected state to be an object, but it was undefined.
添加空state即可解决
  constructor(props) {
    super(props)
    this.state = {}
  }
2、使用componentDidMount生命周期函数时,如果在该函数中直接使用this.setState(),会有如下警告
Do not use setState in componentDidMount react/no-did-mount-set-state
将state设置转移到then方法,或者另一个函数中即可
componentDidMount() {
  this.test()
}
test() {
  this.setState({ name: '' })
}
【应用和数据分离】
使用配置数据,实现数据和应用分离,配置数据包括API调用地址和颜色值,以常量的形式存储在constants目录下
// API.js
let API_HOSTNAME
if (process.env.NODE_ENV === 'development') {
  API_HOSTNAME = '/local'
} else {
  API_HOSTNAME = '/api'
}

export const BASE_AUTH_URL = `${API_HOSTNAME}/auth/admin`
export const BASE_USER_URL = `${API_HOSTNAME}/users`
export const BASE_POST_URL = `${API_HOSTNAME}/posts`
export const BASE_TOPIC_URL = `${API_HOSTNAME}/topics`
export const BASE_CATEGORY_URL = `${API_HOSTNAME}/categories`
export const BASE_LIKE_URL = `${API_HOSTNAME}/likes`
export const BASE_COMMENT_URL = `${API_HOSTNAME}/comments`
export const BASE_RECOMMEND_URL = `${API_HOSTNAME}/recommends`
export const BASE_QINIU_URL = `${API_HOSTNAME}/qiniu`
export const STATIC = 'https://static.xiaohuochai.site'
export const CLIENT_URL = 'https://www.xiaohuochai.cc'

// Colors.js
export const PRIMARY_COLOR = '#00a8e5'
export const DARK_COLOR = '#0066cc'
export const ERROR_COLOR = '#f67280'
export const PRIMARY_BG_COLOR = '#fafafa'
export const TRANSPARENT_BG_COLOR = 'rgba(7, 17, 27, .4)'
export const DARK_BG_COLOR = '#f5f5f5'
export const PRIMARY_LINE_COLOR = '#eee'
export const DARK_LINE_COLOR = '#ebedf0'
【函数节流】
为触发频率较高的函数使用函数节流
/**
 * 函数节流
 * @param {fn} function test(){}
 * @return {fn} function test(){}
 */
export const throttle = (fn, wait = 100) => function func(...args) {
  if (fn.timer) return
  fn.timer = setTimeout(() => {
    fn.apply(this, args)
    fn.timer = null
  }, wait)
}
功能实现
【登录设置】
将用户信息保存到sessionStorage中并检测,如果不存在,则跳转到登录页面
<Router history={history} >
  <Switch>
    <Route path="/login" component={AuthLogin} />
    <Route
      path="/"
      render={props => {
        if (sessionStorage.getItem('token') && sessionStorage.getItem('user')) {
          return <Home {...props} />
        }
        return <Redirect to="/login" />
      }}
    />
  </Switch>
</Router>
【全角空格占位】
使用全角空格占位,从而使文字对齐
<Label htmlFor="username">用户名:</Label> <Label htmlFor="password"> 密码:</Label>
【一像素边框】
将伪元素高度设置为1px,然后用 transform缩小到原来的一半
div {
  position: relative;
  &::after {
    position: absolute;
    left: 0;
    right: 0;
    height: 1px;
    transform: scaleY(.5);
    content: '';
  }
`
【缓动弹出层】
过渡弹出层有两种实现方式,包括transition和animation,该项目使用transition的方式实现
<StyledMask className={doShowMenuList ? 'mask-show' : ''} />
<StyledList className={doShowMenuList ? 'transform-show' : ''} />
const StyledList = styled(HomeMenuList)`
  transform: translateY(-100%);
  transition: .2s;
`
const StyledMask = styled(BaseMask)`
  z-index: 2;
  display: none;
`
const MenuBox = styled.div`
  cursor: pointer;
  & .transform-show {
    transform: translateY(0);
  }
  & .mask-show {
    display: block;
  }
`
【图标管理】
所有的图标都使用SVG格式,存储在common/BaseImg.js文件中
// BaseImg.js
...
export const Home = props => (
  <svg height={24} viewBox="0 0 24 24" width={24} {...props}>
    <path d="M10 20v-6h4v6h5v-8h3L12 3 2 12h3v8z" />
    <path d="M0 0h24v24H0z" fill="none" />
  </svg>
)
【搜索实现】
处理搜索功能时,需要特别处理正则表达式中的元字符
  static getReg(searchText) {
    return new RegExp(searchText.replace(/[[(){}^$|?*+.\\-]/g, '\\$&'), 'ig')
  }
如果将间隔符-放在中间,大写字母,如V会被匹配为/V
return new RegExp(searchText.replace(/[[(){}^$|?*+.-\\]/g, '\\$&'), 'ig')
此时的-被识别为范围间隔符,相当于.到\之间的字符,正好包括了所有的大写字母,所以。一定要把-放在最后

【滑屏实现】
滑屏主要通过touch事件来实现,一般地,有两种形式。一种是当前元素滑动,另一种是其他元素滑动。该项目采用较简单的第二种
  static checkSwipe(absMove, duration) {
    const THRESHOLD = 10
    const SHORTESTTIME = 300
    // 距离大于10,且时间小于300ms,才算做一次滑动
    return Boolean(absMove > THRESHOLD && duration < SHORTESTTIME)
  }
  onTouchStart = e => {
    this.startTime = new Date().getTime()
    this.startX = e.targetTouches[0].pageX
    this.startY = e.targetTouches[0].pageY
  }
  onTouchEnd = e => {
    const { pageX, pageY } = e.changedTouches[0]
    // 如果y轴移动距离大于元素高度,说明手指已经移出元素本身,则取消滑动
    if (pageY - this.startY > this.clientHeight) {
      return false
    }
    const moveX = pageX - this.startX
    const duration = new Date().getTime() - this.startTime
    // 如果符合滑动要求,且向左滑动,则控制条滑出
    if (BaseSwipeItem.checkSwipe(Math.abs(moveX), duration) && moveX < 0) {
      this.setState({ doShowControlBox: true })
    } else {
      this.setState({ doShowControlBox: false })
    }
    return true
  }
【密码框实现】
密码框的右侧一般都有一个小图标用于显示密码
<Wrap className={className} {...rest} >
  <StyledInput
    id="password"
    textIndent={textIndent}
    color={color}
    value={value}
    onChange={onChange}
    type={doShowPassword ? 'password' : 'text'}
  />
  { doShowPassword ?
    <Visibility onClick={onChangeStatus} />
    : <VisibilityOff onClick={onChangeStatus} />
  }
</Wrap>
【fetch函数封装】
该项目是基于create-react-app构建的,自带fetch功能。封装fetch函数到utils目录下的async.js文件中,将loading组件、alert组件整合到fetch函数的整个数据获取过程中
import { showLoading, hideLoading, showAlertText, hideAlertText } from '@/components/Alert/module'
import { logout } from '@/components/Auth/module'

const async = ({ dispatch, url, method, data, headers, success, fail, doHideAlert }) => {
  // 显示loading
  dispatch(showLoading())
  let fetchObj = {}
  if (method) {
    fetchObj = {
      method,
      body: JSON.stringify(data),
      headers: new Headers({ ...headers, 'Content-Type': 'application/json' })
    }
  }
  fetch(url, fetchObj).then(res => {
    // 关闭loading
    dispatch(hideLoading())
    return res.json()
  }).then(json => {
    // 成功
    if (json.code === 0) {
      !doHideAlert && dispatch(showAlertText(json.message))
      setTimeout(() => {
        dispatch(hideAlertText())
      }, 1000)
      success && success(json.result)
      // 自定义错误
    } else if (json.code === 1) {
      dispatch(showAlertText(json.message))
      // 系统错误
    } else if (json.code === 2) {
      dispatch(showAlertText(json.message))
      fail && fail(json.err)
      // 认证失败
    } else if (json.code === 3) {
      dispatch(showAlertText(json.message))
      dispatch(logout)
      // 权限不足
    } else if (json.code === 4) {
      dispatch(showAlertText(json.message))
    }
  }).catch(() => {
    dispatch(showAlertText('服务器故障'))
  })
}

export default async
【组件内路由】
如果要在组件内使用路由功能,可封装utils/history.js文件
// utils/history.js
import createBrowserHistory from 'history/createBrowserHistory'
const customHistory = createBrowserHistory()
export default customHistory
Router中使用history={history},而不是BrowserRouter
// app.js
import history from '@/utils/history'
<Router history={history} >
  <Switch>
    <Route path="/login" component={AuthLogin} />
    <Route
      path="/"
      render={props => {
        if (sessionStorage.getItem('token') && sessionStorage.getItem('user')) {
          return <Home {...props} />
        }
        return <Redirect to="/login" />
      }}
    />
  </Switch>
</Router>
然后,在组件中引用即可
import  history  from '@/utils/history'
// 跳转到首页
history.push('/')
兼容处理
【虚拟键盘】
andriod下,虚拟键盘会影响可视区域的高度;而IOS下,不会影响
可视区域高度 = document.documentElement.clientHeight - 虚拟键盘的高度;
bug重现如下:

所以,要将包含input域的页面高度设为固定
在页面初始化时,获取页面高度
// app.js
  componentDidMount() {
    const { setWrapSize } = this.props
    const { clientHeight, clientWidth } = document.documentElement
    setWrapSize({ clientHeight, clientWidth })
    window.addEventListener('orientationchange', this.setSize)
  }
然后通过行间样式,将此高度设置到包含input域的页面上
// BaseFullScreen
<Wrap className={className} style={{ height: `${wrapHeight}px` }} {...rest}>{children}</Wrap>
【取消自动大写】
IOS下,input域会自动大写首字母,设置autoCapitallize="off"即可
const BaseInput = ({ value, onChange, ...rest }) =>
  <Input {...rest} value={value} onChange={onChange} autoComplete="off" autoCapitalize="off" />
【光标颜色】
默认情况下,光标颜色与字体颜色color相同,但也可以通过caret-color属性来单独设置
但是,IOS的光标不支持caret-color,与字体颜色无关,默认为紫蓝色。所以,尽量不要设置蓝色或紫色背景,否则光标看不清楚
【页面放大】
IOS下,input获取焦点时会放大,meta设置user-scalable=no,可取消放大效果
<meta name="viewport" content="width=device-width, initial-scale=1, user-scalable=no, shrink-to-fit=no">

【圆角】
IOS下,input域只显示底边框时,会出现底边圆角效果,设置border-radius:0即可
border-radius:0

【轮廓outline】
android浏览器下,input域处于焦点状态时,默认会有一圈淡黄色的轮廓outline效果
通过设置outline:none可将其去除
outline: none
【点击背景】
在移动端,点击可点击元素时,android下会出现淡蓝色背景,IOS下会出现灰色背景
bug重现如下:

可以通过-webkt-tap-hightlight-color属性的设置,取消点击时出现的背景效果
* {
  -webkit-tap-highlight-color: rgba(0, 0, 0, 0);
}
【局部不滚动】
IOS下,可能会出现局部滚动不流畅,甚至局部不滚动的bug

通过在该元素上设置overflow-scrolling属性为touch即可解决
div {
  -webkit-overflow-scrolling: touch;
}
【高度无效】
在IOS下,设置height:100%,如果父级的flex值为1,而没有设置具体高度,则100%高度设置无效
处理方法是,在父级通过计算来设置具体高度height,如height: calc(100% - 100px)
网站PWA升级
前面的话
渐进式网络应用 ( Progressive Web Apps ),即我们所熟知的 PWA,是 Google 提出的用前沿的 Web 技术为网页提供 App 般使用体验的一系列方案。PWA 本质上是 Web App,借助一些新技术也具备了 Native App 的一些特性。本文将详细介绍针对现有网站的PWA升级
效果演示
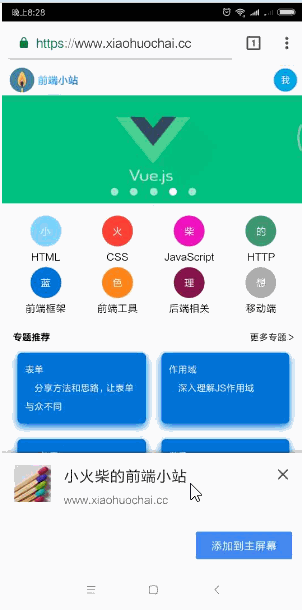
以前端小站xiaohuochai.cc的PWA效果做演示,github移步至此
【添加到桌面】
【离线缓存】
由于手机录屏选择无法进行离线录制,改由模拟器模拟离线效果
概述
PWA 的主要特点包括下面三点:
1、可靠 - 即使在不稳定的网络环境下,也能瞬间加载并展现
2、体验 - 快速响应,并且有平滑的动画响应用户的操作
3、粘性 - 像设备上的原生应用,具有沉浸式的用户体验,用户可以添加到桌面
主要功能包括站点可添加至主屏幕、全屏方式运行、支持离线缓存、消息推送等
【PRPL模式】
“PRPL”(读作 “purple”)是 Google 的工程师提出的一种 web 应用架构模式,它旨在利用现代 web 平台的新技术以大幅优化移动 web 的性能与体验,对如何组织与设计高性能的 PWA 系统提供了一种高层次的抽象
“PRPL”实际上是 Push/Preload、Render、Precache、Lazy-Load 的缩写
1、PUSH/PRELOAD,推送/预加载初始 URL 路由所需的关键资源
2、RENDER,渲染初始路由,尽快让应用可被交互
3、PRE-CACHE,用 Service Worker 预缓存剩下的路由
4、LAZY-LOAD 按需懒加载、懒实例化剩下的路由
【Service workers】
Service Workers 是谷歌 chrome 团队提出并大力推广的一项 web 技术。在 2015 年,它加入到 W3C 标准,进入草案阶段
PWA 的关键在于 Service Workers 。就其核心来说,Service Workers 只是后台运行的 worker 脚本。它们是用 JavaScript 编写的,只需短短几行代码,它们便可使开发者能够拦截网络请求,处理推送消息并执行许多其他任务
Service Worker 中用到的一些全局变量:
self: 表示 Service Worker 作用域, 也是全局变量
caches: 表示缓存
skipWaiting: 表示强制当前处在 waiting 状态的脚本进入 activate 状态
clients: 表示 Service Worker 接管的页面
Service Worker 的工作机制大致如下:用户访问一个具有 Service Worker 的页面,浏览器就会下载这个 Service Worker 并尝试安装、激活。一旦激活,Service Worker 就到后台开始工作。接下来用户访问这个页面或者每隔一个时段浏览器都会下载这个 Service Worker,如果监测到 Service Worker 有更新,就会重新安装并激活新的 Service Worker,同时 revoke 掉旧的 Service Worker,这就是 SW 的生命周期
因为 Service Worker 有着最近的权限接触数据,因此 Service Worker 只能被安装在 HTTPS 加密的页面中,虽然无形当中提高了 PWA 的门槛,不过也是为了安全做考虑
离线缓存
下面来通过service worker实现离线缓存
一般地,通过sw-precache-webpack-plugin插件来实现动态生成service worker文件的效果
不过,首先要在index.html中引用service worker
    <script>
      (function() {
        if('serviceWorker' in navigator) {
          navigator.serviceWorker.register('/service-worker.js');
        }
      })()
    </script>
【SPA】
通过create-react-app生成的react SPA应用默认就进行了sw-precache-webpack-plugin的设置。但是,其只对静态资源进行了设置
如果是接口资源,则一般的处理是优先通过网络访问,如果网络不通,再通过service worker的缓存进行访问
webpack.config.prod.js文件的配置如下
    const SWPrecacheWebpackPlugin = require('sw-precache-webpack-plugin');
    new SWPrecacheWebpackPlugin({
      // By default, a cache-busting query parameter is appended to requests
      // used to populate the caches, to ensure the responses are fresh.
      // If a URL is already hashed by Webpack, then there is no concern
      // about it being stale, and the cache-busting can be skipped.
      dontCacheBustUrlsMatching: /\.\w{8}\./,
      filename: 'service-worker.js',
      logger(message) {
        if (message.indexOf('Total precache size is') === 0) {
          // This message occurs for every build and is a bit too noisy.
          return;
        }
        if (message.indexOf('Skipping static resource') === 0) {
          // This message obscures real errors so we ignore it.
          // https://github.com/facebookincubator/create-react-app/issues/2612
          return;
        }
        console.log(message);
      },
      minify: true,
      // For unknown URLs, fallback to the index page
      navigateFallback: publicUrl + '/index.html',
      // Ignores URLs starting from /__ (useful for Firebase):
      // https://github.com/facebookincubator/create-react-app/issues/2237#issuecomment-302693219
      navigateFallbackWhitelist: [/^(?!\/__).*/],
      // Don't precache sourcemaps (they're large) and build asset manifest:
      staticFileGlobsIgnorePatterns: [/\.map$/, /asset-manifest\.json$/],
      runtimeCaching: [{
          urlPattern: '/',
          handler: 'networkFirst'
        },
        {
          urlPattern: /\/api/,
          handler: 'networkFirst'
        }
      ]
    })
【SSR】
如果是服务器端渲染的应用,则配置基本类似。但由于无法使用代理,则需要设置网站实际路径,且由于静态资源已经存到CDN,则缓存不再通过service worker处理
配置如下
    new SWPrecacheWebpackPlugin({
      dontCacheBustUrlsMatching: /\.\w{8}\./,
      filename: 'service-worker.js',
      logger(message) {
        if (message.indexOf('Total precache size is') === 0) {
          return;
        }
        if (message.indexOf('Skipping static resource') === 0) {
          return;
        }
        console.log(message);
      },
      navigateFallback: 'https://www.xiaohuochai.cc',
      minify: true,
      navigateFallbackWhitelist: [/^(?!\/__).*/],
      dontCacheBustUrlsMatching: /./,
      staticFileGlobsIgnorePatterns: [/\.map$/, /\.json$/],
      runtimeCaching: [{
          urlPattern: '/',
          handler: 'networkFirst'
        },
        {
          urlPattern: /\/(posts|categories|users|likes|comments)/,
          handler: 'networkFirst'
        },
      ]
    })
  ]
添加到屏幕
没人愿意多此一举地在移动设备键盘上输入长长的网址。通过添加到屏幕的功能,用户可以像从应用商店安装本机应用那样,选择为其设备添加一个快捷链接,并且过程要顺畅得多
【配置项说明】
使用manifest.json文件来实现添加到屏幕的功能,下面是该文件内的配置项
short_name: 应用展示的名字
icons: 定义不同尺寸的应用图标
start_url: 定义桌面启动的 URL
description: 应用描述
display: 定义应用的显示方式,有 4 种显示方式,分别为:
  fullscreen: 全屏
  standalone: 应用
  minimal-ui: 类似于应用模式,但比应用模式多一些系统导航控制元素,但又不同于浏览器模式
  browser: 浏览器模式,默认值
name: 应用名称
orientation: 定义默认应用显示方向,竖屏、横屏
prefer_related_applications: 是否设置对应移动应用,默认为 false
related_applications: 获取移动应用的方式
background_color: 应用加载之前的背景色,用于应用启动时的过渡
theme_color: 定义应用默认的主题色
dir: 文字方向,3 个值可选 ltr(left-to-right), rtl(right-to-left) 和 auto(浏览器判断),默认为 auto
lang: 语言
scope: 定义应用模式下的路径范围,超出范围会以浏览器方式显示
下面是一份常规的manifest.json文件的配置
{
  "name": "小火柴的前端小站",
  "short_name": "前端小站",
  "start_url": "/",
  "display": "standalone",
  "description": "",
  "theme_color": "#fff",
  "background_color": "#d8d8d8",
  "icons": [{
      "src": "./logo_32.png",
      "sizes": "32x32",
      "type": "image/png"
    },
    {
      "src": "./logo_48.png",
      "sizes": "48x48",
      "type": "image/png"
    },
    {
      "src": "./logo_96.png",
      "sizes": "96x96",
      "type": "image/png"
    },
    {
      "src": "./logo_144.png",
      "sizes": "144x144",
      "type": "image/png"
    },
    {
      "src": "./logo_192.png",
      "sizes": "192x192",
      "type": "image/png"
    },
    {
      "src": "./logo_256.png",
      "sizes": "256x256",
      "type": "image/png"
    }
  ]
}
【注意事项】
1、在 Chrome 上首选使用 short_name,如果存在,则优先于 name 字段使用
2、图标的类型最好是png,,且存在144px的尺寸,否则会得到如下提示
Site cannot be installed: a 144px square PNG icon is required, but no supplied icon meets this requirement
3、start_url表示项目启动路径
如果是'/',则启动路径为
localhost:3000/
如果是'/index.html',则启动路径为
localhost:3000/index.html
所以,最好填写'/'
【HTML引用】
在HTML文档中通过link标签来引用manifest.json文件
<link rel="manifest" href="/manifest.json">
要特别注意manifest文件路径问题,要将该文件放到静态资源目录下,否则,会找不到该文件,控制台显示如下提示
Manifest is not valid JSON. Line: 1, column: 1, Unexpected token
如果index.html也位于静态资源目录,则设置如下
<link rel="manifest" href="/manifest.json">
如果index.html位于根目录,而静态资源目录为static,则设置如下
<link rel="manifest" href="/static/manifest.json" />
【meta标签】
为了更好地SEO,需要通过meta标签设置theme-color
<meta name="theme-color" content="#fff"/>
【SSR】
如果是服务器端配置,需要在server.js文件中配置manifest.json、logo、icon等文件的静态路径
app.use(express.static(path.join(__dirname, 'dist')))
app.use('/manifest.json', express.static(path.join(__dirname, 'manifest.json')))
app.use('/logo', express.static(path.join(__dirname, 'logo')))
app.use('/service-worker.js', express.static(path.join(__dirname, 'dist/service-worker.js')))
移动端常见问题处理
前面的话
本文将详细介绍移动web开发中的常见问题
Input
【光标颜色】
默认情况下,光标颜色与字体颜色color相同,但也可以通过caret-color属性来单独设置
caret-color: auto;
caret-color: transparent;
caret-color: currentColor;
caret-color: red;
caret-color: #5729e9;
caret-color: rgb(0, 200, 0);
caret-color: hsla(228, 4%, 24%, 0.8);
但是,IOS的光标不支持caret-color,与字体颜色无关,默认为紫蓝色。所以,尽量不要设置蓝色或紫色背景,否则光标看不清楚
【光标高度】
input域的光标高度与行高line-height相同,所以不要设置太高的行高,可以通过设置上下padding来撑开高度
【放大】
IOS下,input获取焦点时会放大,meta设置user-scalable=no,可取消放大效果
<meta name="viewport" content="width=device-width, initial-scale=1, user-scalable=no, shrink-to-fit=no">
【自动大写】
一般地,IOS下默认开启键盘的首字母自动大写功能,这样输入英文的时候,首字母便会自动大写
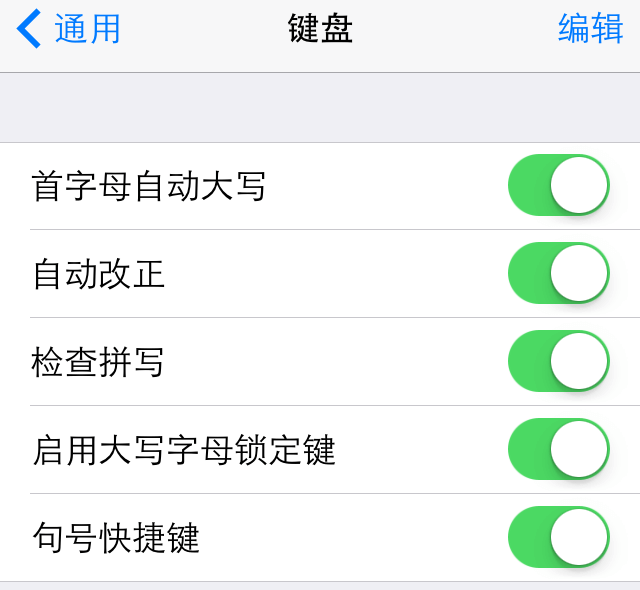
但是,有些时候并不希望一直是首字母大写的。比如用户名这个字段,如果字段本身就是区分大小写的,首字母自动大写往往会给用户带来麻烦。可以通过在表单元素上可以通过设置autocapitalize="off"来关闭
<input type="text" autocapitalize="off">
【圆角】
IOS下,input域只显示底边框时,会出现两个底部底边圆角效果,设置border-radius:0即可
border-radius:0
【自动保存】
input域默认会开启自动保存功能,可以使用autocomplete="off"属性将其关闭
<input autocomplete="off" />
要特别注意的是,如果使用react框架,需要将autocomplete替换为autoComplete这种小驼峰形式
【轮廓outline】
android浏览器下,input域处于焦点状态时,默认会有一圈淡黄色的轮廓outline效果
通过设置outline:none可将其去除
outline: none
【虚拟键盘】
IOS弹出虚拟键盘不影响可视区域大小,而android手机弹出虚拟键盘时会影响。所以,最好将包含input域的页面高度设为固定
在页面初始化时,获取页面高度
// app.js
  componentDidMount() {
    const { setWrapSize } = this.props
    const { clientHeight, clientWidth } = document.documentElement
    setWrapSize({ clientHeight, clientWidth })
    window.addEventListener('orientationchange', this.setSize)
  }
然后通过行间样式,将此高度设置到包含input域的页面上
// BaseFullScreen
<Wrap className={className} style={{ height: `${wrapHeight}px` }} {...rest}>{children}</Wrap>
样式
【点击背景】
在移动端,点击可点击元素时,android下会出现淡蓝色背景,IOS下会出现灰色背景
可以通过-webkt-tap-hightlight-color属性的设置,取消点击时出现的背景效果
* {
  -webkit-tap-highlight-color: rgba(0, 0, 0, 0);
}
【appearance】
使用appearance:none主要用来去除表单类元素的中浏览器内置样式,如去除data类型input域的叉叉,去除number类型input域的上下箭头等
-webkit-appearance: none;
【禁止选中】
有时不希望用户在网站上选择文本,或许是出于版权的原因,如电子书网站。通常使用js来实现
另一个方案就是,将-webkit-user-select设为none
-webkit-user-select:none;
【禁止文字缩放】
部分手机上,切换横竖屏时,会缩放字体。使用如下设置,可以禁止文字缩放
* {
  -webkit-text-size-adjust:100%;
}
【文本渲染】
使用text-rendering:optimizeLegibility属性,可以让浏览器在绘制文本时将着重考虑易读性,而不是渲染速度和几何精度.它会使字间距和连字有效
text-rendering: optimizeLegibility;
该属性在移动设备上会造成比较明显的性能问题
【文本平滑显示】
-webkit-font-smoothing属性可以用来控制字体的像素显示是否平滑
none 关闭抗锯齿,字体边缘犀利。
antialiased 字体像素级平滑,在深色背景上会让文字看起来更细了
subpixel-antialiased 字体亚像素级平滑,主要为了在非视网膜设备下更好的显示
body { -webkit-font-smoothing: antialiased; }
【轮廓outline】
input、textarea等表单类标签,在获取焦点的情况下,在andriod系统下,会出现淡黄色轮廓outline,使用outline:none将其去除
outline: none
【placeholder】
placeholder默认是浅灰色,如果input域是浅灰色背景,则这时placeholder的文本与背景颜色相近,无法清晰显示,就需要设置placeholder的颜色
可以通过伪元素来进行设置
::placeholder {
    color: #fff;
  }
【清除按钮圆角】
input,button{
  -webkit-appearance:none;
  border-radius:0;
}
【滚动回弹】
-webkit-overflow-scrolling 属性控制元素在移动设备上是否使用滚动回弹效果
auto 使用普通滚动, 当手指从触摸屏上移开,滚动会立即停止
touch 使用具有回弹效果的滚动, 当手指从触摸屏上移开,内容会继续保持一段时间的滚动效果。继续滚动的速度和持续的时间和滚动手势的强烈程度成正比。同时也会创建一个新的堆栈上下文
body {
  -webkit-overflow-scrolling: touch;
}
一定要设置该属性,否则在IOS下会出现局部滚动不流畅的bug
【1倍行高】
设置line-height:1,即行高为1时,有的页面会出现文字显示不全的情况,所以行高设置一定要大于1
1像素边框
由于retina屏的原因,1px 的 border 会显示成两个物理像素,所以看起来会感觉很粗,这是一个移动端开发常见的问题
解决方案有很多,但都有自己的优缺点
1、0.5px 边框
从iOS 8开始,iOS 浏览器支持 0.5px 的 border,但是在 Android 上是不支持的,0.5px 会被认为是 0px,所以这种方法,兼容性很差
2、背景渐变
CSS3 有了渐变背景,可以通过渐变背景实现 1px 的 border,实现原理是设置 1px 的渐变背景,50% 有颜色,50% 是透明的
@mixin commonStyle() {
  background-size: 100% 1px,1px 100% ,100% 1px, 1px 100%;
  background-repeat: no-repeat;
  background-position: top, right top,  bottom, left top;
}
@mixin border($border-color) {
  @include commonStyle();
  background-image:linear-gradient(180deg, $border-color, $border-color 50%, transparent 50%),
  linear-gradient(270deg, $border-color, $border-color 50%, transparent 50%),
  linear-gradient(0deg, $border-color, $border-color 50%, transparent 50%),
  linear-gradient(90deg, $border-color, $border-color 50%, transparent 50%);
}
3、伪类 + transform
这类方法的实现原理是用伪元素高度设置为1px,然后用 transform缩小到原来的一半
div {
  position: relative;
  &::after {
    position: absolute;
    left: 0;
    right: 0;
    height: 1px;
    transform: scaleY(.5);
    content: '';
  }
`
布局
【vh】
页面使用vh来控制元素高度的时候,在安卓端浏览器虚拟键盘弹出时,导致视口高度改变,以至于vh的取值改变
// 正常模式下
100vh = document.documentElement.clientHeight;

// 安卓端弹出虚拟键盘情况下
100vh = document.documentElement.clientHeight - 虚拟键盘的高度;
这种情况导致了在虚拟键盘弹出时,页面中使用vh定高的元素的大小被压缩,造成布局错位以及文字溢出
所以,最好将包含input域的页面高度设为固定
【100%与100vh】
100vh指的是视口,即屏幕高度的100%,不仅包括浏览器可视高度,还包括浏览器地址栏高度。而100%高度,是页面高度的100%
所以,在全屏情况下,100vh等于100%高度,否则,100vh大于100%高度
【高度无效】
在IOS下,设置height:100%,如果父级的flex值为1,而没有设置具体高度,则100%高度设置无效
处理方法是,在父级通过计算来设置具体高度height,如height: calc(100% - 100px)
事件
【鼠标事件】
由于移动设备没有鼠标,所以与电脑端有一些不同之处
1、不支持dblclick双击事件。在移动设备中双击浏览器窗口会放大画面
2、单击元素会触发mousemove事件
3、两个手指放在屏幕上且页面随手指移动而滚动时会触发mousewheel和scroll事件
【touch事件】
新版的chrome下,不支持直接给document和body设置touch事件,所以下列代码无效
document.addEventListener('touchstart', function(e) {
  e.preventDefault();
})
图片
【SVG】
SVG图片由于其矢量的性质,缩放不失真,则代码量较少,大量地应用在小图标上。但在使用的过程中,有一些要注意的地方
1、在伪类中添加SVG,在IOS下svg不显示
2、在页面中添加SVG,在android的微信中下会出现设置透明度opacity的元素有的不显示的情况,所以尽量不设置透明度
3、在mask属性中设置SVG,可以通过background-color给SVG变换颜色
【base64】
要特别注意的是,图片变化base64格式之后,再添加查询字符串,会报错
【缓存】
移动端更改同名图片无法清除缓存。所以,还是要在图片命名上做文章
meta
【shrink-to-fit=no】
IOS9+系统下,使用Viewport元标记"width=device-width"会导致页面缩小以适应溢出视口边界的内容。可以通过添加"shrink-to-fit=no"到meta标签来覆盖此行为,增加的值将阻止页面缩放以适应视口
<meta name="viewport" content="width=device-width, initial-scale=1.0, maximum-scale=1.0, user-scalable=no,shrink-to-fit=no">
【页面缩放】
在meta标签中设置了禁止缩放user-scalable=no,可以实现在IOS下input域焦点状态时放大被禁止的效果。但是,仍然无法阻止页面整体的缩放
【识别规则】
1、打电话
<a href="tel:0755-10086">打电话给:0755-10086</a>
2、发短信,winphone系统无效
<a href="sms:10086">发短信给: 10086</a>
3、跳转到地图
<a href="iosamap://viewMap?sourceApplication=yukapril&poiname=国宏宾馆&lat=39.905592&lon=116.33604&dev=0">高德地图</a>
<a href="androidamap://viewMap?sourceApplication=yukapril&poiname=国宏宾馆&lat=39.905592&lon=116.33604&dev=0">高德</a>
4、写邮件
<a href="mailto:peun@foxmail.com">peun@foxmail.com</a>
5、禁止识别
<meta name="format-detection" content="telephone=no,email=no,address=no"/>
【爬虫】
robots(网页搜索引擎索引方式):对应一组使用逗号(,)分割的值,通常取值:
none:搜索引擎将忽略此网页,等同于noindex,nofollow;
noindex:搜索引擎不索引此网页;nofollow:搜索引擎不继续通过此网页的链接索引搜索其它的网页;
all:搜索引擎将索引此网页与继续通过此网页的链接索引,等同于index,follow;
index:搜索引擎索引此网页;follow:搜索引擎继续通过此网页的链接索引搜索其它的网页;
使用下列代码,则网页会被搜索引擎忽略
<meta name="robots" content="none"/>
【添加到主屏幕】
在IOS下,在head元素底部,使用下列代码可以实现添加到主屏幕的功能
  <meta name="apple-mobile-web-app-capable" content="yes">
  <meta name="apple-mobile-web-app-status-bar-style" content="black">
  <meta name="apple-mobile-web-app-title" content="Weather PWA">
  <link rel="apple-touch-icon" href="images/icons/icon-152x152.png">
【QQ浏览器】
// 全屏模式
<meta name="x5-fullscreen" content="true">
// 强制竖屏
<meta name="x5-orientation" content="portrait">
// 强制横屏
<meta name="x5-orientation" content="landscape">
// 应用模式
<meta name="x5-page-mode" content="app">
【UC浏览器】
// 全屏模式
<meta name="full-screen" content="yes">
// 强制竖屏
<meta name="screen-orientation" content="portrait">
// 强制横屏
<meta name="screen-orientation" content="landscape">
// 应用模式
<meta name="browsermode" content="application">
循序渐进学.Net Core Web Api开发系列【4】:前端访问WebApi
系列目录
本系列涉及到的源码下载地址:https://github.com/seabluescn/Blog_WebApi
一、概述
前一篇文章重点介绍了Controller的一些知识,本篇重点介绍如何通过HTML端来调用这些后台API。
二、准备工作
1、引入js包
前面介绍过前端的js包,需要通过Bower工具进行管理,这里我们添加三个js的包:
jQuery
jquery-form
bootstrap
2、添加静态文件支持
所有静态页面存放在wwwroot文件夹下面,默认是不能访问的,需要在Configure方法内要增加下面语句:app.UseStaticFiles();
        public void Configure(IApplicationBuilder app, IHostingEnvironment env)
        {
            //启用Mvc服务
            app.UseMvcWithDefaultRoute();
            app.UseStaticFiles();
        }
三、开工
先建两个实体类
    public class Product
    {
        public string Code { get; set; }
        public string Name { get; set; }
        public int Numbers { get; set; }
        public User user { get; set; }
        public Product()
        {
            user = new User();
        }
    }

    public class User
    {
        public string Name { get; set; }
        public int Age { get; set; }
    }
1、通过json格式
后台服务代码:
    [Produces("application/json")]
    [Route("api/products")]
    public class ProductsController : Controller
    {
        [HttpPost]
        public string  AddProduct(String Code,[FromBody]Product product)
        {
            Console.WriteLine($"Code :{Code}");
            Console.WriteLine($"product code :{product.Code}");
            Console.WriteLine($"product name :{product.Name}");
       Console.WriteLine($" product.user.Name :{product.user.Name}");
            return "success";
        }
    }
前端调用代码:
<!DOCTYPE html>
<html lang="zh-CN">
<head>
    <meta charset="utf-8">
    <title>Using Bootstrap</title>
    <link rel="stylesheet" href="lib/bootstrap/dist/css/bootstrap.css" />
    <script src="lib/jquery/dist/jquery.js"></script>
    <script src="lib/jquery-form/dist/jquery.form.min.js"></script>
    <script src="lib/bootstrap/dist/js/bootstrap.js"></script>
    <script>
        $(document).ready(function () {
            $("#add1").click(function (event) {
                var datastr = "{ 'Code': '2222', 'Name': '33333','Numbers': 0,'user':{'Name':'username'}}";
                $.ajax({
                    type: "POST",
                    url: "api/products",
                    contentType: "application/json;charset=UTF-8",
                    data: datastr,
                    success: function (result) {
                        alert("success");
                    },
                    error: function (error) {
                        alert("出错:" + error.responseText);
                    }
                });
            });
        });
    </script>
</head>
<body>
        <div>
            <button type="button" class="btn btn-success" id="add1">ADD1</button><br /><br />
        </div>
</body>
</html>
其中datastr是一个json字符串。
注意:第一个参数Code是没有办法取到值的,只有FromBody标记的参数才能取到值,Code可以通过URL传过来,或者封装到类里,比如更新product的操作,主键可以通过product.Code获得,而不是单独传过来。
通过Chrome的开发者工具DevTools,我们可以跟踪一下提交的数据信息:
head信息:
|
1
|
Content-Type: application/json;charset=UTF-8 |
POST的数据:
|
1
|
{ 'Code': '2222', 'Name': '33333','Numbers': 0,'user':{'Name':'username'}} |
2、普通表单的提交
服务端代码:
    [Produces("application/json")]
    [Route("api/products")]
    public class ProductsController : Controller
    {
        [HttpPost]
        public string  AddProduct(String Code,Product product)
        {
            Console.WriteLine($"Code :{Code}");
            Console.WriteLine($" product code :{product.Code}");
            Console.WriteLine($" product name :{product.Name}");
            Console.WriteLine($" product.user.Name :{product.user.Name}");

            return "success";
        }
    }
服务端代码和上面基本一样,去掉了FromBody标签。
前端调用代码:
<!DOCTYPE html>
<html lang="zh-CN">
<head>
    <meta charset="utf-8">
    <title>Using Bootstrap</title>
    <link rel="stylesheet" href="lib/bootstrap/dist/css/bootstrap.css" />
    <script src="lib/jquery/dist/jquery.js"></script>
    <script src="lib/jquery-form/dist/jquery.form.min.js"></script>
    <script src="lib/bootstrap/dist/js/bootstrap.js"></script>

    <script>
        $(document).ready(function () {
            $("#add3").click(function (event) {
                $("#myform").ajaxSubmit();
            });
        });
    </script>
</head>
<body>
    <form id="myform" action="api/products" method="post"  >
        <div>
            Code:<input type="text" id="Code" name="Code" /><br />
            productCode:<input type="text" id="product.Code" name="product.Code" /><br />
            productName:<input type="text" id="product.Name" name="product.Name" /><br />
            UserName:<input type="text" id="product.user.Name" name="product.user.Name" /><br />
            <input type="submit" value="Submit" /><br /><br />
            <button type="button" class="btn btn-success" id="add3">ADD3</button><br /><br />
        </div>
    </form>
</body>
</html>
add3模拟了一个submit的操作,通过submit‘按钮提交数据或通过ADD3按钮提交数据,其效果一致。
head信息:
|
1
|
Content-Type: application/x-www-form-urlencoded |
Post的数据:
|
1
|
Code=111&product.Code=www&product.Name=eeee&product.user.Name=4444 |
3、二进制格式文本
后台代码和上面一致。
前台代码:
<!DOCTYPE html>
<html lang="zh-CN">

<head>
    <meta charset="utf-8">
    <title>Using Bootstrap</title>
    <link rel="stylesheet" href="lib/bootstrap/dist/css/bootstrap.css" />
    <script src="lib/jquery/dist/jquery.js"></script>
    <script src="lib/jquery-form/dist/jquery.form.min.js"></script>
    <script src="lib/bootstrap/dist/js/bootstrap.js"></script>

    <script>
        $(document).ready(function () {
            $("#add2").click(function (event) {

                var datastr = new FormData();
                datastr.append("Code", "111111");
                datastr.append("product.Code", "3333");
                datastr.append("product.Name", "4444");
                datastr.append("product.user.Name", "555555");

                $.ajax({
                    type: "POST",
                    url: "api/products",
                    contentType: false,
                    processData: false,
                    data: datastr,
                    success: function (result) {
                        alert(result);
                    },
                    error: function (error) {
                        alert("出错:" + error.responseText);
                    }
                });
            });
        });
    </script>
</head>
<body>
    <form id="myform" action="api/products" method="post"  >
        <div>
            Code:<input type="text" id="Code" name="Code" /><br />
            productCode:<input type="text" id="product.Code" name="product.Code" /><br />
            productName:<input type="text" id="product.Name" name="product.Name" /><br />
            UserName:<input type="text" id="product.user.Name" name="product.user.Name" /><br />

            <button type="button" class="btn btn-success" id="add2">ADD2</button><br /><br />
        </div>
    </form>
</body>
</html>
此时前台构建了一个FormData的对象,并进行提交,属性的值应该从表单中进行读取。
有一个更方便的方式可以填充FormData对象:
var formdata = new FormData(document.getElementById("myform"));
实际效果和上面代码一致。
head信息:
|
1
|
Content-Type: multipart/form-data; boundary=----WebKitFormBoundarywjCGumOsjj4HdEQC |
Post的数据:
|
1
2
3
4
5
6
7
8
9
10
11
12
13
|
------WebKitFormBoundarywjCGumOsjj4HdEQCContent-Disposition: form-data; name="Code"111111------WebKitFormBoundarywjCGumOsjj4HdEQCContent-Disposition: form-data; name="product.Code"3333------WebKitFormBoundarywjCGumOsjj4HdEQCContent-Disposition: form-data; name="product.Name"4444------WebKitFormBoundarywjCGumOsjj4HdEQCContent-Disposition: form-data; name="product.user.Name"555555------WebKitFormBoundarywjCGumOsjj4HdEQC-- |
由于 multipart/form-data类型可以传输非文本格式文件,可能包含特殊字符,不能简单通过&字符分割内容,所以定义了一个字符串来进行分割。
如果需要上传文件,就必须采用这个方式。
[Abp 源码分析]四、模块配置
0.简要介绍
在 Abp 框架当中通过各种 Configuration 来实现模块的配置,Abp 本身提供的很多基础设施功能的一些在运行时的行为是通过很多不同的 Configuration 来开放给用户进行一些自定义配置的。
比如说缓存模块,我要配置缓存的过期时间,Abp 默认是 1 个小时,但是我也可以自己来定义,直接赋值或者从配置项来读取都是由具体使用者来控制的,所以 Abp 通过各种 Configuration 类来控制一些运行时参数。
这些 Abp 本身基础设施的配置类都是存放在 \Abp\src\Abp\Configuration\Startup\ 这个文件夹内部的,我们来看一下他们的依赖关系。
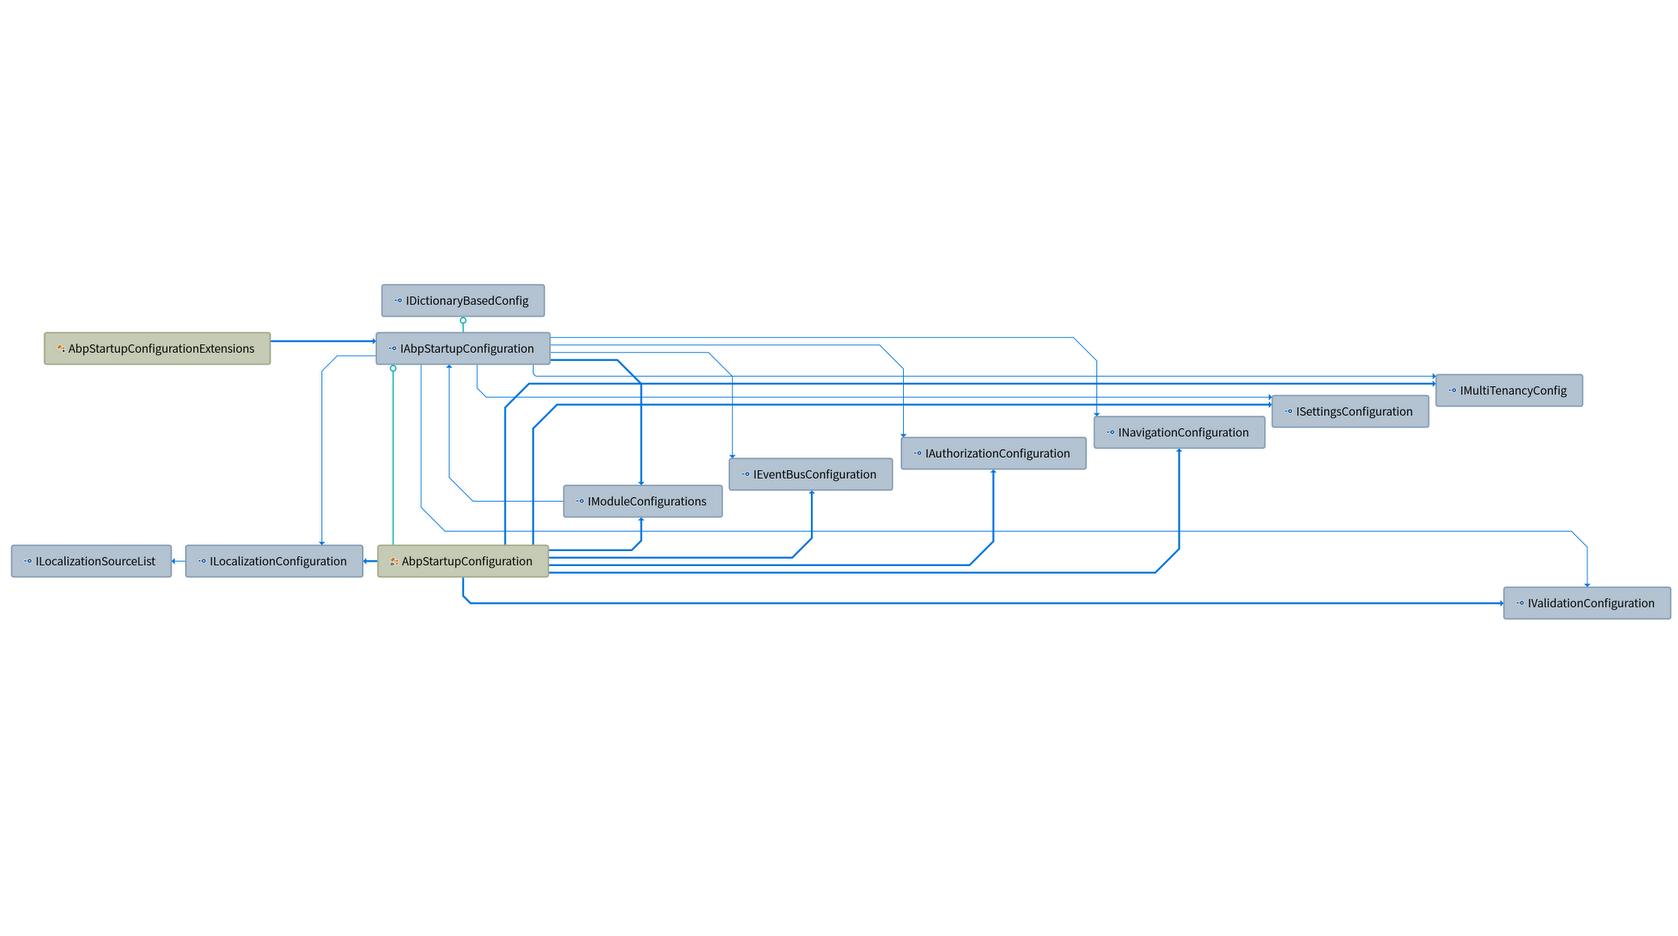
1.启动流程
从上图可以看到在 IAbpStartupConfiguration 内部拥有诸多引用(可能没有列举完成,可以在其定义看到),基本上 Abp 自己的基础设施配置都在这里面。
那么 IAbpStartupConfiguration 自己内部的这些属性是在哪儿初始化的呢,其实就是在之前讲过的 AbpBootstrapper 的 Initialize() 内部初始化的。再看下代码:
public virtual void Initialize()
{
    try
    {
        // 其他代码
        IocManager.IocContainer.Install(new AbpCoreInstaller());
        IocManager.Resolve<AbpStartupConfiguration>().Initialize();
        // 其他代码
    }
    catch (Exception ex)
    {
        _logger.Fatal(ex.ToString(), ex);
        throw;
    }
}
在 AbpCoreInstaller 类内部之前也说过,在这里面统一注入了这些 Configuration 的单例,同时解析出 AbpStartupConfiguration ,调用其 Initialzie() 方法来对自己的那些 xxxConfiguration 接口赋值,代码如下:
public void Initialize()
{
    Localization = IocManager.Resolve<ILocalizationConfiguration>();
    Modules = IocManager.Resolve<IModuleConfigurations>();
    Features = IocManager.Resolve<IFeatureConfiguration>();
    Navigation = IocManager.Resolve<INavigationConfiguration>();
    Authorization = IocManager.Resolve<IAuthorizationConfiguration>();
    Validation = IocManager.Resolve<IValidationConfiguration>();
    Settings = IocManager.Resolve<ISettingsConfiguration>();
    UnitOfWork = IocManager.Resolve<IUnitOfWorkDefaultOptions>();
    EventBus = IocManager.Resolve<IEventBusConfiguration>();
    MultiTenancy = IocManager.Resolve<IMultiTenancyConfig>();
    Auditing = IocManager.Resolve<IAuditingConfiguration>();
    Caching = IocManager.Resolve<ICachingConfiguration>();
    BackgroundJobs = IocManager.Resolve<IBackgroundJobConfiguration>();
    Notifications = IocManager.Resolve<INotificationConfiguration>();
    EmbeddedResources = IocManager.Resolve<IEmbeddedResourcesConfiguration>();
    EntityHistory = IocManager.Resolve<IEntityHistoryConfiguration>();

    CustomConfigProviders = new List<ICustomConfigProvider>();
    ServiceReplaceActions = new Dictionary<Type, Action>();
}
所以,在模块定义的基类 AbpModule 当中,早就注入了 IAbpStartupConfiguration 接口,让你很方便的就可以在模块的预加载的时候配置各种基础设施的参数。举个栗子:
public override void PreInitialize()
{
    Configuration.Caching.ConfigureAll(z=>z.DefaultSlidingExpireTime = TimeSpan.FromHours(1));
}
可以看到这里我们的 Configuration 属性其实就是 IAbpStartupConfiguration 接口。
2.代码分析
2.1自定义模块配置
我们可以看到 IAbpStartupConfiguration 除了自己拥有大量基础设施的配置类,同时他还继承一个基类叫做 DictionaryBasedConfig ,那么 Abp 框架为什么要这么写呢?
其实这个基类的作用就是存放用户自定义的 Configuration 类型的,细心观察的话会发现在 AbpStartupConfiguration 的内部有一个 Get 方法,该方法就是用来获取存储的配置类型。
public T Get<T>()
{
    // 调用基类的 GetOrCreate 方法,不存在的话直接从 IocContainer 中解析
    return GetOrCreate(typeof(T).FullName, () => IocManager.Resolve<T>());
}
在 DictionaryBasedConfig 中维护了一个字典 CustomSettings ,其 Key/Value 类型为 string/object ,因为在 Abp 框架当中是不知道你自定义模块配置类的类型的,所以存了一个 object 对象。
然后就有以下用法,首先在模块 PreInitialize() 方法当中注入你需要注入的配置类:
public override void PreInitialize()
{
    // 注入配置类
    IocManager.Register<IAbpAspNetCoreConfiguration, AbpAspNetCoreConfiguration>();

    // 替换服务,后面讲解
    Configuration.ReplaceService<IPrincipalAccessor, AspNetCorePrincipalAccessor>(DependencyLifeStyle.Transient);
    Configuration.ReplaceService<IAbpAntiForgeryManager, AbpAspNetCoreAntiForgeryManager>(DependencyLifeStyle.Transient);
    Configuration.ReplaceService<IClientInfoProvider, HttpContextClientInfoProvider>(DependencyLifeStyle.Transient);
}
然后针对 IModuleConfigurations 写一个扩展方法,因为在 IModuleConfigurations 内部就有一个 IAbpAspNetCoreConfiguration 的实例,IModuleConfigurations 的注释就说该接口是用于配置模块的,模块可以通过编写扩展方法来添加自己的 Configuration 类:
public static class AbpAspNetCoreConfigurationExtensions
{
    /// <summary>
    /// Used to configure ABP ASP.NET Core module.
    /// </summary>
    public static IAbpAspNetCoreConfiguration AbpAspNetCore(this IModuleConfigurations configurations)
    {
        // 两种写法都差不多
        return configurations.AbpConfiguration.GetOrCreate("AbpModule", () => IocManager.Resolve<IAbpAspNetCoreConfiguration>());
        return configurations.AbpConfiguration.Get<IAbpAspNetCoreConfiguration>();
    }
}
2.2 服务实现替换
在 Abp 当中允许我们替换一些他本身的一些实现,只要你是在模块进行预加载的时候替换的话,都是可以的。而 Abp 他本身在 IAbpStartupConfiguration 当中提供了一个方法叫做 ReplaceService() 方法专门来让你替换服务。
我们来看一下他的定义:
void ReplaceService(Type type, Action replaceAction);emmmm,传入一个 Type 和 Action,咋跟我看到的不一样呢,Ctrl + N 搜索了一下,发现在模块里面使用的 ReplaceService() 方法是存放在 AbpStartupConfigurationExtensions 里面编写的一个静态方法,其定义如下:
public static void ReplaceService<TType, TImpl>(this IAbpStartupConfiguration configuration, DependencyLifeStyle lifeStyle = DependencyLifeStyle.Singleton)
    where TType : class
    where TImpl : class, TType
{
    configuration.ReplaceService(typeof(TType), () =>
    {
        configuration.IocManager.Register<TType, TImpl>(lifeStyle);
    });
}
我来看看,传入一个 Type 和 一个 Action ,Type 用来调用 IAbpStartupConfiguration 的同名方法,Action 则是用来注册组件的。
原来如此,我们再来到 IAbpStartupConfiguration.ReplaceService(Type type, Action replaceAction) 的具体实现:
public Dictionary<Type, Action> ServiceReplaceActions { get; private set; }

public void ReplaceService(Type type, Action replaceAction)
{
    ServiceReplaceActions[type] = replaceAction;
}
唔,就是一个字典嘛,我们来看看在什么地方用到过它。
public override void Initialize()
{
    foreach (var replaceAction in ((AbpStartupConfiguration)Configuration).ServiceReplaceActions.Values)
    {
        replaceAction();
    }

    // 其他代码
}
最后我们看到在 AbpKernelModule 的 Initialize() 方法里面就会遍历这个字典,来调用之前存入的 Action 。
因为 Abp 所有组件的注册都是在模块 Initialize() 内部来进行注册的,而这串代码刚好又放在 AbpKernelModule的初始化方法的第一行就开始执行,所以确保你替换的组件能够在 Abp 内部组件注册前执行。
所以当你要替换 Abp 内置组件服务的时候一定要记住在模块的 PreInitialize() 里面执行哦~
3. 扩展:Abp 支持多数据库
如果你的 Abp 项目有多个数据库上下文实体的时候怎么办呢?
在 Abp 官方 Demo 当中就有说明,你可以通过替换默认的 IConnectionStringResolver 来实现不同数据库的解析哦~,我们继承 DefaultConnectionStringResolver 实现一个 MulitDbContextConnectionStringResolver。
public class MulitDbContextConnectionStringResolver : DefaultConnectionStringResolver
{
    public HKERPConnectionStringResolver(IAbpStartupConfiguration configuration)
        : base(configuration)
    {
    }

    public override string GetNameOrConnectionString(ConnectionStringResolveArgs args)
    {
        if (args["DbContextConcreteType"] as Type == typeof(ADbContext))
        {
            var configuration = AppConfigurations.Get(WebContentDirectoryFinder.CalculateContentRootFolder());
            // 返回 ADbContext 的 ConnectionString
            return configuration.GetConnectionString(AllConsts.ADbConnectionStringName);
        }

        if (args["DbContextConcreteType"] as Type == typeof(BDbContext))
        {
            var configuration = AppConfigurations.Get(WebContentDirectoryFinder.CalculateContentRootFolder());
            // 返回 BDbContext 的 ConnectionString
            return configuration.GetConnectionString(HKERPCRMConsts.BDbConnectionStringName);
        }

        // 都不是则使用默认的数据库连接字符串

        return base.GetNameOrConnectionString(args);
    }

}
然后在我们的 EFCore 模块的预加载方法当中加入以下代码:
Configuration.ReplaceService(typeof(IConnectionStringResolver), () =>
{
    IocManager.IocContainer.Register(
        Component.For<IConnectionStringResolver, IDbPerTenantConnectionStringResolver>()
            .ImplementedBy<MulitDbContextConnectionStringResolver>()
            .LifestyleTransient()
        );
});
当然你也不要忘记在后面通过 AddDbContext() 方法来把你的数据库上下文添加到 Abp 里面去哦。
Configuration.Modules.AbpEfCore().AddDbContext<ADbContext>(options=>{ /*配置代码*/});
Configuration.Modules.AbpEfCore().AddDbContext<BDbContext>(options=>{ /*配置代码*/});
[Abp 源码分析]三、依赖注入
0.简要介绍
在 Abp 框架里面,无时无刻不存在依赖注入,关于依赖注入的作用与好处我就不在这里多加赘述了,网上有很多解释的教程。在 [Abp 源码分析]一、Abp 框架启动流程分析 里面已经说过,Abp 本身在框架初始化的时候我们就可以看到它使用 Castle Windsor 将 Asp.Net Core 自带的 IServiceProvider 替换掉了。
1.大体结构
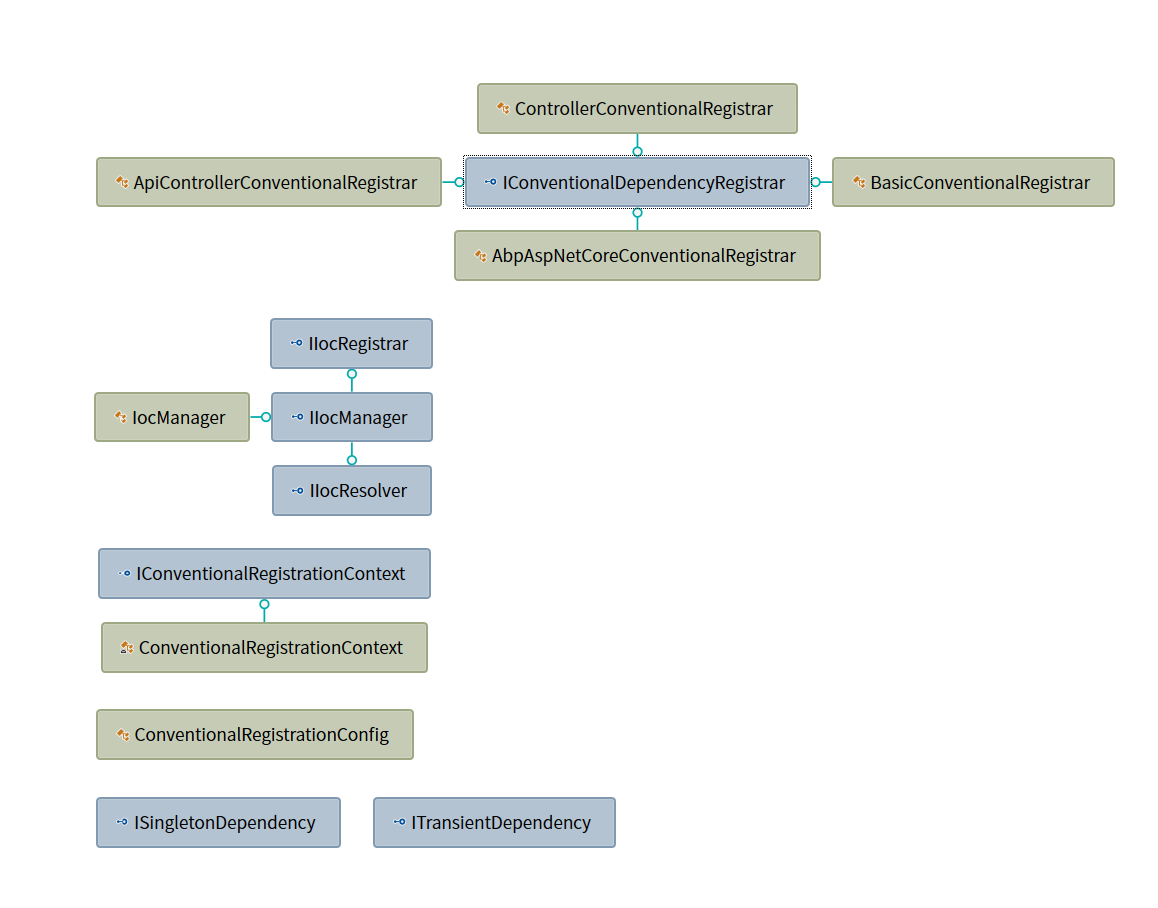
在 Abp 框架当中,它的依赖注入相关的类型基本上都放在 Abp 项目的 Dependency 文件夹里面,下图是他们之间的依赖关系:
2 代码解析
2.1 基本实现
IIocManager 是直接继承 IIocRegistrar 与 IIocResolver 的一个接口,通过名称我们就可以看出来他们的作用,IIocRegistrar 内部提供了组件注册的方法定义,而 IIocResolver 内部则是提供了解析已经注入的组件方法。在 IIocManager 本身则是封装了一个 Castle Windsor 的 Ioc 容器,定义如下:
/// <summary>
/// This interface is used to directly perform dependency injection tasks.
/// </summary>
public interface IIocManager : IIocRegistrar, IIocResolver, IDisposable
{
    /// <summary>
    /// Reference to the Castle Windsor Container.
    /// </summary>
    IWindsorContainer IocContainer { get; }

    /// <summary>
    /// Checks whether given type is registered before.
    /// </summary>
    /// <param name="type">Type to check</param>
    new bool IsRegistered(Type type);

    /// <summary>
    /// Checks whether given type is registered before.
    /// </summary>
    /// <typeparam name="T">Type to check</typeparam>
    new bool IsRegistered<T>();
}
那么我们来看看 IIocManager 的具体实现。
方法虽然看起来挺多,不过更多的只是在 Castle Windsor 上面进行了一层封装而已,可以看到 Register() 这个注册方法在其内部也是直接调用的 IWindsorContainer.Register() 来进行注入。
那么 Abp 为什么还要再包装一层呢,因为对外开放的你在使用的时候都使用的是 IIocManager 提供的注册方法,那么你需要替换 DI 框架的时候可以很快捷的替换掉整个依赖注入框架而不会影响现有代码。
public void Register(Type type, DependencyLifeStyle lifeStyle = DependencyLifeStyle.Singleton)
{
    IocContainer.Register(ApplyLifestyle(Component.For(type), lifeStyle));
}
2.2 规约注入
我们重点说一说它的规约注入,什么是规约注入?
在上面的类图当中,可以看到有一个 IConventionalDependencyRegistrar 接口,并且该接口还拥有四个实现,我们以 BasicConventionalRegistrar 类为例子看看里面做了什么操作。
/// <summary>
/// This class is used to register basic dependency implementations such as <see cref="ITransientDependency"/> and <see cref="ISingletonDependency"/>.
/// </summary>
public class BasicConventionalRegistrar : IConventionalDependencyRegistrar
{
    public void RegisterAssembly(IConventionalRegistrationContext context)
    {
        //Transient
        context.IocManager.IocContainer.Register(
            Classes.FromAssembly(context.Assembly)
                .IncludeNonPublicTypes()
                .BasedOn<ITransientDependency>()
                .If(type => !type.GetTypeInfo().IsGenericTypeDefinition)
                .WithService.Self()
                .WithService.DefaultInterfaces()
                .LifestyleTransient()
            );

        //Singleton
        context.IocManager.IocContainer.Register(
            Classes.FromAssembly(context.Assembly)
                .IncludeNonPublicTypes()
                .BasedOn<ISingletonDependency>()
                .If(type => !type.GetTypeInfo().IsGenericTypeDefinition)
                .WithService.Self()
                .WithService.DefaultInterfaces()
                .LifestyleSingleton()
            );

        //Windsor Interceptors
        context.IocManager.IocContainer.Register(
            Classes.FromAssembly(context.Assembly)
                .IncludeNonPublicTypes()
                .BasedOn<IInterceptor>()
                .If(type => !type.GetTypeInfo().IsGenericTypeDefinition)
                .WithService.Self()
                .LifestyleTransient()
            );
    }
}
在 BasicConventionalRegistrar 内部,他会扫描传入的程序集,并且根据类型所继承的接口来进行自动注入,所以 Abp 定义了两个辅助注入接口,叫做ITransientDependency 和 ISingletonDependency,并且在下面还注入了拦截器。
这样的话,我们自己就不需要频繁的使用 IIocManager.Register() 方法来手动注入,只需要在自己的实现类或者接口上面,继承上述两个接口之一即可。
在 IocManager 内部维护了一个集合 _conventionalRegistrars。
/// <summary>
/// List of all registered conventional registrars.
/// </summary>
private readonly List<IConventionalDependencyRegistrar> _conventionalRegistrars;
这个集合就是已经存在的规约注册器,在 AbpKernelModule 的预加载方法里面就使用 AddConventionalRegistrar() 方法来添加了 BasicConventionalRegistrar 注册器。代码在 AbpKernelModule.cs 的 45 行:
public override void PreInitialize()
{
    IocManager.AddConventionalRegistrar(new BasicConventionalRegistrar());

    // 其他代码
}
之后每当程序调用 IIocManager.RegisterAssemblyByConvention(Assembly assembly) 方法的时候,就会根据传入的 Assembly 来循环调用存放在集合里面注册器的 RegisterAssembly() 方法,当然你也可以随时定义一个 Registrar ,注册约定你也可以自己来编写。
public void RegisterAssemblyByConvention(Assembly assembly, ConventionalRegistrationConfig config)
{
    var context = new ConventionalRegistrationContext(assembly, this, config);

    foreach (var registerer in _conventionalRegistrars)
    {
        registerer.RegisterAssembly(context);
    }

    if (config.InstallInstallers)
    {
        IocContainer.Install(FromAssembly.Instance(assembly));
    }
}
注:一般来说,每个模块都会在它的
Initialize方法当中调用 IocManager.RegisterAssemblyByConvention(),将自己传入该方法当中来注入当前模块程序集所有符合规约的组件。
这里值得注意的是 RegisterAssemblyByConvention() 方法还有一个重载 RegisterAssemblyByConvention(Assembly assembly, ConventionalRegistrationConfig config),他将会传入一个 ConventionalRegistrationConfig 对象,该对象只有一个 bool InstallInstallers 属性,主要是在注册的时候告诉 Abp 框架是否使用该程序集内部的 IWindsorInstaller 接口规则。
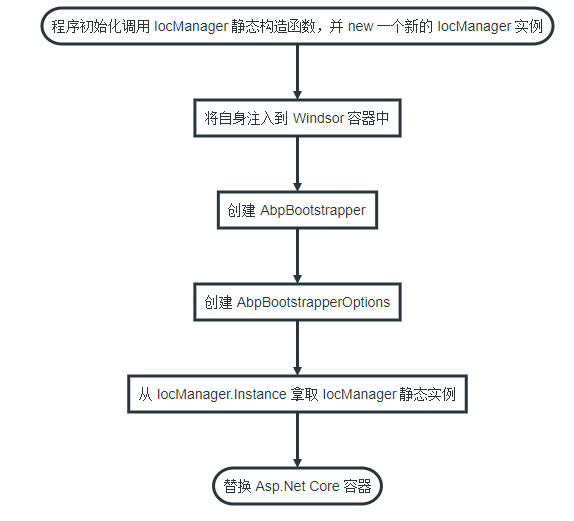
2.3 初始化过程
呐,首先呢在我们初始化 AbpBootstrapper 的时候,就已经创建好了我们的 IocManager 实例,我们可以来到 AbpBootstrapper.cs 的构造函数有以下代码:
public IIocManager IocManager { get; }

private AbpBootstrapper([NotNull] Type startupModule, [CanBeNull] Action<AbpBootstrapperOptions> optionsAction = null)
{
    Check.NotNull(startupModule, nameof(startupModule));

    var options = new AbpBootstrapperOptions();
    optionsAction?.Invoke(options);

    if (!typeof(AbpModule).GetTypeInfo().IsAssignableFrom(startupModule))
    {
        throw new ArgumentException($"{nameof(startupModule)} should be derived from {nameof(AbpModule)}.");
    }

    StartupModule = startupModule;

    IocManager = options.IocManager;
    PlugInSources = options.PlugInSources;

    _logger = NullLogger.Instance;

    if (!options.DisableAllInterceptors)
    {
        AddInterceptorRegistrars();
    }
}
可以看到在 new 了一个 AbpBootstrapperOptions 对象,并且在第 17 行将 options 创建好的 IocManager 赋值给 AbpBootstrapper 本身的 IocManager 属性。
那么在 options 内部是如何创建 IIocManager 的呢?
public AbpBootstrapperOptions()
{
    IocManager = Abp.Dependency.IocManager.Instance;
    PlugInSources = new PlugInSourceList();
}
可以看到他直接是使用的 IocManager 这个类所提供的一个静态实例。
也就是在 IocManager 类里面他有一个静态构造函数:
static IocManager()
{
    Instance = new IocManager();
}
就是这种操作,之后在 IocManager 的构造函数里面呢就将自己再注册到了 Castle Windsor 的容器里面,这样其他的组件就可以直接注入使用 IIocManager 了。
public IocManager()
{
    IocContainer = new WindsorContainer();
    _conventionalRegistrars = new List<IConventionalDependencyRegistrar>();

    //Register self!
    IocContainer.Register(
        Component.For<IocManager, IIocManager, IIocRegistrar, IIocResolver>().UsingFactoryMethod(() => this)
        );
}
我们可以回顾一下在替换 Asp.Net Core 自身的 Ioc 容器的时候,在使用的 CreateServiceProvider 就是 Castle Windsor 提供的 IocContainer 对象,该对象就是我们上文在 AbpBootstrapperOptions 里面创建的静态实例。
public static IServiceProvider AddAbp<TStartupModule>(this IServiceCollection services, [CanBeNull] Action<AbpBootstrapperOptions> optionsAction = null)
    where TStartupModule : AbpModule
{
    var abpBootstrapper = AddAbpBootstrapper<TStartupModule>(services, optionsAction);

    ConfigureAspNetCore(services, abpBootstrapper.IocManager);

    return WindsorRegistrationHelper.CreateServiceProvider(abpBootstrapper.IocManager.IocContainer, services);
}3.初始化流程图
总的来说呢,整个 Abp 框架的依赖注入相关的初始化流程图就像这样。