
C# .Net 多进程同步 通信 共享内存 内存映射文件 Memory Mapped 转 VC中进程与进程之间共享内存 .net环境下跨进程、高频率读写数据 使用C#开发Android应用之WebApp 分布式事务之消息补偿解决方案
C# .Net 多进程同步 通信 共享内存 内存映射文件 Memory Mapped 转
节点通信存在两种模型:共享内存(Shared memory)和消息传递(Messages passing)。
内存映射文件对于托管世界的开发人员来说似乎很陌生,但它确实已经是很远古的技术了,而且在操作系统中地位相当。实际上,任何想要共享数据的通信模型都会在幕后使用它。
内存映射文件究竟是个什么?内存映射文件允许你保留一块地址空间,然后将该物理存储映射到这块内存空间中进行操作。物理存储是文件管理,而内存映射文件是操作系统级内存管理。


优势:
1.访问磁盘文件上的数据不需执行I/O操作和缓存操作(当访问文件数据时,作用尤其显著);
2.让运行在同一台机器上的多个进程共享数据(单机多进程间数据通信效率最高);
利用文件与内存空间之间的映射,应用程序(包括多个进程)可以通过直接在内存中进行读写来修改文件。.NET Framework 4 用托管代码按照本机Windows函数访问内存映射文件的方式来访问内存映射文件,管理 Win32 中的内存映射文件 。
有两种类型的内存映射文件:
-
持久内存映射文件
持久文件是与磁盘上的源文件关联的内存映射文件。在最后一个进程使用完此文件后,数据将保存到磁盘上的源文件中。这些内存映射文件适合用来处理非常大的源文件。
-
非持久内存映射文件
非持久文件是未与磁盘上的源文件关联的内存映射文件。当最后一个进程使用完此文件后,数据将丢失,并且垃圾回收功能将回收此文件。这些文件适用于为进程间通信 (IPC) 创建共享内存。
1)在多个进程之间进行共享(进程可通过使用由创建同一内存映射文件的进程所指派的公用名来映射到此文件)。
2)若要使用一个内存映射文件,则必须创建该内存映射文件的完整视图或部分视图。还可以创建内存映射文件的同一部分的多个视图,进而创建并发内存。为了使两个视图能够并发,必须基于同一内存映射文件创建这两个视图。
3)如果文件大于应用程序用于内存映射的逻辑内存空间(在 32 位计算机上为2GB),则还需要使用多个视图。
有两种类型的视图:流访问视图和随机访问视图。使用流访问视图可对文件进行顺序访问;在使用持久文件时,随机访问视图是首选方法。
.Net 共享内存 内存映射文件原理:通过操作系统的内存管理器访问的,因此会自动将此文件分隔为多个页,并根据需要对其进行访问。您不需要自行处理内存管理。如下图:

C# .Net 共享内存 演示代码如下:
//持久内存映射文件:基于现有文件创建一个具有指定公用名的内存映射文件
using (var mmf = MemoryMappedFile.CreateFromFile(@"c:\内存映射文件.data", FileMode.Open, "公用名"))
{
//通过指定的 偏移量和大小 创建内存映射文件视图服务器
using (var accessor = mmf.CreateViewAccessor(offset, length)) //偏移量,可以控制数据存储的内存位置;大小,用来控制存储所占用的空间
{
//Marshal提供了一个方法集,这些方法用于分配非托管内存、复制非托管内存块、将托管类型转换为非托管类型,此外还提供了在与非托管代码交互时使用的其他杂项方法。
int size = Marshal.SizeOf(typeof(char));
//修改内存映射文件视图
for (long i = 0; i < length; i += size)
{
char c= accessor.ReadChar(i);
accessor.Write(i, ref c);
}
}
}
//另一个进程或线程可以,在系统内存中打开一个具有指定名称的现有内存映射文件
using (var mmf = MemoryMappedFile.OpenExisting("公用名"))
{
using (var accessor = mmf.CreateViewAccessor(4000000, 2000000))
{
int size = Marshal.SizeOf(typeof(char));
for (long i = 0; i < length; i += size)
{
char c = accessor.ReadChar(i);
accessor.Write(i, ref c);
}
}
}
//非持久内存映射文件:未映射到磁盘上的现有文件的内存映射文件
using (MemoryMappedFile mmf = MemoryMappedFile.CreateNew("testmap", 10000))
{
bool mutexCreated;
//进程间同步
Mutex mutex = newMutex(true, "testmapmutex", out mutexCreated);
using (var stream = mmf.CreateViewStream()) //创建文件内存视图流 基于流的操作
{
var writer = newBinaryWriter(stream);
writer.Write(1);
}
mutex.ReleaseMutex();
Console.WriteLine("Start Process B and press ENTER to continue.");
Console.ReadLine();
mutex.WaitOne();
using (MemoryMappedViewStream stream = mmf.CreateViewStream())
{
var reader = newBinaryReader(stream);
Console.WriteLine("Process A says: {0}", reader.ReadBoolean());
Console.WriteLine("Process B says: {0}", reader.ReadBoolean());
}
mutex.ReleaseMutex();
}
using (MemoryMappedFile mmf = MemoryMappedFile.OpenExisting("testmap"))
{
Mutex mutex = Mutex.OpenExisting("testmapmutex");
mutex.WaitOne();
using (var stream = mmf.CreateViewStream(1, 0))//注意这里的偏移量
{
var writer = newBinaryWriter(stream);
writer.Write(0);
}
mutex.ReleaseMutex();
}
C# .Net 进程间通信 共享内存 完整示例: C#共享内存非持久化方式通讯的例子,通讯时的线程和进程控制也没有问题。如下是实现的代码。
先启动消息服务IMServer_Message,
再启动状态服务IMServer_State,
IMServer_Message回车一次(创建共享内存公用名和公用线程锁,并视图流方式写共享内存),
IMServer_State回车一次(获取共享内存并视图流方式写、视图访问器写入结构体类型)
并立刻IMServer_Message再回车一次(读取刚刚写入的信息),
观察IMServer_State屏显变化并等待(线程锁)约5s(线程锁被释放)后
在IMServer_Message上观察屏显(显示刚刚写入共享内存的信息)
IMServer_Message.exe 代码
using System;
using System.IO;
using System.IO.MemoryMappedFiles;
using System.Runtime.InteropServices;
using System.Threading;
namespace IMServer_Message
{
/// <summary>
/// 用于共享内存方式通信的 值类型 结构体
/// </summary>
public struct ServiceMsg
{
public int Id;
public long NowTime;
}
internal class Program
{
private static void Main(string[] args)
{
Console.Write("请输入共享内存公用名(默认:testmap):");
string shareName = Console.ReadLine();
if (string.IsNullOrEmpty(shareName))
shareName = "testmap";
using (MemoryMappedFile mmf = MemoryMappedFile.CreateOrOpen(shareName, 1024000,MemoryMappedFileAccess.ReadWrite))
{
bool mutexCreated;
//进程间同步
var mutex = new Mutex(true, "testmapmutex", out mutexCreated);
using (MemoryMappedViewStream stream = mmf.CreateViewStream()) //创建文件内存视图流
{
var writer = new BinaryWriter(stream);
for (int i = 0; i < 5; i++)
{
writer.Write(i);
Console.WriteLine("{0}位置写入流:{0}", i);
}
}
mutex.ReleaseMutex();
Console.WriteLine("启动状态服务,按【回车】读取共享内存数据");
Console.ReadLine();
mutex.WaitOne();
using (MemoryMappedViewStream stream = mmf.CreateViewStream())
{
var reader = new BinaryReader(stream);
for (int i = 0; i < 10; i++)
{
Console.WriteLine("{1}位置:{0}", reader.ReadInt32(), i);
}
}
using (MemoryMappedViewAccessor accessor = mmf.CreateViewAccessor(1024, 10240))
{
int colorSize = Marshal.SizeOf(typeof (ServiceMsg));
ServiceMsg color;
for (int i = 0; i < 50; i += colorSize)
{
accessor.Read(i, out color);
Console.WriteLine("{1}\tNowTime:{0}", new DateTime(color.NowTime), color.Id);
}
}
mutex.ReleaseMutex();
}
Console.WriteLine("测试: 我是 即时通讯 - 消息服务 我启动啦!!!");
Console.ReadKey();
}
}
}
IMServer_State.exe代码
using System;
using System.IO;
using System.IO.MemoryMappedFiles;
using System.Runtime.InteropServices;
using System.Threading;
namespace IMServer_State
{
/// <summary>
/// 用于共享内存方式通信的 值类型 结构体
/// </summary>
public struct ServiceMsg
{
public int Id;
public long NowTime;
}
internal class Program
{
private static void Main(string[] args)
{
Console.Write("请输入共享内存公用名(默认:testmap):");
string shareName = Console.ReadLine();
if (string.IsNullOrEmpty(shareName))
shareName = "testmap";
using (MemoryMappedFile mmf = MemoryMappedFile.CreateOrOpen(shareName, 1024000,MemoryMappedFileAccess.ReadWrite))
{
Mutex mutex = Mutex.OpenExisting("testmapmutex");
mutex.WaitOne();
using (MemoryMappedViewStream stream = mmf.CreateViewStream(20, 0)) //注意这里的偏移量
{
var writer = new BinaryWriter(stream);
for (int i = 5; i < 10; i++)
{
writer.Write(i);
Console.WriteLine("{0}位置写入流:{0}", i);
}
}
using (MemoryMappedViewAccessor accessor = mmf.CreateViewAccessor(1024, 10240))
{
int colorSize = Marshal.SizeOf(typeof (ServiceMsg));
var color = new ServiceMsg();
for (int i = 0; i < colorSize*5; i += colorSize)
{
color.Id = i;
color.NowTime = DateTime.Now.Ticks;
//accessor.Read(i, out color);
accessor.Write(i, ref color);
Console.WriteLine("{1}\tNowTime:{0}", new DateTime(color.NowTime), color.Id);
Thread.Sleep(1000);
}
}
Thread.Sleep(5000);
mutex.ReleaseMutex();
}
Console.WriteLine("测试: 我是 即时通讯 - 状态服务 我启动啦!!!");
Console.ReadKey();
}
}
}
进程A写数据,进程B读数据;
进程A:
#include "stdafx.h"
#include <Windows.h>
#include <iostream>
using namespace std;
int _tmain(int argc, _TCHAR* argv[])
{
HANDLE lhShareMemory;
char* lpBuffer = NULL;
lhShareMemory = CreateFileMapping(HANDLE(0xFFFFFFFF), NULL, PAGE_READWRITE,
0, 10, "mySharedMemory");
if (NULL == lhShareMemory)
{
if (ERROR_ALREADY_EXISTS == GetLastError())
{
cout << "Already exists!";
}
else
{
cout << "Create Sheared Memory unsuccessfully!";
}
return 0;
}
lpBuffer = (char*)MapViewOfFile(lhShareMemory, FILE_MAP_WRITE, 0, 0, 10);
if (NULL == lpBuffer)
{
cout << "Get Share memory unsuccessfully!";
return 0;
}
strcpy(lpBuffer, "hello");
cout << *(lpBuffer + 40) << endl;
Sleep(600000);
UnmapViewOfFile(lpBuffer);
return 0;
}
进程B:
#include "stdafx.h"
#include <Windows.h>
#include <iostream>
#include <string>
using namespace std;
int _tmain(int argc, _TCHAR* argv[])
{
HANDLE lhShareMemory;
char* lpcBuffer;
lhShareMemory = OpenFileMapping(FILE_MAP_READ, false, "mySharedMemory");
if (NULL == lhShareMemory)
{
cout << "Open share memory unsuccessfully!" << endl;
DWORD ldwError = GetLastError();
cout << ldwError;
return 0;
}
lpcBuffer = (char*)MapViewOfFile(lhShareMemory, FILE_MAP_READ, 0, 0, 100);
if (NULL == lpcBuffer)
{
cout << "Open share memory unsuccessfully!";
return 0;
}
for (int i = 0; i < 100; ++i)
{
cout << *(lpcBuffer + i);
}
UnmapViewOfFile(lpcBuffer);
return 0;
}
.net环境下跨进程、高频率读写数据
一、需求背景
1、最近项目要求高频次地读写数据,数据量也不是很大,多表总共加起来在百万条上下。
单表最大的也在25万左右,历史数据表因为不涉及所以不用考虑,
难点在于这个规模的热点数据,变化非常频繁。
数据来源于一些检测设备的采集数据,一些大表,有可能在极短时间内(如几秒钟)可能大部分都会变化,
而且主程序也有一些后台服务需要不断轮询、读写某种类型的设备,所以要求信息交互时间尽可能短。
2、之前的解决方案是把所有热点数据,统一加载到共享内存里边,到也能够支撑的住(毫秒级的),但是由于系统架构升级,之前的程序(20年前的)不能兼容。
只能重新写一个,最先想到的是用redis,当时把所有API重写完成后,测试发现效率不行,是的,你没有看错,redis也是有使用范围的。
3、redis读写非常快,但是对于大批量读写操作我觉得支持不够,虽然redis支持批量读写,但是效率还是不够快,
对于字符串(string)类型的批量读写,我测试过;效率比较好的在每批次200 至 250条之间,处理20万条数据耗时5秒左右, (PC机,8G,4核)
而对于有序集合(sorted set)类型,批量写的操作用起来非常别扭,而且没有修改API(如有其他方式请指教),我测试过,效率没string类型那么高
其他类型不适合我的业务场景,就没考虑使用了
4、所以项目组最后决定还是用回共享内存,先决定在.net环境下使用c#的共享内存,这个功能可能使用的人不多,其实在.net4.0版本就已经集成进来了
在System.IO.MemoryMappedFile命名空间下。这个类库让人很无语,因为里边能用的只有Write、Read这2种方法,而且只是针对字节的操作,
需要非常多的类型转换,非常麻烦!想想,只能以字节为单位去构建一个需要存放百万级数据的内存数据库,得多麻烦?
需要手动搞定索引功能,因为要支持各种查询,最后花了一天的时间写完DEMO,最后测试后发现效率并没有很大提高,因为当时加了互斥量测试,
但是离毫秒级差得远。这个技术点有兴趣的可以了解下,园子里有,如:https://www.cnblogs.com/zeroone/archive/2012/04/18/2454776.html
二、没错,第一节写的太多了
1、最后分析,这应该是c#语言的瓶颈,c#对于这种骚操作是不那么成熟的。
2、最后瞄来瞄去,决定使用VC开发一个dll,在里边封装对内存数据的读写功能,然后c#调用
3、本人的C、C++不那么熟、参考了一些实例,比如园子里的:http://www.cnblogs.com/cwbcwb505/archive/2008/12/08/1350505.html
4、是的,你没有看错,2008年的,我还看到一篇更早的,看来底层开发C、C++那么经久不衰不是没有道理的,很多技术现在都在用
5、看看什么是共享内存

三、开始写代码了
1、首先建2个控制台项目,支持MFC,
2、先这样:一个负责创建共享内存,初始化数据
3、再这样:一个读写数据测试,最后修改
4、最后修改下图片细节,测试一下,看看效果


5、完成了,see, 是不是很简单呀?都会了吗?

四、真的要贴代码了
1、先定义个枚举返回状态

1 typedef enum
2 {
3     Success = 0,
4     AlreadyExists = 1,
5     Error = 2,
6     OverSize = 3
7 }enumMemory;
2、再定义个结构体用来测试
 1 typedef struct
 2 {
 3     int        TagID;
 4     char    TagName[32];
 5     int        Area;
 6     double    EngVal;
 7     double    UpdateTime;
 8     double    RawMax;
 9     double    RawMin;
10     double    RawVal;
11     char    Name[50];
12     char    Al;
13     double    ASTime;
14     char    MaskState;
15     double    AMTime;
16     char    Cf;
17     char    Tdf;
18     char    AlarmCode[32];
19 }TENG;
3、开始创建共享内存
 1     int Create(UINT size)
 2     {
 3         // Data
 4         HANDLE fileMap = CreateFileMapping(INVALID_HANDLE_VALUE, NULL, PAGE_READWRITE, 0, size, “Name”);
 5
 6         if (fileMap == NULL || fileMap == INVALID_HANDLE_VALUE)
 7             return Error;
 8
 9         if (GetLastError() == ERROR_ALREADY_EXISTS)
10             return AlreadyExists;
11
12         // init
13         void *mapView = MapViewOfFile(fileMap, FILE_MAP_WRITE, 0, 0, size);
14
15         if (mapView == NULL)
16             return Error;
17         else
18             memset(mapView, 0, size);
19
20         return Success;
21     }
4、再开始写数据
 1     int Write(void *pDate, UINT nSize, UINT offset)
 2     {
 3         // open
 4         HANDLE fileMap = OpenFileMapping(FILE_MAP_WRITE, FALSE, “Name”);
 5
 6         if (fileMap == NULL)
 7             return Error;
 8
 9         // hander
10         void *mapView = MapViewOfFile(fileMap, FILE_MAP_WRITE, 0, 0, nSize);
11
12         if (mapView == NULL)
13             return Error;
14         else
15             WriteDataPtr = mapView;
16
17         // write
18         memcpy(mapView, pDate, nSize);
19
20         UnmapViewOfFile(pMapView);
21         return Success;
22     }
5、开始读数据
 1     int Read(void *pData, UINT nSize, UINT offset)
 2     {
 3         // open
 4         HANDLE fileMap = OpenFileMapping(FILE_MAP_READ, FALSE, GetTableName());
 5
 6         if (fileMap == NULL)
 7             return Error;
 8
 9         // hander
10         void *pMapView = MapViewOfFile(fileMap, FILE_MAP_READ, 0, 0, nSize);
11
12         if (pMapView == NULL)
13             return Error;
14         else
15             ReadDataPtr = pMapView;
16
17         memcpy(pData, (pMapView, nSize);
18
19         UnmapViewOfFile(pMapView);
20         return Success;
21     }
6、OK了,不复杂,网上都有这些资料,最后我们贴上测试程序
 1 int _tmain(int argc, TCHAR* argv[], TCHAR* envp[])
 2 {
 3     int length = 100000;
 4     CEng * ceng = new CEng();
 5     DWORD dwStart = GetTickCount();
 6
 7     for (int i = 0; i < length; i++) {
 8         TENG eng;
 9         ceng->Read(&eng, ceng->size, ceng->size * i);
10
11         eng.EngVal = i;
12         ceng->Write(&eng, ceng->size, (i*ceng->size));
13
14         if (i % 10000 == 0 || i == length - 1)
15             printf("正在读写的Eng.TagName:%s \n", eng.TagName);
16     }
17
18     printf("总条数%d,耗时:%d 毫秒 \n", length, GetTickCount() - dwStart);
19
20     // 验证数据
21     TENG eng5000;
22     ceng->Read(&eng5000, ceng->size, ceng->size * 5000);
23     printf("\n验证数据 \n");
24     printf("第5000个Eng的TagID:%d, EngVal:%lf \n", eng5000.TagID, eng5000.EngVal);
25
26
27     scanf_s("按任意键结束");
28     return 0;
29 }
7、还有写测试程序
 1 int _tmain(int argc, TCHAR* argv[], TCHAR* envp[])
 2 {
 3     int length = 100000;
 4     CEng * ceng = new CEng();
 5     ceng->Create(ceng->size * length);
 6
 7     DWORD dwStart = GetTickCount();
 8
 9     for (int i = 0; i < length; i++)
10     {
11         TENG eng;
12         memset(&eng, 0, ceng->size);
13
14         eng.TagID = i;
15         sprintf_s(eng.AlarmCode, "AlarmCode.%d", i);
16         sprintf_s(eng.TagName, "TagName.%d", i);
17
18         if (i % 10000 == 0 || i == length - 1)
19             printf("正在写入的Eng.TagName:%s \n", eng.TagName);
20
21         ceng->Write(&eng, ceng->size, (i*ceng->size));
22     }
23
24
25     // print time
26     printf("写入数据完毕,总条数:%d\n", length);
27     printf("初始化值共享内存区耗时:%d 毫秒 \n", GetTickCount() - dwStart);
28
29
30     scanf_s("按任意键结束");
31     return 0;
32 }
8、当然得再贴一遍啦
五、差点忘记做成DLL了
1、定义外部函数
1 extern "C" __declspec(dllexport) int ReadFromSharedMemory(TENG *pData, int nSize, int offset)
2 {
3     return ceng->Read(pData, nSize, offset);
4 }
5
6 extern "C" __declspec(dllexport) int WriteToSharedMemory(void *pData, int nSize, int offset)
7 {
8     return ceng->Write(pData, nSize, offset);
9 }
2、好了,VC到此为止,可以去领盒饭了,c#进场
1     public class Lib
2     {
3         [DllImport("ConsoleApplication4.dll", CallingConvention = CallingConvention.Cdecl)]
4         public static extern int ReadFromSharedMemory(IntPtr pData, int nSize, int offset);
5
6         [DllImport("ConsoleApplication4.dll", CallingConvention = CallingConvention.Cdecl)]
7         public static extern int WriteToSharedMemory(IntPtr pData, int nSize, int offset);
8     }
3、c#测试一下
 1 static void Main(string[] args)
 2         {
 3             var length = 100000;
 4             var startTime = DateTime.Now;
 5             var size = Marshal.SizeOf(typeof(TEng));
 6             var intPtrOut = Marshal.AllocHGlobal(size);
 7             var intPtrIn = Marshal.AllocHGlobal(size);
 8
 9             for (var i = 0; i < length; i++)
10             {
11                 Lib.ReadFromSharedMemory(intPtrOut, size, size * i);
12
13                 var eng = Marshal.PtrToStructure<TEng>(intPtrOut);
14                 eng.EngVal = i;
15
16                 Marshal.StructureToPtr(eng, intPtrIn, true);
17                 Lib.WriteToSharedMemory(intPtrIn, size, size * i);
18
19                 if (i % 10000 == 0)
20                     Console.WriteLine("eng.TagID:{0}", eng.TagID);
21             }
22
23             Console.WriteLine("总条数{0},耗时:{1} 毫秒", length.ToString(),
24                 (DateTime.Now - startTime).TotalMilliseconds.ToString());
25
26             // 验证数据
27             var intPtr100 = Marshal.AllocHGlobal(size);
28             Lib.ReadFromSharedMemory(intPtr100, size, size * 100);
29
30             var eng100 = Marshal.PtrToStructure<TEng>(intPtr100);
31
32             Console.WriteLine();
33             Console.WriteLine("验证数据");
34             Console.WriteLine("第100个Eng的TagID:{0},EngVal:{1}", eng100.TagID, eng100.EngVal);
35
36             Console.ReadKey();
37         }

4、165毫秒,相比在VC下运行,差了一个数量级,但是,也不错了;
因为c#环境下需要不断的Marshal.PtrToStructure、Marshal.StructureToPtr,频繁地把数据在托管内存俞共享内存之间搬运
是需要耗费时间的,这点有更好处理方式的请指教,
六、因为跨线程、进程,所以要考虑加入互斥量哦
1、很简单,MFC下有现成的类CMutex,加在Write里边在看看效率

互斥量是需要耗费资源的,多了将进100毫秒
2、读写都加上互斥量试试看

又多了80多毫秒,
鱼与熊掌不可兼得啊。要根据实际运用场景觉得是否加上互斥量
好了,人家51去游玩、我却宅家里码程序,可见我的趣味还是挺高的,洗澡、洗衣服、然后去吃饭、一天没进食了,
内存映射
1,Redis操作性能,单机220w每秒,存放数据15亿,至强32核,512G内存
2,C#内存操作,每秒1.6亿次,AMD8核8G内存
3,C#共享内存操作,简称MMF,4000w读写每秒
使用C#开发Android应用之WebApp
近段时间了解了一下VS2017开发安卓应用的一些技术,特地把C#开发WebApp的一些过程记录下来,
欢迎大家一起指教、讨论,废话少说,是时候开始表演真正的技术了。。
1、新建空白Android应用

2、拖一个WebView控件进来


3、打开模拟器Genymotion,选择一个系统版本,启动


4、加载网页
4.1 打开MainActivity.cs,在OnCreate方法里添加2行代码
 1         protected override void OnCreate(Bundle savedInstanceState)
 2         {
 3             base.OnCreate(savedInstanceState);
 4
 5             // Set our view from the "main" layout resource
 6             SetContentView(Resource.Layout.Main);
 7
 8             var web = FindViewById<WebView>(Resource.Id.webView1);
 9             web.LoadUrl("http://www.baidu.com");
10         }
加载网页就是这样简单,F5调试,就可以看到模拟器有了变化,打开了我们的应用,并如期加载了网页

5、网页端调用手机APP后台方法
5.1 打开MainActivity.cs,重写OnCreate为如下
 1         protected override void OnCreate(Bundle savedInstanceState)
 2         {
 3             base.OnCreate(savedInstanceState);
 4
 5             var webView = new WebView(this);
 6             SetContentView(webView);
 7
 8             webView.Settings.JavaScriptEnabled = true;
 9             webView.AddJavascriptInterface(new CustomJSInterface(this), "CSharp");
10             webView.LoadUrl("http://192.168.0.113:8080/");
11         }
标红的是实现前端调用后台方法的关键,新建CustomJSInterface.cs
 1     public class CustomJSInterface : Java.Lang.Object
 2     {
 3         Context context;
 4
 5         public CustomJSInterface(Context context)
 6         {
 7             this.context = context;
 8         }
 9
10         [Export]
11         [JavascriptInterface]
12         public void ShowToast(string message)
13         {
14             Toast.MakeText(context, message, ToastLength.Short).Show();
15         }
16     }
而"http://192.168.0.113:8080/"是我们的Web站点,大部分业务逻辑在网站里处理,WebApp只是在外表包了一个壳
5.2 我们再新建一个本地Web站点

改动首页HTML,主要功能是点击按钮,会调用后台ShowToast,这是个提示功能
1 @{
2     ViewBag.Title = "Home Page";
3 }
4
5 <br />
6 <div class="jumbotron">
7     <button type="button" onClick="CSharp.ShowToast('hello')">由前端调用C#后台方法</button>
8 </div>
浏览器预览

5.3 VS2017按F5部署,可以看的模拟器也正常把本地站点加载进来了

点击"获取前端JS返回的数据"

6、APP执行前端JS方法
6.1 重写OnCreate
 1             // 必须重写WebView客户端
 2             webView.SetWebViewClient(new CustomWebViewClient());
 3             // 先打开首页
 4             webView.LoadUrl("http://192.168.0.113:8080/");
 5
 6             // APP主动获取前端数据
 7             var btn = FindViewById<Button>(Resource.Id.button1);
 8             btn.Click += delegate
 9             {
10                 var callback = new ReceiveValueCallback();
11                 callback.OnReceiveValueCallback += (message) =>
12                 {
13                     Toast.MakeText(this.ApplicationContext, message, ToastLength.Short).Show();
14                 };
15
16                 webView.EvaluateJavascript("GetData()", callback);
17             };
6.2 新建CustomWebViewClient.cs
1     class CustomWebViewClient : WebViewClient
2     {
3         public override bool ShouldOverrideUrlLoading(WebView view, String url)
4         {
5             view.LoadUrl(url);
6             return true;
7         }
8     }
6.3 新建ReceiveValueCallback.cs,这个类主要负责处理前端返回的数据
 1     public class ReceiveValueCallback : Java.Lang.Object, IValueCallback
 2     {
 3         public delegate void OnReceiveValueCallbackHandler(string message);
 4         public event OnReceiveValueCallbackHandler OnReceiveValueCallback;
 5
 6         // 重写ReceiveValue方法
 7         public void OnReceiveValue(Java.Lang.Object value)
 8         {
 9             OnReceiveValueCallback(value.ToString());
10         }
11     }
6.4 修改Index.html
 1 @{
 2     ViewBag.Title = "Home Page";
 3 }
 4
 5 <br />
 6 <div class="jumbotron">
 7     <button type="button" onClick="CSharp.ShowToast('hello')">由前端调用C#后台方法</button>
 8 </div>
 9
10 <script type="text/javascript">
11     function GetData() {
12         return "123456789";
13     }
14 </script>
6.5 VS2017按F5部署

6.6 点击按钮"获取前端JS返回的数据"

7、WebAPP使用疑问
7.1 细心的人可能注意到:前端代码完全可以自己处理完业务,那还有WebApp什么事情呢?这时的APP完全就跟一个浏览器差不多!
7.2 确实是这样的WebApp相对与其他安卓APP来说,是轻量级的,只是一个壳子,但是他也是有其合适的使用范围;
比如:如果前端并没有数据持久化功能(如纯JS前端),这时要保存数据只能调用其他的WebApi,而由于JS的特性可能会引起一些安全问题。
或者根本没有第三方API,数据需要保存在手机端,JS也没有这种权限。
所以既兼顾了像升级Web站点那样简便,又有一些手机端的操作权限,WebApp应运而生。
分布式事务之消息补偿解决方案
一、数据库本地事务
先看看数据库事务的定义:单个逻辑工作单元执行的一系列操作,要么完全地执行,要么完全地不执行
这个比较容易理解,操作过数据库的一般都懂,既是业务需求涉及到多个数据表操作的时候,需要用到事务
要么一起更新,要么一起不更新,不会出现只更新了部分数据表的情况,下边看看数据库事务的使用
1 begin tran
2     begin try
3         update Table1 set Field = 1 where ID = 1
4         update Table2 set Field = 2 where ID = 1
5     end try
6     begin catch
7         rollback tran
8     end catch
9 commit tran
上实例在小型项目中一般是问题不大的,因为小型项目一般是单机系统,数据库、Web服务大都在一台服务器上,甚至可能只有一个数据库文件,
这种情况下使用本地事务没有一点问题;
但是本地事务有很大的缺陷,因为开启事务一般是锁表的,事务执行期间会一直锁着,其他的操作一般都要排队等待,对性能要求比较高的系统是不能忍受的。
特别是涉及改动不同数据库的操作,这会造成跨库事务,性能更加低
如果还涉及到不在同一台服务器、甚至不同网段部署的数据库,那本地事务简直是系统运行的灾难,是首先需要丢弃的解决方案。

那如果遇到上述情况,该怎么做呢,这就涉及到分布式事务了
二、分段式事务的补偿机制
如果有海量数据需要处理、或者要求高并发请求的话,同步的事务机制已经是不现实的了,这种情况下必须采用异步事务机制,既分段式的事务
分段式事务一般做法就是把需求任务分段式地完成,通过事务补偿机制来保证业务最终执行成功,补偿机制一般可以归类为2种:
1 )定时任务补偿:
通过定时任务去跟进后续任务,根据不同的状态表确定下一步的操作,从而保证业务最终执行成功,
这种办法可能会涉及到很多的后台服务,维护起来也会比较麻烦,这是应该是早期比较流行的做法
2) 消息补偿:
通过消息中间件触发下一段任务,既通过实时消息通知下一段任务开始执行,执行完毕后的消息回发通知来保证业务最终完成;
当然这也是异步进行的,但是能保证数据最终的完整性、一致性,也是近几年比较热门的做法
定时任务补偿就不说了,这篇文章我们来讨论一下通过消息补偿来完成分布式事务的一般做法
三、分布式事务之消息补偿
0)我们以简单的产品下单场景来说明,(不要较真哈)
1)先来看看分布式异步事务处理流程示意图,APP1与APP2需要互相订阅对方消息
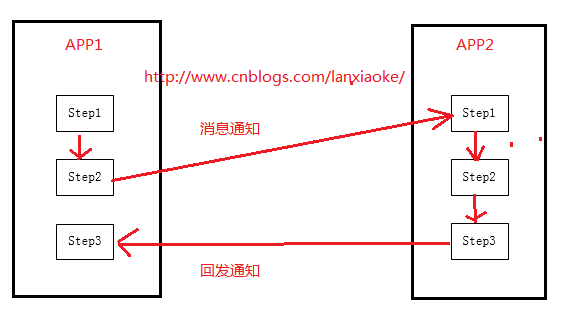
2)首先看数据库,2个,一个库存库,一个已下单成功的库
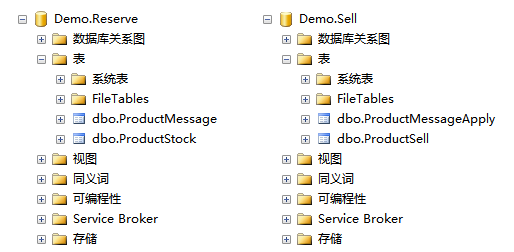
 1 -- 下单通知,主要作用保留已下单操作,消息发送失败可以根据此表重新发送
 2 CREATE TABLE [dbo].[ProductMessage](
 3     [ID] [int] IDENTITY(1,1) NOT NULL,
 4     [Product] [varchar](50) NULL,
 5     [Amount] [int] NULL,
 6     [UpdateTime] [datetime] NULL
 7 )
 8 -- 库存
 9 CREATE TABLE [dbo].[ProductStock](
10     [ID] [int] IDENTITY(1,1) NOT NULL,
11     [Product] [varchar](50) NULL,
12     [Amount] [int] NULL
13 )
14 -- 下单成功
15 CREATE TABLE [dbo].[ProductSell](
16     [ID] [int] IDENTITY(1,1) NOT NULL,
17     [Product] [varchar](50) NULL,
18     [Customer] [int] NULL,
19     [Amount] [int] NULL
20 )
21 -- 下单成功消息,主要作用防止重复消费
22 CREATE TABLE [dbo].[ProductMessageApply](
23     [ID] [int] IDENTITY(1,1) NOT NULL,
24     [MesageID] [int] NULL,
25     [CreateTime] [datetime] NULL
26 )
3)项目架构Demo

数据底层访问使用的是Dapper、使用redis作为消息中间件
4)实体层代码
 1     public class ProductMessage
 2     {
 3         [Key]
 4         [IgnoreProperty(true)]
 5         public int ID { get; set; }
 6         public string Product { get; set; }
 7         public int Amount { get; set; }
 8         public DateTime UpdateTime { get; set; }
 9     }
10     public class ProductMessageApply
11     {
12         [Key]
13         [IgnoreProperty(true)]
14         public int ID { get; set; }
15         public int MesageID { get; set; }
16         public DateTime CreateTime { get; set; }
17     }
18     public class ProductSell
19     {
20         [Key]
21         [IgnoreProperty(true)]
22         public int ID { get; set; }
23         public string Product { get; set; }
24         public int Customer { get; set; }
25         public int Amount { get; set; }
26     }
27     public class ProductStock
28     {
29         [Key]
30         [IgnoreProperty(true)]
31         public int ID { get; set; }
32         public string Product { get; set; }
33         public int Amount { get; set; }
34     }
5)服务接口层代码
 1     public interface IProductMessageApplyService
 2     {
 3         void Add(ProductMessageApply entity);
 4         ProductMessageApply Get(int id);
 5     }
 6     public interface IProductMessageService
 7     {
 8         void Add(ProductMessage entity);
 9         IEnumerable<ProductMessage> Gets(object paramPairs = null);
10         void Delete(int id);
11     }
12     public interface IProductSellService
13     {
14         void Add(ProductSell entity);
15     }
16     public interface IProductStockService
17     {
18         void ReduceReserve(int id, int amount);
19     }
6)库存、消息通知
 1     public class ProductMessageService : IProductMessageService
 2     {
 3         private IRepository<ProductMessage> repository;
 4
 5         public ProductMessageService(IRepository<ProductMessage> repository)
 6         {
 7             this.repository = repository;
 8         }
 9
10         public void Add(ProductMessage entity)
11         {
12             this.repository.Add(entity);
13         }
14
15         public IEnumerable<ProductMessage> Gets(object paramPairs = null)
16         {
17             return this.repository.Gets(paramPairs);
18         }
19
20         public void Delete(int id)
21         {
22             this.repository.Delete(id);
23         }
24     }
25
26     public class ProductStockService : IProductStockService
27     {
28         private IRepository<ProductStock> repository;
29
30         public ProductStockService(IRepository<ProductStock> repository)
31         {
32             this.repository = repository;
33         }
34
35         public void ReduceReserve(int id, int amount)
36         {
37             var entity = this.repository.Get(id);
38             if (entity == null) return;
39
40             entity.Amount = entity.Amount - amount;
41             this.repository.Update(entity);
42         }
43     }
7)下单、下单成功消息
 1     public class ProductMessageApplyService : IProductMessageApplyService
 2     {
 3         private IRepository<ProductMessageApply> repository;
 4
 5         public ProductMessageApplyService(IRepository<ProductMessageApply> repository)
 6         {
 7             this.repository = repository;
 8         }
 9
10         public void Add(ProductMessageApply entity)
11         {
12             this.repository.Add(entity);
13         }
14
15         public ProductMessageApply Get(int id)
16         {
17             return this.repository.Get(id);
18         }
19     }
20
21     public class ProductSellService : IProductSellService
22     {
23         private IRepository<ProductSell> repository;
24
25         public ProductSellService(IRepository<ProductSell> repository)
26         {
27             this.repository = repository;
28         }
29
30         public void Add(ProductSell entity)
31         {
32             this.repository.Add(entity);
33         }
34     }
8)下单减库存测试
 1 namespace Demo.Reserve.App
 2 {
 3     class Program
 4     {
 5         static void Main(string[] args)
 6         {
 7             Console.WriteLine(string.Format("{0} 程序已启动", DateTime.Now.ToString()));
 8
 9             Send();
10             Subscribe();
11
12             Console.ReadKey();
13         }
14
15         private static void Send()
16         {
17             var unitOfWork = new UnitOfWork(Enums.Reserve);
18
19             try
20             {
21                 var productStockRepository = new BaseRepository<ProductStock>(unitOfWork);
22                 var productStockServic = new ProductStockService(productStockRepository);
23                 var productMessageRepository = new BaseRepository<ProductMessage>(unitOfWork);
24                 var productMessageService = new ProductMessageService(productMessageRepository);
25
26                 var id = 1;
27                 var amount = 2;
28                 var productMessage = new ProductMessage()
29                 {
30                     Product = "ProductCode",
31                     Amount = amount,
32                     UpdateTime = DateTime.Now
33                 };
34
35                 productStockServic.ReduceReserve(id, amount);
36                 productMessageService.Add(productMessage);
37                 unitOfWork.Commit();
38                 Console.WriteLine(string.Format("{0} 减库存完成", DateTime.Now.ToString()));
39                 Thread.Sleep(1000);
40
41                 var message = JsonConvert.SerializeObject(productMessage);
42                 RedisConfig.Instrace.Publish("channel.Send", message);
43                 Console.WriteLine(string.Format("{0} 发送减库存消息: {1}", DateTime.Now.ToString(), message));
44             }
45             catch (Exception ex)
46             {
47                 //Logger.Error(ex);
48                 unitOfWork.Rollback();
49             }
50         }
51
52         private static void Subscribe()
53         {
54             var client = RedisConfig.Instrace.NewClient();
55             var subscriber = client.GetSubscriber();
56
57             subscriber.Subscribe("channel.Success", (chl, message) =>
58             {
59                 try
60                 {
61                     var unitOfWork = new UnitOfWork(Enums.Reserve);
62                     var productMessageRepository = new BaseRepository<ProductMessage>(unitOfWork);
63                     var productMessageService = new ProductMessageService(productMessageRepository);
64
65                     var messageID = message.ToString().ToInt();
66                     if (messageID > 0)
67                     {
68                         productMessageService.Delete(messageID);
69                         Console.WriteLine(string.Format("{0} 收到消费成功消息:{1}", DateTime.Now.ToString(), message));
70                     }
71                 }
72                 catch (Exception ex)
73                 {
74                     //Logger.Error(ex);
75                 }
76             });
77         }
78     }
79 }
9)下单成功及消息回发测试
 1 namespace Demo.Sell.App
 2 {
 3     class Program
 4     {
 5         static void Main(string[] args)
 6         {
 7             Subscribe();
 8
 9             Console.WriteLine(string.Format("{0} 程序已启动", DateTime.Now.ToString()));
10             Console.ReadKey();
11         }
12
13         private static void Subscribe()
14         {
15             var client = RedisConfig.Instrace.NewClient();
16             var subscriber = client.GetSubscriber();
17
18             subscriber.Subscribe("channel.Send", (chl, message) =>
19             {
20                 Consume(message);
21             });
22         }
23
24         private static void Consume(string message)
25         {
26             var unitOfWork = new UnitOfWork(Enums.Sell);
27
28             try
29             {
30                 Console.WriteLine(string.Format("{0} 收到减库存消息: {1}", DateTime.Now.ToString(), message));
31
32                 var productMessage = JsonConvert.DeserializeObject<ProductMessage>(message);
33
34                 var productSellRepository = new BaseRepository<ProductSell>(unitOfWork);
35                 var productSellService = new ProductSellService(productSellRepository);
36
37                 var productMessageApplyRepository = new BaseRepository<ProductMessageApply>(unitOfWork);
38                 var productMessageApplyService = new ProductMessageApplyService(productMessageApplyRepository);
39
40                 var noExists = productMessageApplyService.Get(productMessage.ID) == null;
41                 if (noExists)
42                 {
43                     productSellService.Add(new ProductSell()
44                     {
45                         Product = productMessage.Product,
46                         Amount = productMessage.Amount,
47                         Customer = 123
48                     });
49
50                     productMessageApplyService.Add(new ProductMessageApply()
51                     {
52                         MesageID = productMessage.ID,
53                         CreateTime = DateTime.Now
54                     });
55
56                     unitOfWork.Commit();
57                     Console.WriteLine(string.Format("{0} 消息消费完成", DateTime.Now.ToString()));
58                     Thread.Sleep(1000);
59                 }
60
61                 RedisConfig.Instrace.Publish("channel.Success", productMessage.ID.ToString());
62                 Console.WriteLine(string.Format("{0} 发送消费完成通知:{1}", DateTime.Now.ToString(), productMessage.ID.ToString()));
63             }
64             catch (Exception ex)
65             {
66                 //Logger.Error(ex);
67                 unitOfWork.Rollback();
68             }
69         }
70     }
71 }
10)好了,到了最后检验成果的时候了
先打开Demo.Sell.App.exe、然后打开Demo.Reserve.App.exe
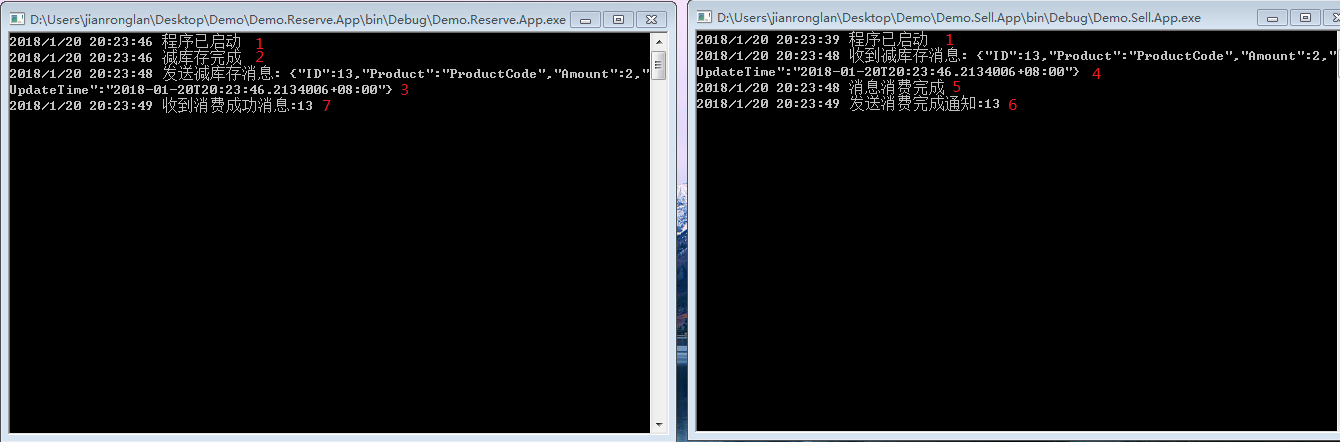
大功告成!

