
Kubernetes调度流程与安全(七)
一、Kubernetes中的调度流程
1,介绍
Scheduler 是 k8s 中的调度器,主要的任务是把定义的 Pod 分配到集群的节点上。Scheduler 是作为一个单独的程序运行的,启动之后会一直监听 apiserver。听起来很简单,但有很多要考虑的问题:
- 公平:如何保证每个节点都能被分配资源。
- 资源利用率高:集群所有资源最大化被使用。
- 效率:调度的性能要好,能够尽快的对大批量的 Pod 完成调度工作。
- 灵活:允许用户根据自己的需求控制调度逻辑。
调度过程分为几个部分:
2,亲和性
亲和性策略,可以设置 Pod 在创建时更倾向创建在哪个节点上。其有两个维度可设置:
- 节点亲和性:设置节点的相关信息,在创建 Pod 的时候与节点信息进行匹配。
- Pod 亲和性:设置 Pod 的相关信息,在创建 Pod 的时候与已存在的 Pod 信息进行匹配。
不管是节点亲和性还是 Pod 亲和性,其设置策略中都有 软策略 和 硬策略 两种方案。
- 软策略(preferredDuringSchedulingIgnoredDuringExecution):Pod 倾向于创建在某个节点上,如果条件不符合,可以创建在其它节点上。
- 硬策略(requiredDuringSchedulingIgnoredDuringExecution):Pod 必须被创建某个节点上,如果条件不符合,那么 Pod 会一直处于 pending 状态。
a)节点亲和性
软策略示例
apiVersion: v1
kind: Pod
metadata:
  name: node-pre-pod
spec:
  containers:
  - name: nginx-container
    image: hub.xcc.com/my-xcc/my-nginx:v1
    ports:
    - containerPort: 80
  affinity:
    nodeAffinity:               #亲和性
      preferredDuringSchedulingIgnoredDuringExecution: #软策略
      - weight: 1               #权重值
        preference:
          matchExpressions:     #匹配表达式
          - key: kubernetes.io/hostname #节点标签名
            operator: In        #操作运算关系符
            values:             #标签值
            - worker01
硬策略示例
apiVersion: v1
kind: Pod
metadata:
  name: node-req-pod
spec:
  containers:
  - name: nginx-container
    image: hub.xcc.com/my-xcc/my-nginx:v1
    ports:
    - containerPort: 80
  affinity:
    nodeAffinity:            #节点亲和性
      requiredDuringSchedulingIgnoredDuringExecution: #硬策略
        nodeSelectorTerms:
        - matchExpressions:
          - key: kubernetes.io/hostname
            operator: NotIn
            values:
            -worker01
两个策略组合。这样的Pod会先匹配符合硬策略的节点,然后在匹配符合软策略的节点。
apiVersion: v1
kind: Pod
metadata:
  name: node-pod
spec:
  containers:
  - name: nginx-container
    image: hub.xcc.com/my-xcc/my-nginx:v1
    ports:
    - containerPort: 80
  affinity:
    nodeAffinity:
      requiredDuringSchedulingIgnoredDuringExecution:
        nodeSelectorTerms:
        - matchExpressions:
          - key: kubernetes.io/hostname
            operator: NotIn
            values:
            - worker01
      preferredDuringSchedulingIgnoredDuringExecution:
      - weight: 1
        preference:
          matchExpressions:
          - key: kubernetes.io/hostname
            operator: In
            values:
            - worker02
b)Pod亲和性
- podAffinity:Pod 与指定的 Pod 在同一拓扑域。
- podAntiAffinity:Pod 与指定的 Pod 不在同一拓扑域。
拓扑域:使用 topologyKey 属性(下方示例中有)定义的值,通俗来讲就是节点的标签。
示例
apiVersion: v1
kind: Pod
metadata:
  name: pod-aff-pod
spec:
  containers:
  - name: nginx-container
    image: hub.xcc.com/my-xcc/my-nginx:v1
    ports:
    - containerPort: 80
  affinity:
    podAffinity:
      requiredDuringSchedulingIgnoredDuringExecution:
      - labelSelector:
          matchExpressions:
          - key: pod-name
            operator: In
            values:
            - nginx-pod
        topologyKey: kubernetes.io/hostname
    podAntiAffinity:
      preferredDuringSchedulingIgnoredDuringExecution:
      - weight: 1
        podAffinityTerm:
          labelSelector:
            matchExpressions:
            - key: pod-name
              operator: In
              valuses:
              - nginx-pod
        topologyKey: kubernetes.io/hostname
| 调度策略 | 匹配标签 | 操作符 | 拓扑域支持 | 调度目标 |
|---|---|---|---|---|
| nodeAffinity | 主机 | In、NotIn、Exists、DoesNotExist、Gt、Lt | 否 | 指定主机 |
| podAffinity | Pod | In、NotIn、Exists、DoesNotExist | 是 | Pod 与指定 Pod 在同一拓扑域 |
| podAnitAffinity | Pod | In、NotIn、Exists、DoesNotExist | 是 | Pod 与指定 Pod 不在同一拓扑域 |
3,污点和容忍
污点(taint)和容忍(toleration)相互相互配合,可以用来避免 Pod 被分配到不适合的节点上。每个节点可以有0个或者多个 taint,这表示对于那些不能容忍这些 taint 的 Pod,是不会被创建在这些节点上的。如果将 toleration 应用于 Pod 上,则表示这些 Pod 可以被调度到具有匹配 taint 的节点上。
通俗来讲,就是节点上可以设置污点(taint),如果创建 Pod 时不设置 Pod 的容忍(toleration)的话,那么该 Pod 就不可能被创建在有污点的节点上。master 节点默认有一个污点,这也就是为什么前面我们创建的 Pod 一直没有被创建在 master 节点上的原因。
kubectl get node
kubectl describe node master01
......
Taints:             node-role.kubernetes.io/master:NoSchedule
......
a)污点
key=value:effect
-
key=value:每一个污点都有一个 key 和 value 作为 污点的标签,其中 value 可以为空,即 key:effect。我们上面列出的 master 默认污点就是这种格式。
-
effect:描述污点的作用,支持以下三种选项:
- NoSchedule:k8s 不会将 Pod 调度到具有该污点的 Node 上。
- PreferNoSchedule:k8s 尽量避免将 Pod 调度到具有该污点的 Node 上。
- NoExecute:k8s 不会将 Pod 调度到具有该污点的 Node 上,同时会将 Node 上已存在的 Pod 驱逐出去。
注意:上面描述的前提是所有 Pod 是没有设置容忍的。
设置、去除污点
# 设置污点
kubectl taint nodes node01 check=test:NoSchedule
# 去除污点,只需要在最后加一个 '-'
kubectl taint nodes node01 check=test:NoSchedule-
# 查看某个node的污点,其结果中的 Taints 字段便是污点
kubectl describe node node01
设置多master防止资源浪费
kubectl taint nodes <node-name> node-role.kubernetes.io/master=:PreferNoSchedule
b)容忍
设置了污点的 node 将根据污点的作用(effect)与 Pod 之间产生互斥的关系。但是我们可以在创建 Pod 时为 Pod 设置容忍,意味着 Pod 在创建时可以容忍污点的存在,可以被调度到存在污点的 node 上。
spec:
  tolerations:
  - effect: "NoSchedule"
    key: "key"
    operator: "Exists"
    tolerationSeconds: 3600
    value: "value"
-
key、value、effect:需要与 node 上的污点标签信息一致。
-
operator:表示 key 与 value 的关系。
- Exists:忽略 value 的值,只要 key 匹配上即可。
- Equal:默认为 Equal。
-
tolerationSeconds:如果 effect 的值为 Noexecute,那么 tolerationSeconds 表示 Pod 在被驱逐之前还可以保留运行的时间。
#当不指定 key 时,表示容忍所有的污点 key
spec:
  tolerations:
  - operator: "Exists"
#当不指定 effect 时,表示容忍所有的污点作用
spec:
  tolerations:
  - key: "key"
    operator: "Exists"
4,指定调度节点
如果你想要指定 Pod 被调度到具体的 node 上,那么你可以这样做
kind: Pod
spec:
  nodeName: node01  #将 Pod 直接调度到指定的 node 节点上,会跳过 Scheduler 的调度策略,是强制匹配
# 或者
spec:
  nodeSelector:  #通过 k8s 的 label-selector 机制选择节点,由调度器策略匹配 label,而后调度 Pod 到目标节点上,该匹配规则属于强制约束。
    kubernetes.io/hostname: node01
二、Kubernetes中的认证、鉴权和准入控制
1,机制说明
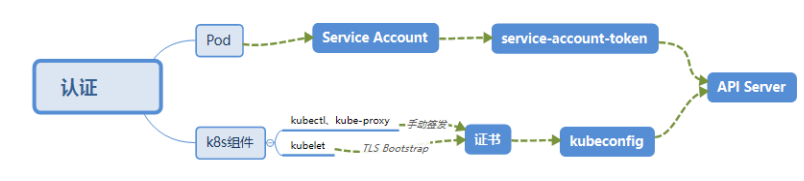
Kubernetes作为一个分布式集群的管理工具,保证集群的安全性是一个重要的任务。API Server是集群内部各组件通信的中介,也是外部控制的入口。所以Kubernetes的安全机制基本就是围绕保护API Server来设计的。Kubernetes使用了认证(Authetication)、鉴权(Authorization)、准入控制(Admission Control)三步来保证API Server的安全。
2,认证(Authentication)
-
HTTP Token 认证:通过一个 Token 来识别合法用户
-
HTTP Base 认证:通过 用户名+密码 的方式认证(base64加密)
-
最严格的 HTTPS 证书认证:基于 CA 根证书签名的客户端身份认证方式
a)HTTPS 证书认证:

b)需要认证的节点
- Kubenetes 组件对 API Server 的访问:kubectl、Controller Manager、Scheduler、kubelet、kube-proxy
- Kubernetes 管理的 Pod 对容器的访问:Pod(dashborad 也是以 Pod 形式运行)
- Controller Manager、Scheduler 与 API Server 在同一台机器,所以直接使用 API Server 的非安全端口访问, --insecure-bind-address=127.0.0.1
- kubectl、kubelet、kube-proxy 访问 API Server 就都需要证书进行 HTTPS 双向认证
- 手动签发:通过 k8s 集群的跟 ca 进行签发 HTTPS 证书
- 自动签发:kubelet 首次访问 API Server 时,使用 token 做认证,通过后,Controller Manager 会为kubelet 生成一个证书,以后的访问都是用证书做认证了
c)kubeconfig
d)ServiceAccount
e)Secret 与 SA 的关系
- token是使用 API Server 私钥签名的 JWT。用于访问API Server时,Server端认证
- ca.crt,根证书。用于Client端验证API Server发送的证书
- namespace, 标识这个service-account-token的作用域名空间
kubectl get secret --all-namespaces
kubectl describe secret default-token-5gm9r --namespace=kube-system
3,授权(Authorization)
上面认证过程,只是确认通信的双方都确认了对方是可信的,可以相互通信。而鉴权是确定请求方有哪些资源的权限。API Server 目前支持以下几种授权策略 (通过 API Server 的启动参数 “--authorization-mode” 设置)。
- AlwaysDeny:表示拒绝所有的请求,一般用于测试
- AlwaysAllow:允许接收所有请求,如果集群不需要授权流程,则可以采用该策略
- ABAC(Attribute-Based Access Control):基于属性的访问控制,表示使用用户配置的授权规则对用户请求进行匹配和控制
- Webbook:通过调用外部 REST 服务对用户进行授权
- RBAC(Role-Based Access Control):基于角色的访问控制,现行默认规则
4,RBAC授权模式
- 对集群中的资源和非资源均拥有完整的覆盖
- 整个 RBAC 完全由几个 API 对象完成,同其它 API 对象一样,可以用 kubectl 或 API 进行操作
- 可以在运行时进行调整,无需重启 API Server
a)RBAC 的 API 资源对象说明
b)Role和ClusterRole
kind: Role
apiVersion: rbac.authorization.k8s.io/v1beta1
metadata:
  namespace: default
  name: pod-reader
rules:
- apiGroups: [""] # "" indicates the core API group
  resources: ["pods"]
  verbs: ["get", "watch", "list"]
ClusterRole 具有与 Role 相同的权限角色控制能力,不同的是 ClusterRole 是集群级别的,ClusterRole 可以用于:
- 集群级别的资源控制( 例如 node 访问权限 )
- 非资源型 endpoints( 例如 /healthz 访问 )
- 所有命名空间资源控制(例如 pods )
kind: ClusterRole
apiVersion: rbac.authorization.k8s.io/v1beta1
metadata:
  # "namespace" omitted since ClusterRoles are not namespaced
  name: secret-reader
rules:
- apiGroups: [""]
  resources: ["secrets"]
  verbs: ["get", "watch", "list"]
c)RoleBinding和ClusterRoleBinding
kind: RoleBinding
apiVersion: rbac.authorization.k8s.io/v1beta1
metadata:
  name: read-pods
  namespace: default
subjects:
- kind: User
  name: jane
  apiGroup: rbac.authorization.k8s.io
roleRef:
  kind: Role
  name: pod-reader
  apiGroup: rbac.authorization.k8s.io
kind: RoleBinding
apiVersion: rbac.authorization.k8s.io/v1beta1
metadata:
  name: read-secrets
  namespace: development             # 只能访问 development 空间中的 secrets(因为 RoleBinding 定义在 development 命名空间)
subjects:
- kind: User
  name: dave
  apiGroup: rbac.authorization.k8s.io
roleRef:
  kind: ClusterRole                  # RoleBinding 引用了一个 ClusterRole
  name: secret-reader                #这个 ClusterRole 具有整个集群内对 secrets 的访问权限
  apiGroup: rbac.authorization.k8s.io
使用 ClusterRoleBinding 可以对整个集群中的所有命名空间资源权限进行授权;以下 ClusterRoleBinding 样例展示了授权 manager 组内所有用户在全部命名空间中对 secrets 进行访问 。
#允许在manger的Group组中的每个人都可以去读取任意namespace下的secrets
kind: ClusterRoleBinding
apiVersion: rbac.authorization.k8s.io/v1beta1
metadata:
  name: read-secrets-global
subjects:
- kind: Group
  name: manager
  apiGroup: rbac.authorization.k8s.io
roleRef:
  kind: ClusterRole
  name: secret-reader #余ClusterRole对应
  apiGroup: rbac.authorization.k8s.io
d)Resources
Kubernetes 集群内一些资源一般以其名称字符串来表示,这些字符串一般会在 API 的 URL 地址中出现;同时某些资源也会包含子资源,例如 logs 资源就属于 pods 的子资源,API 中 URL 样例如下
GET /api/v1/namespaces/{namespace}/pods/{name}/log
kind: Role
apiVersion: rbac.authorization.k8s.io/v1beta1
metadata:
  namespace: default
  name: pod-and-pod-logs-reader
rules:
- apiGroups: [""]
  resources: ["pods/log"]
  verbs: ["get", "list"]
5,实践(创建用户管理dev空间)
{
  "CN": "devuser",     #定义用户
  "hosts": [

  ],
  "key": {
    "algo": "rsa",
    "size": 2048
  },
  "names": [
    {
      "C": "CN",
      "ST": "BeiJing",
      "L": "BeiJing",
      "O": "k8s",       #定义Group组
      "OU": "System"
    }
  ]
}
下载证书工具
wget https://pkg.cfssl.org/R1.2/cfssl_linux-amd64
mv cfssl_linux-amd64 /usr/local/bin/cfssl
wget https://pkg.cfssl.org/R1.2/cfssljson_linux-amd64
mv cfssljson_linux-amd64 /usr/local/bin/cfssljson
wget https://pkg.cfssl.org/R1.2/cfssl-certinfo_linux-amd64
mv cfssl-certinfo_linux-amd64 /usr/local/bin/cfssl-certinfo
#创建用户devuser
useradd devuser
passwd devuser
#创建使用定义的json文件 cd /etc/kubernetes/pki
cfssl gencert -ca=ca.crt -ca-key=ca.key -profile=kubernetes /usr/local/demo/dev-namespace/devuser-csr.json | cfssljson -bare devuser
设置集群参数
#ip为master的ip
export KUBE_APISERVER="https://192.168.232.71:6443"
kubectl config set-cluster kubernetes \
--certificate-authority=/etc/kubernetes/pki/ca.crt \
--embed-certs=true \
--server=${KUBE_APISERVER} \
--kubeconfig=devuser.kubeconfig
kubectl config set-credentials devuser \
--client-certificate=/etc/kubernetes/pki/devuser.pem \
--client-key=/etc/kubernetes/pki/devuser-key.pem \
--embed-certs=true \
--kubeconfig=devuser.kubeconfig
设置上下文参数
#创建dev名称空间
kubectl create namespace dev
kubectl config set-context kubernetes \
--cluster=kubernetes \
--user=devuser \
--namespace=dev \
--kubeconfig=devuser.kubeconfig
创建rolebinding绑定
# 在名为”dev”的名字空间中将admin ClusterRole授予用户”devuser”
kubectl create rolebinding devuser-admin-binding --clusterrole=admin --user=devuser --namespace=dev
# 查看rolebinding
kubectl describe rolebinding devuser-admin-binding -n dev
设置默认上下文
#使用root用户
mkdir /home/devuser/.kube
cp -f ./devuser.kubeconfig /home/devuser/.kube/config
#赋予权限
chown -R devuser:devuser  /home/devuser/.kube


#使用devuser用户操作
kubectl config use-context kubernetes --kubeconfig=config
测试
#使用用户devuser创建deployment
kubectl run my-nginx --image=hub.xcc.com/my-xcc/my-nginx:v1
#使用用户root 查看所有命名空间下的pod
kubectl get pods --all-namespaces
6,准入控制(Admission Control)
官方文档上有一份针对不同版本的准入控制器推荐列表,其中最新的 1.14 的推荐列表是:
NamespaceLifecycle,LimitRanger,ServiceAccount,DefaultStorageClass,DefaultTolerationSeconds,Mutat ingAdmissionWebhook,ValidatingAdmissionWebhook,ResourceQuota
- NamespaceLifecycle: 防止在不存在的 namespace 上创建对象,防止删除系统预置 namespace,删除
- namespace 时,连带删除它的所有资源对象。
- LimitRanger:确保请求的资源不会超过资源所在 Namespace 的 LimitRange 的限制。
- ServiceAccount: 实现了自动化添加 ServiceAccount。
- ResourceQuota:确保请求的资源不会超过资源的 ResourceQuota 限制。

