
Customization of SharePoint Custom List Form
Introduction
When user click on "New Item" in a SharePoint custom list, "NewForm.aspx" page will be diaplyed. This article explains about how to customize NewForm.aspx.
Background
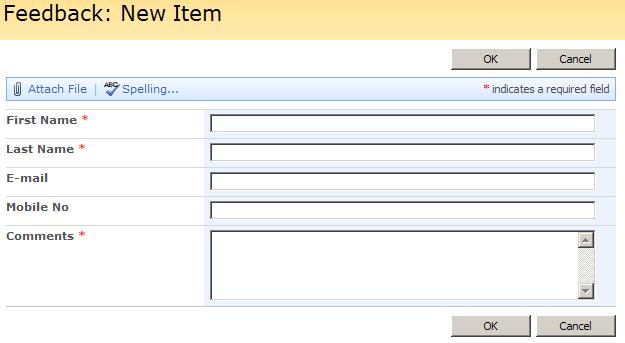
My client wants a Feedback form with ‘Submit’ and ‘Cancel’ buttons and when user clicks on ‘Submit’, validations of form fields should be done and a popup should be displayed with a message ‘Feedback submitted successfully’.
Procudure
- Create a custom list with all the required fields. Here I have a created a custom list called ‘Feedback’.
- Open the site in SharePoint Designer to create a new page that contains a custom list form.
- In SharePoint Designer, on File menu, click New
- In the New dialog box, on the Page tab, click General, and then double-click on ASPX.
- On the Insert menu, point to SharePoint Controls, and then click Custom List Form.
The List or Document Library Form dialog box opens. - In the List or document library to use for form list, choose the list or library for which you want to create a form. To follow the example, click Feedback.
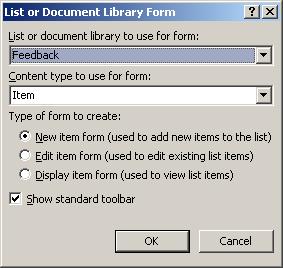
- Under Type of form to create, indicate whether you want to create a New item form, an Edit item form, or a Display item form.
To follow the example, click New item form. - Click OK. The New item form appears on the page.
- To attach a master page, on the Format menu, point to Master Page, and then click Attach Master Page. In the Select a Master Page dialog box, click Default Master Page, and then click OK. The Match Content Regions dialog box appears. To match the body of the page to the PlaceHolderMain content placeholder, click OK.
- To save the new custom list form, on the File menu, click Save as.
- In the Save As dialog box, in the large list box, browse to the list or library folder for which the custom list form was created.
To follow the example, in the Save As dialog box, double-click Lists, and then double-click Feedback to open the Feedback folder. In the File Name box, type FeedbackForm, and then click Save.
The FeedbackForm.aspx page appears in the Folder List in the Feedback folder.
Now instead of existing OK, Cancel buttons, I want to add my own buttons with associated JavaScript.
- Open the FeedBackForm.aspx in Sharepoint Designer.
- Locate the OK, Cancel buttons and make Visible property to false.
- Use the following code to add Submit and Cancel buttons.
<input type="button" value="Submit" name="btnSave"
onclick="javascript:alert('Thanks for your feedback');
{ddwrt:GenFireServerEvent('__commit;__redirect={/}')}; " />
<input type="button" value="Cancel" name="btnCancel"
onclick="javascript: {ddwrt:GenFireServerEvent('__redirect={/}')}"
style="width: 101px" />
And finally whenever the user wants to enter the feedback, user should be redireted to this newly created page. Follow the below steps to get this possible.
- In the SharePoint Designer Folder List, right click on Feedback list and then click Properties on the shortcut menu.
- In the List Properties dialog box, click on Supporting Files tab.
- In the Content type specific forms, select Item.
- Click Browse under new item form and select FeedbackForm.aspx and then click OK.
- Click OK.
Now open a new Feedback form and enter values and click on Submit button. A popup will be diaplyed with a message Thanks for your feedback.
Wait… This demo is not over.
In this form, First Name, Last Name and Comments are mandatory fields. Even though you didn’t enter data into any of these fileds, a popup will be diaplayed, which should not happen.
For this you need to write some Javascript, which will validate the mandatory fileds and then diaplys a popup with message. We need to execute this Javascript on Submit button onClick event.
Note: For tips on Using Javascript to Manipulate a List Form Field, visit Microsoft SharePoint Designer Team Blog. There is an error in SharePoint Filed Type table. Actually the TagName of Multiple Lines of Text is textarea.
Follow the below steps to complete the validation.
- Open FeedbackForm.aspx in SharePoint Designer.
- Add the following Javascript code block at the top of page. (Add after <asp:content ...>)
  <script type=”text/javascript” language="”javascript”">
function getField(tagName, tagName1, identifier)
{
var length = identifier.length;
var count = 0;
var tags = document.getElementsByTagName(tagName);
var moretags = document.getElementsByTagName(tagName1);
for (var i=0; i < tags.length; i++)
{
if ((tags[i].title == 'First Name' && tags[i].value != ' ') ||
(tags[i].title == 'Last Name' && tags[i].value != ' ') ||
(tags[i].title == 'E-Mail' && tags[i].value != ' '))
{
count = count + 1;
}
}
for (var j=0; j < moretags.length; j++)
{
if (moretags[j].title == 'Comments' && moretags[j].value != ' ')
{
count = count + 1;
}
}
if(count == 4)
{
return true;
}
else
{
return false;
}
} </script>
Note: You need to modify this Javascript function according to your Custom list fields information.
Now call this function from onClick event of Submit button. Finally, the Submit button will look like below.
<input type="button" value="Submit" name="btnSave"
onclick="javascript:if(getField('input','textarea','TextField'))alert('Thanks
for your feedback'); {ddwrt:GenFireServerEvent('__commit;__redirect={/}')}; " />
License

This article, along with any associated source code and files, is licensed under The Code Project Open License (CPOL)
This posting is provided "AS IS" with no warranties, and confers no rights.


