
Hyperledger Fabric 1.0 从零开始(六)——创建Fabric多节点集群
4:创建Fabric多节点集群
4.1、配置说明
首先可以根据官方Fabric自带的e2e_cli列子中的集群方案来生成我们自己的集群,与案例不同的是我们需要把容器都分配到不同的服务器上,彼此之间通过网络来进行通信,网络构建完成后则进行相关的channel和chaincode操作。
笔者目前申请了五台服务器,所有的服务器均是按照上述e2e_cli环境构建与测试步骤配置。计划其中四台服务器运行peer节点,另外一台服务器运行orderer节点,为其它四个节点提供order服务。
虚拟机具体参数如下表所示:
|
名称 |
ip |
节点标识 |
节点Hostname |
Organization(组织机构) |
|
Server1 |
10.130.116.8 |
orderer |
orderer.example.cn |
Orderer |
|
Server2 |
10.130.116.9 |
sp0 |
peer0.org1.example.cn |
Org1 |
|
Server3 |
10.130.116.10 |
sp1 |
peer1.org1.example.cn |
Org1 |
|
Server4 |
10.130.116.25 |
sp2 |
peer0.org2.example.cn |
Org2 |
|
Server5 |
10.130.116.27 |
sp3 |
Peer1.org2.example.cn |
Org2 |
4.2、生成公私钥、证书、创世区块等
公私钥和证书是用于Server与Server之间的安全通信,另外要创建channel并让其它节点加入channel就需要创世区块,这些必备文件都可以通过一个命令生成,并且官方已经给出了脚本,在如下目录中的文件:
/opt/gopath/src/github.com/hyperledger/fabric/examples/e2e_cli/ generateArtifacts.sh
使用generateArtifacts.sh生成证书和config.tx,具体执行命令如下:
bash generateArtifacts.sh mychannel
这里创建了5台服务器,在任意一台服务器的该目录下执行此项命令即可,将会生成两个目录,它们分别为channel-artifacts和crypto-config,两个目录的结果和含义如下视图:
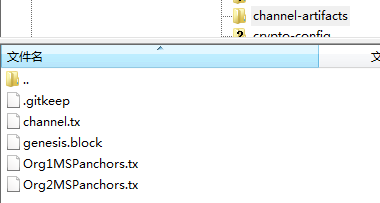
在上述目录里的文件用于orderer创建channel,它们根据configex.yaml的配置生成。

在上述目录里有orderer和peer的证书、私钥和用于通信加密的tls证书等文件,它通过configex.yaml配置文件生成。
4.3、配置多服务器
根据4.2的方案,以及之前所述的gopath目录等配置方案,我们假定所有的服务器都按照该文档的配置来操作,所有服务器都有Fabric源码且目录为
/opt/gopath/src/github.com/hyperledger/fabric
我们在Server1上执行如下命令生成构建Fabric网络所需的成员证书等必要材料:
bash generateArtifacts.sh mychannel
如4.2中所述,该命令只需在其中某一台服务器上运行一次即可,其它服务器无需再次运行。
在运行该命令的服务器/opt/gopath/src/github.com/hyperledger/fabric/examples/e2e_cli目录下会生成channel-artifacts和crypto-config目录,需要把它们拷贝到其它服务器相同的e2e_cli目录下,如果在其它服务器中已经存在该目录,则先把此目录删除。
当所有服务器都有同一个channel-artifacts和crypto-config目录后,接下来就开始配置compose文件。
4.4、设置peer0.org1.example.com节点的docker-compose文件
e2e_cli中提供了多个yaml文件,我们可以基于docker-compose-cli.yaml文件创建,具体可执行如下命令:
cp docker-compose-cli.yaml docker-compose-peer.yaml
然后修改docker-compose-peer.yaml,去掉orderer的配置,只保留一个peer和cli,因为我们要多级部署,节点与节点之前又是通过主机名通讯,所以需要修改容器中的host文件,也就是extra_hosts设置,修改后的peer配置如下:
1 peer0.org1.example.com:
2     container_name: peer0.org1.example.com
3     extends:
4       file:  base/docker-compose-base.yaml
5       service: peer0.org1.example.com
6     extra_hosts:
7      - "orderer.example.com:10.130.116.8"
同样,cli也需要能够和各个节点通讯,所以cli下面也需要添加extra_hosts设置,去掉无效的依赖,并且去掉command这一行,因为我们是每个peer都会有个对应的客户端,也就是cli,所以我只需要去手动执行一次命令,而不是自动运行。修改后的cli配置如下:
 1 cli:
 2     container_name: cli
 3     image: hyperledger/fabric-tools
 4     tty: true
 5     environment:
 6       - GOPATH=/opt/gopath
 7       - CORE_VM_ENDPOINT=unix:///host/var/run/docker.sock
 8       - CORE_LOGGING_LEVEL=DEBUG
 9       - CORE_PEER_ID=cli
10       - CORE_PEER_ADDRESS=peer0.org1.example.com:7051
11       - CORE_PEER_LOCALMSPID=Org1MSP
12       - CORE_PEER_TLS_ENABLED=true
13       - CORE_PEER_TLS_CERT_FILE=/opt/gopath/src/github.com/hyperledger/fabric/peer/crypto/peerOrganizations/org1.example.com/peers/peer0.org1.example.com/tls/server.crt
14       - CORE_PEER_TLS_KEY_FILE=/opt/gopath/src/github.com/hyperledger/fabric/peer/crypto/peerOrganizations/org1.example.com/peers/peer0.org1.example.com/tls/server.key
15       - CORE_PEER_TLS_ROOTCERT_FILE=/opt/gopath/src/github.com/hyperledger/fabric/peer/crypto/peerOrganizations/org1.example.com/peers/peer0.org1.example.com/tls/ca.crt
16       - CORE_PEER_MSPCONFIGPATH=/opt/gopath/src/github.com/hyperledger/fabric/peer/crypto/peerOrganizations/org1.example.com/users/Admin@org1.example.com/msp
17     working_dir: /opt/gopath/src/github.com/hyperledger/fabric/peer
18     volumes:
19         - /var/run/:/host/var/run/
20         - ../chaincode/go/:/opt/gopath/src/github.com/hyperledger/fabric/examples/chaincode/go
21         - ./crypto-config:/opt/gopath/src/github.com/hyperledger/fabric/peer/crypto/
22         - ./scripts:/opt/gopath/src/github.com/hyperledger/fabric/peer/scripts/
23         - ./channel-artifacts:/opt/gopath/src/github.com/hyperledger/fabric/peer/channel-artifacts
24     depends_on:
25       - peer0.org1.example.com
26     extra_hosts:
27      - "orderer.example.com:10.130.116.8"
28      - "peer0.org1.example.com:10.130.116.9"
29      - "peer1.org1.example.com:10.130.116.10"
30      - "peer0.org2.example.com:10.130.116.25"
31      - "peer1.org2.example.com:10.130.116.27"
在3.2示例单机模式下,4个peer会映射主机不同的端口,但是我们在多机部署的时候是不需要映射不同端口的,所以需要修改base/docker-compose-base.yaml文件,将所有peer的端口映射都改为相同的:
1 ports:
2   - 7051:7051
3   - 7052:7052
4   - 7053:7053
4.5、设置peer1.org1.excmple.com节点的docker-compose文件
与peer0.org1.example.com节点compose文件配置一样,不过需要将启动的容器改为peer1.org1.example.com,并且添加peer0.org1.example.com的IP映射,对应的cli中也改成对peer1.org1.example.com的依赖。这是修改后的peer1.org1.example.com上的配置示例:
 1 peer1.org1.example.com:
 2     container_name: peer1.org1.example.com
 3     extends:
 4       file:  base/docker-compose-base.yaml
 5       service: peer1.org1.example.com
 6     extra_hosts:
 7      - "orderer.example.com:10.130.116.8"
 8      - "peer0.org1.example.com:10.130.116.9"
 9
10   cli:
11     container_name: cli
12     image: hyperledger/fabric-tools
13     tty: true
14     environment:
15       - GOPATH=/opt/gopath
16       - CORE_VM_ENDPOINT=unix:///host/var/run/docker.sock
17       - CORE_LOGGING_LEVEL=DEBUG
18       - CORE_PEER_ID=cli
19       - CORE_PEER_ADDRESS=peer1.org1.example.com:7051
20       - CORE_PEER_LOCALMSPID=Org1MSP
21       - CORE_PEER_TLS_ENABLED=true
22       - CORE_PEER_TLS_CERT_FILE=/opt/gopath/src/github.com/hyperledger/fabric/peer/crypto/peerOrganizations/org1.example.com/peers/peer1.org1.example.com/tls/server.crt
23       - CORE_PEER_TLS_KEY_FILE=/opt/gopath/src/github.com/hyperledger/fabric/peer/crypto/peerOrganizations/org1.example.com/peers/peer1.org1.example.com/tls/server.key
24       - CORE_PEER_TLS_ROOTCERT_FILE=/opt/gopath/src/github.com/hyperledger/fabric/peer/crypto/peerOrganizations/org1.example.com/peers/peer1.org1.example.com/tls/ca.crt
25       - CORE_PEER_MSPCONFIGPATH=/opt/gopath/src/github.com/hyperledger/fabric/peer/crypto/peerOrganizations/org1.example.com/users/Admin@org1.example.com/msp
26     working_dir: /opt/gopath/src/github.com/hyperledger/fabric/peer
27     volumes:
28         - /var/run/:/host/var/run/
29         - ../chaincode/go/:/opt/gopath/src/github.com/hyperledger/fabric/examples/chaincode/go
30         - ./crypto-config:/opt/gopath/src/github.com/hyperledger/fabric/peer/crypto/
31         - ./scripts:/opt/gopath/src/github.com/hyperledger/fabric/peer/scripts/
32         - ./channel-artifacts:/opt/gopath/src/github.com/hyperledger/fabric/peer/channel-artifacts
33     depends_on:
34       - peer1.org1.example.com
35     extra_hosts:
36      - "orderer.example.com:10.130.116.8"
37      - "peer0.org1.example.com:10.130.116.9"
38      - "peer1.org1.example.com:10.130.116.10"
39      - "peer0.org2.example.com:10.130.116.25"
40      - "peer1.org2.example.com:10.130.116.27"
与上述类似,可以再次设置peer0.org2.example.com及peer1.org2.example.com节点compose配置文件。
4.6、设置order节点的docker-compose文件
与创建peer的配置文件类似,我们也复制一个yaml文件出来进行修改:
cp docker-compose-cli.yaml docker-compose-orderer.yaml
orderer服务器上我们只需要保留order设置,其他peer和cli设置都可以删除。orderer可以不设置extra_hosts。
以下是order compose的配置示例:
1 orderer.example.com:
2     extends:
3       file:   base/docker-compose-base.yaml
4       service: orderer.example.com
5     container_name: orderer.example.com
本章节及后面的一章可以直接参阅:Fabric 1.0的多机部署,在这位老师的博客里写的非常清楚,而且我也是参考这篇博客来完成多机多节点自动部署方案的,只是手动调配及后续操作在网上基本上没有可供参考的中文内容,需要查看官网文档来逐步实现。

