

Linux之Ganglia源码安装
一、Ganglia简介:
Ganglia是UC Berkeley发起的一个开源集群监视项目,设计用于测量数以千计的节点。Ganglia的核心包含gmond、gmetad以及一个Web前端。主要是用来监控系统性能,如:cpu 、mem、硬盘利用率、 I/O负载、网络流量情况等,通过曲线很容易见到每个节点的工作状态,对合理调整、分配系统资源,提高系统整体性能起到重要作用。
二、Ganglia进程介绍:
每台计算机都运行一个收集和发送度量数据的名为 gmond 的守护进程。接收所有度量数据的主机可以显示这些数据并且可以将这些数据的精简表单传递到层次结构中。正因为有这种层次结构模式,才使得 Ganglia 可以实现良好的扩展。gmond 带来的系统负载非常少,这使得它成为在集群中各台计算机上运行的一段代码,而不会影响用户性能。所有这些数据多次收集会影响节点性能。网络中的 “抖动”发生在大量小消息同时出现时,可以通过将节点时钟保持一致,来避免这个问题。 gmetad可以部署在集群内任一台节点或者通过网络连接到集群的独立主机,它通过单播路由的方式与gmond通信,收集区域内节点的状态信息,并以XML数据的形式,保存在数据库中。 由RRDTool工具处理数据,并生成相应的的图形显示,以Web方式直观的提供给客户端。
三、Ganglia的部署:
3.1、安装apache
[root@localhost app]# tar zxvf httpd-2.2.23.tar.gz
[root@localhost app]# cd httpd-2.2.23
[root@localhost httpd-2.2.23]# ./configure --prefix=/usr/local/apache2 --enable-so --enable-mods-shared=most
[root@localhost httpd-2.2.23]# make && make install
----将httpd添加到服务当中去:
[root@localhost httpd-2.2.23]# cp /usr/local/apache2/bin/apachectl /etc/init.d/httpd
[root@localhost httpd-2.2.23]# chkconfig --add httpd
service httpd does not support chkconfig
这里说的是httpd服务不支持chkconfig , 添加支持:    vi /etc/init.d/httpd
在 #!/bin/sh  下添加这两句:
      #chkconfig:345 85 15
      #description:Start and stop the Apache HTTP Server
[root@localhost httpd-2.2.23]# vi /etc/init.d/httpd
[root@localhost httpd-2.2.23]# chkconfig --add httpd
[root@localhost httpd-2.2.23]# service httpd restart
httpd not running, trying to start
[root@localhost httpd-2.2.23]# ps -ef |grep httpd |grep -v grep
root     18196     1  0 15:15 ?        00:00:00 /usr/local/apache2/bin/httpd -k restart
daemon   18197 18196  0 15:15 ?        00:00:00 /usr/local/apache2/bin/httpd -k restart
daemon   18198 18196  0 15:15 ?        00:00:00 /usr/local/apache2/bin/httpd -k restart
daemon   18199 18196  0 15:15 ?        00:00:00 /usr/local/apache2/bin/httpd -k restart
daemon   18200 18196  0 15:15 ?        00:00:00 /usr/local/apache2/bin/httpd -k restart
daemon   18201 18196  0 15:15 ?        00:00:00 /usr/local/apache2/bin/httpd -k restart
3.2、安装php
[root@localhost app]# tar zxvf php-5.4.10.tar.gz
[root@localhost app]# cd php-5.4.10
[root@localhost php-5.4.10]# ./configure --prefix=/usr/local/php --with-apxs2=/usr/local/apache2/bin/apxs
[root@localhost php-5.4.10]# make && make install
修改apache对php的参数:
####vi /etc/httpd/httpd.conf
/usr/local/apache2/conf/httpd.conf
----将User和Group修改为你指定的用户
User nobody
Group nobody
----在index.html后面添加index.php
<IfModule dir_module>
    DirectoryIndex index.html index.php
</IfModule>
----在最后添加下面三行
AddType application/x-httpd-php .php
AddType application/x-httpd-php-source .phps
PidFile "/var/run/httpd.pid"
测试php配置是否成功:
######vi /usr/local/apache2/htdocs/index.php,添加:
<?
phpinfo();
?>

#######重启启动apache
[root@localhost php-5.4.10]# service httpd restart
3.3、安装依赖包:
[root@localhost php-5.4.10]# rpm -qa apr-devel apr-util check-devel cairo-devel pango-devel libxml2-devel rpm-build glib2-devel dbus-devel freetype-devel fontconfig-devel gcc-c++ expat-devel python-devel libXrender-devel
freetype-devel-2.2.1-21.el5_3
gcc-c++-4.1.2-46.el5
libxml2-devel-2.6.26-2.1.2.8
glib2-devel-2.12.3-4.el5_3.1
python-devel-2.4.3-27.el5
fontconfig-devel-2.4.1-7.el5
cairo-devel-1.2.4-5.el5
pango-devel-1.14.9-6.el5
rpm-build-4.4.2.3-18.el5
apr-util-1.2.7-7.el5_3.2
libXrender-devel-0.9.1-3.1
dbus-devel-1.1.2-12.el5
####安装apr_develhe expat
[root@localhost app]# tar -zxvf expat-2.0.1.tar.gz
[root@localhost expat-2.0.1]# ./configure
[root@localhost expat-2.0.1]# make && make install
[root@localhost app]# rpm -ivh apr-devel-1.2.7-11.el5_3.1.i386.rpm
warning: apr-devel-1.2.7-11.el5_3.1.i386.rpm: Header V3 DSA signature: NOKEY, key ID 37017186
Preparing...                ########################################### [100%]
   1:apr-devel              ########################################### [100%]
3.4、安装libconfuse
[root@localhost app]# tar -zxvf confuse-2.7.tar.gz
[root@localhost confuse-2.7]# ./configure CFLAGS=-fPIC --disable-nls
[root@localhost confuse-2.7]# make && make install
####调整lib库的位置
vi /etc/ld.so.conf.d/libconfuse.conf,添加:/usr/local/lib,然后/sbin/ldconfig -v
3.5、安装pcre
[root@localhost app]# tar zxvf pcre-8.12.tar.gz
[root@localhost app]# cd pcre-8.12
[root@localhost pcre-8.12]# ./configure && make && make install
####调整lib库的位置
vi /etc/ld.so.conf.d/libpcre.conf,添加:/usr/local/lib,然后/sbin/ldconfig -v
3.6、安装RRDTool
[root@localhost app]# tar zxvf rrdtool-1.4.8.tar.gz
[root@localhost app]# cd rrdtool-1.4.8
[root@localhost rrdtool-1.4.8]# ./configure --prefix=/usr/local
[root@localhost rrdtool-1.4.8]# make && make install
####调整lib库的位置
vi /etc/ld.so.conf.d/librrd.conf,添加:/usr/local/lib,然后/sbin/ldconfig -v
3.7、安装ganglia
[root@localhost app]# tar zxvf ganglia-3.1.7.tar.gz
[root@localhost app]# ./configure --prefix=/usr/local/ganglia --with-gmetad --with-librrd=/usr/local/lib --sysconfdir=/etc/ganglia
[root@localhost app]# make
[root@localhost app]# make install
添加gmond和gmetad为系统服务:
[root@localhost ganglia-3.1.7]# cp gmond/gmond.init /etc/rc.d/init.d/gmond
[root@localhost ganglia-3.1.7]# cp gmetad/gmetad.init /etc/rc.d/init.d/gmetad
[root@localhost ganglia-3.1.7]# chkconfig --add gmond && chkconfig gmond on
[root@localhost ganglia-3.1.7]# chkconfig --add gmetad && chkconfig gmetad on
3.8、Ganglia web前端设置:
[root@localhost ganglia-3.1.7]# mkdir -p /var/lib/ganglia/rrds
[root@localhost ganglia-3.1.7]# chown nobody:nobody /var/lib/ganglia/rrds

[root@localhost app]# tar zxvf ganglia-web-3.5.2.tar.gz
[root@localhost app]# cd ganglia-web-3.5.2
[root@localhost ganglia-web-3.5.2]# vi Makefile
将GDESTDIR = /var/www/html/ganglia
APACHE_USER = apache
改为
GDESTDIR = /usr/local/apache2/htdocs/ganglia
APACHE_USER = nobody
[root@localhost ganglia-web-3.5.2]# make install
rsync --exclude "rpmbuild" --exclude "*.gz" --exclude "Makefile" --exclude "*debian*" --exclude "ganglia-web-3.5.2" --exclude ".git*" --exclude "*.in" --exclude "*~" --exclude "#*#" --exclude "ganglia-web.spec" -a . ganglia-web-3.5.2
mkdir -p //var/lib/ganglia/dwoo/compiled && \
    mkdir -p //var/lib/ganglia/dwoo/cache && \
    mkdir -p //var/lib/ganglia && \
    rsync -a ganglia-web-3.5.2/conf/ //var/lib/ganglia/conf && \
    rsync --exclude "conf" -a ganglia-web-3.5.2/* //usr/local/apache2/htdocs/ganglia && \
    chown -R nobody:nobody //var/lib/ganglia/dwoo //var/lib/ganglia/conf

[root@localhost ganglia-web-3.5.2]# cp /usr/local/bin/rrdtool /usr/bin/rrdtool
四、Ganglia的简单配置
4.1、生成gmond默认配置文件:
[root@localhost ganglia-3.1.7]# gmond -t |tee /etc/ganglia/gmond.conf
4.2、
4.3、启动ganglia,并访问其web页面:
[root@localhost ganglia-web-3.5.2]# service gmond restart
Shutting down GANGLIA gmond:                               [FAILED]
Starting GANGLIA gmond:                                    [  OK  ]
[root@localhost ganglia-web-3.5.2]# service gmetad restart
Shutting down GANGLIA gmetad:                              [FAILED]
Starting GANGLIA gmetad:                                   [  OK  ]
[root@localhost ganglia-web-3.5.2]# service httpd restart
4.4、web页面: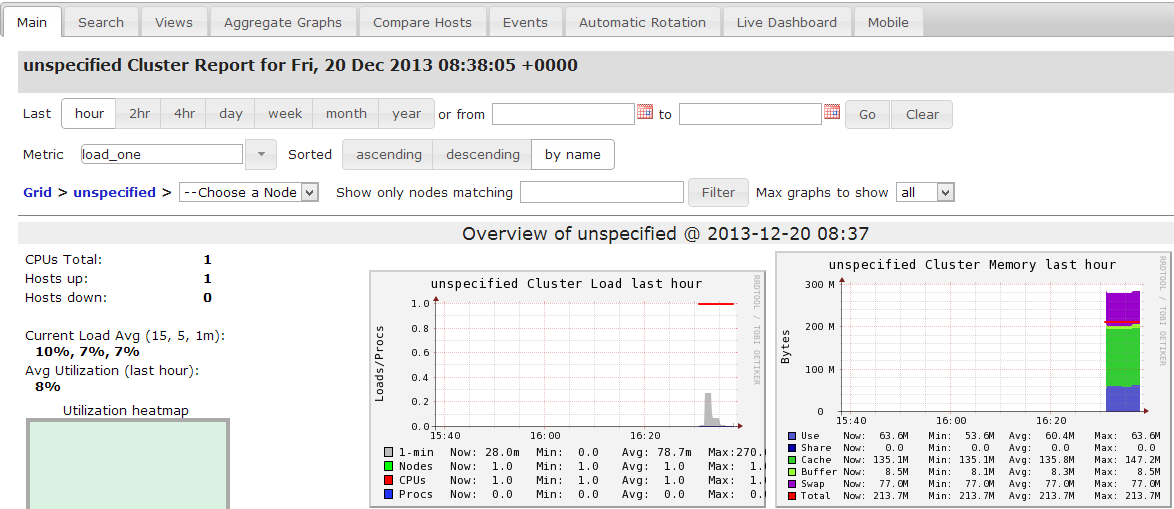
五、参考资料
http://share.blog.51cto.com/278008/577554
http://www.cnblogs.com/wukenaihe/archive/2013/03/21/2972837.html
http://www.ibm.com/developerworks/cn/linux/l-ganglia-nagios-1/
http://chenjiuling.blog.51cto.com/3057028/949221
http://blog.csdn.net/ganglia/article/details/16112529
六、单播模式设置:
在每个节点上都要配置/etc/ganglia/gmond.conf
globals {
  daemonize = yes
  setuid = yes
  user = root /*运行Ganglia的用户(一般可能是nobody)*/
  debug_level = 0
  max_udp_msg_len = 1472
  mute = no
  deaf = no
  host_dmax = 120 /*secs */
  cleanup_threshold = 300 /*secs */
  gexec = no
  send_metadata_interval = 15 /*发送数据的时间间隔*/
}

cluster {
  name = "hadoop_hf" /*集群名称*/
  owner = "root" /*运行Ganglia的用户*/
  latlong = "unspecified"
  url = "unspecified"
}

udp_send_channel {
# mcast_join = 239.2.11.71 /*注释掉组播*/
  host = 192.168.228.172 /*发送给安装gmetad的机器*/
  port = 8649
  ttl = 1
}
/* You can specify as many udp_recv_channels as you like as well. */
udp_recv_channel {
 # mcast_join = 239.2.11.71  /*注释掉组播*/
  port = 8649
 # bind = 239.2.11.71  /*注释掉组播*/
}

