asp.net core 系列 20 EF基于数据模型创建数据库
一.概述
本章使用 Entity Framework Core 构建执行基本数据访问的 ASP.NET Core MVC 应用程序。使用迁移(migrations)基于数据模型创建数据库,是一种code first模式。可以在Windows 上使用 Visual Studio 2017,或在 Windows、macOS 或 Linux 上使用 .NET Core CLI 来学习。已经安装了NET Core 2.1 SDK,这里使用Visual Studio 2017和sql server 2012演示。
1.1 创建新项目
(1) 打开 Visual Studio 2017
(2) 选择 ASP.NET Core Web 应用程序。
(3) 输入 EFGetStarted.AspNetCore.NewDb 作为名称。
(4) 在新建 ASP.NET Core Web 应用程序 对话框中:
确保在下拉列表中选择“.NET Core”和“ASP.NET Core 2.2”
选择“Web 应用程序(模型视图控制器)”项目模板
确保将“身份验证”设置为“无身份验证”
(5) 编译
出错:“任务不支持“SharedCompilationId”参数。请确认该参数存在于此任务中” ,安装如下:
PM> install-package Microsoft.Net.Compilers
1.2 安装 Entity Framework Core
要安装 EF Core,需要把目标对象的 EF Core 数据库提供程序安装。本篇使用SQL Server数据库,需要安装 SQL Server 提供程序包。
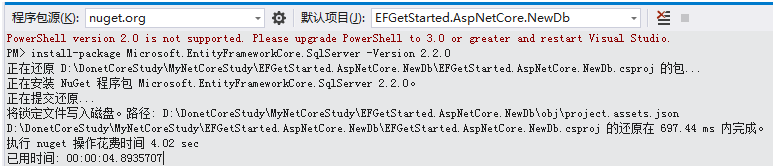
install-package Microsoft.EntityFrameworkCore.SqlServer -Version 2.2.0
1.3 创建模型
右键单击“Models”文件夹,然后选择“添加”>“类。输入“Model.cs”作为名称。
    /// <summary>
    /// 创建模型
    /// using Microsoft.EntityFrameworkCore;
    /// </summary>
    public class BloggingContext : DbContext
    {
        public BloggingContext(DbContextOptions<BloggingContext> options)
            : base(options)
        { }

        public DbSet<Blog> Blogs { get; set; }
        public DbSet<Post> Posts { get; set; }
    }

    public class Blog
    {
        public int BlogId { get; set; }
        public string Url { get; set; }

        public ICollection<Post> Posts { get; set; }
    }

    public class Post
    {
        public int PostId { get; set; }
        public string Title { get; set; }
        public string Content { get; set; }

        public int BlogId { get; set; }
        public Blog Blog { get; set; }
    }
1.4 使用依赖注入注册上下文
服务(例如 BloggingContext)在应用程序启动期间通过依赖关系注入进行注册。 需要这些服务的组件(如 MVC 控制器)可以通过向构造函数或属性添加相关参数来获得对应服务。
        public void ConfigureServices(IServiceCollection services)
        {
            services.Configure<CookiePolicyOptions>(options =>
            {
                // This lambda determines whether user consent for non-essential cookies is needed for a given request.
                options.CheckConsentNeeded = context => true;
                options.MinimumSameSitePolicy = SameSiteMode.None;
            });
            services.AddMvc().SetCompatibilityVersion(CompatibilityVersion.Version_2_2);
            /*
              using EFGetStarted.AspNetCore.NewDb.Models;
              using Microsoft.EntityFrameworkCore;
             */
                     var connection = "Data Source = {ip};Initial Catalog = EFGetStarted.AspNetCore.NewDb; User ID = hsr;Password =js*2015;";
                      services.AddDbContext<BloggingContext>
                (options => options.UseSqlServer(connection));
        }
上面通过services.AddDbContext< BloggingContext)服务注入到容器中,并使用UseSqlServer 连接方式。我在sql 2012中已手动建立了EFGetStarted.AspNetCore.NewDb库。在生产应用中,通常会将连接字符串放在配置文件或环境变量中。 为简单起见,本篇在代码中定义它。
1.5 创建数据库
以下步骤使用迁移Migration创建数据库。根据上面1.3以有的模型。在工具”>“NuGet 包管理器”>“包管理器控制台”,运行以下命令:
   PM> Add-Migration InitialCreate
    The Entity Framework Core Package Manager Console Tools don't support PowerShell version 2.0. Upgrade to PowerShell version 3.0 or higher,
    restart Visual Studio, and try again.
解决方案: https://blog.csdn.net/lilinoscar/article/details/81739770
    PM> Add-Migration InitialCreate
        Microsoft.EntityFrameworkCore.Infrastructure[10403]
              Entity Framework Core 2.2.1-servicing-10028 initialized 'BloggingContext' using provider 'Microsoft.EntityFrameworkCore.SqlServer'
     with options: None
      To undo this action, use Remove-Migration.
在vs 2017当前项目结构中查看,自动生成二个.cs类, 如下所示:

PM> Update-Database

Add-Migration 命令为迁移搭建基架,以便为模型创建一组初始表。 Update-Database 命令创建数据库并向其应用新的迁移。
1.6 创建控制器
生成 Blogs实体 控制器和视图。右键单击“控制器”文件夹,然后选择“添加”>“控制器”
   public class BlogsController : Controller
    {

        public BloggingContext BloggingContext { get; }

        public BlogsController(BloggingContext bloggingContext)
        {
            this.BloggingContext = bloggingContext;
        }

        // GET: /<controller>/
        public IActionResult Index()
        {
            return View();
        }

        [HttpGet]
        public IActionResult Create()
        {
            return View();
        }

        [HttpPost]
        public async Task<IActionResult> Create([Bind("Url")] Blog blog)
        {
            BloggingContext.Add<Blog>(blog);
            await BloggingContext.SaveChangesAsync();
            return View();
        }
    }
1.7 创建视图
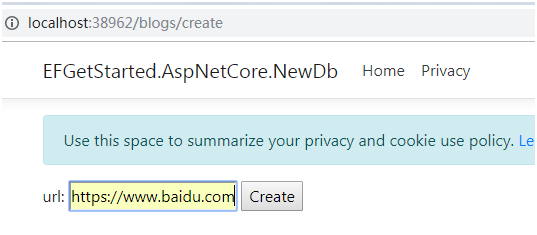
新建视图,结构目录是:Views-- Blogs-- Create.cshtml
    @model EFGetStarted.AspNetCore.NewDb.Models.Blog;

    @{
    <form asp-controller="Blogs" asp-action="Create" method="post" >
        <p>
            url: <input type="text" asp-for="Url" />
            <input type="submit" value="Create" />
        </p>
    </form>
    }
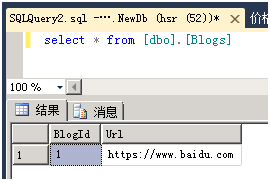
演示如下,点击create按钮,异步调用后台控制器Blogs下的Create的HttpPost特性方法。插入一条数据到Blogs数据表中。
参考文献:
官方文档:ASP.NET Core 新建数据库

