
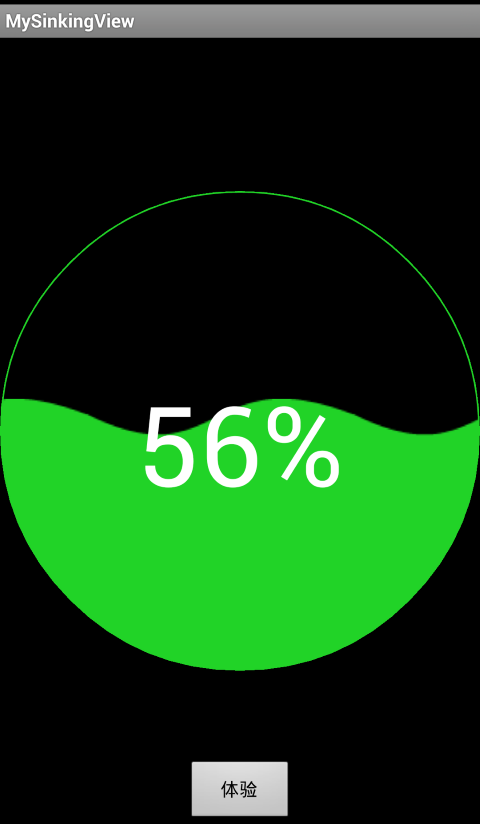
Android 自定义View修炼-仿360手机卫士波浪球进度的实现
像360卫士的波浪球进度的效果,一般最常用的方法就是 画线的方式,先绘sin线或贝塞尔曲线,然后从左到右绘制竖线,然后再裁剪圆区域。
今天我这用图片bitmap的方式,大概的方法原理是:
(1)首先用clipPath裁剪园区域,
(2)然后用4张图来不断绘制到画布上,再用偏移量来控制移动的速度,从而形成波浪动态效果。
(3)有一点需要注意的是,裁剪圆的时候用到的clipPath这个方法,在android 4.1,和4.2等某些系统上,裁剪出来不是圆,而是矩形,针对这些系统 需要在manifest.xml文件的activity中
将硬件加速关掉,因为默认是开启的。即添加这个:android:hardwareAccelerated="false"
(源码在下面最后给出哈)
手机上的效果:
下面咱们就来看看怎么实现吧:
(1)自定义波浪View的实现:
package com.czm.mysinkingview;

import android.content.Context;
import android.graphics.Bitmap;
import android.graphics.BitmapFactory;
import android.graphics.Canvas;
import android.graphics.Color;
import android.graphics.Paint;
import android.graphics.Paint.Style;
import android.graphics.Path;
import android.graphics.Path.Direction;
import android.graphics.Region.Op;
import android.util.AttributeSet;
import android.util.Log;
import android.widget.FrameLayout;
/**
 * 水波浪球形进度View
 * @author caizhiming
 *
 */
public class MySinkingView extends FrameLayout {
    private static final int DEFAULT_TEXTCOLOT = 0xFFFFFFFF;

    private static final int DEFAULT_TEXTSIZE = 250;

    private float mPercent;

    private Paint mPaint = new Paint();

    private Bitmap mBitmap;

    private Bitmap mScaledBitmap;

    private float mLeft, mTop;

    private int mSpeed = 15;

    private int mRepeatCount = 0;

    private Status mFlag = Status.NONE;

    private int mTextColor = DEFAULT_TEXTCOLOT;

    private int mTextSize = DEFAULT_TEXTSIZE;

    public MySinkingView(Context context, AttributeSet attrs) {
        super(context, attrs);
    }

    public void setTextColor(int color) {
        mTextColor = color;
    }

    public void setTextSize(int size) {
        mTextSize = size;
    }

    public void setPercent(float percent) {
        mFlag = Status.RUNNING;
        mPercent = percent;
        postInvalidate();

    }

    public void setStatus(Status status) {
        mFlag = status;
    }

    public void clear() {
        mFlag = Status.NONE;
        if (mScaledBitmap != null) {
            mScaledBitmap.recycle();
            mScaledBitmap = null;
        }

        if (mBitmap != null) {
            mBitmap.recycle();
            mBitmap = null;
        }
    }

    @Override
    protected void dispatchDraw(Canvas canvas) {
        super.dispatchDraw(canvas);
        int width = getWidth();
        int height = getHeight();

        //裁剪成圆区域
        Path path = new Path();
        canvas.save();
        path.reset();
        canvas.clipPath(path);
        path.addCircle(width / 2, height / 2, width / 2, Direction.CCW);
        canvas.clipPath(path, Op.REPLACE);

        if (mFlag == Status.RUNNING) {
            if (mScaledBitmap == null) {
                mBitmap = BitmapFactory.decodeResource(getContext().getResources(), R.drawable.wave2);
                mScaledBitmap = Bitmap.createScaledBitmap(mBitmap, mBitmap.getWidth(), getHeight(), false);
                mBitmap.recycle();
                mBitmap = null;
                mRepeatCount = (int) Math.ceil(getWidth() / mScaledBitmap.getWidth() + 0.5) + 1;
            }
            for (int idx = 0; idx < mRepeatCount; idx++) {
                canvas.drawBitmap(mScaledBitmap, mLeft + (idx - 1) * mScaledBitmap.getWidth(), (1-mPercent) * getHeight(), null);
            }
            String str = (int) (mPercent * 100) + "%";
            mPaint.setColor(mTextColor);
            mPaint.setTextSize(mTextSize);
            mPaint.setStyle(Style.FILL);
            canvas.drawText(str, (getWidth() - mPaint.measureText(str)) / 2, getHeight() / 2 + mTextSize / 2, mPaint);

            mLeft += mSpeed;
            if (mLeft >= mScaledBitmap.getWidth())
                mLeft = 0;
            // 绘制外圆环
            mPaint.setStyle(Paint.Style.STROKE);
            mPaint.setStrokeWidth(4);
            mPaint.setAntiAlias(true);
            mPaint.setColor(Color.rgb(33, 211, 39));
            canvas.drawCircle(width / 2, height / 2, width / 2 - 2, mPaint);

            postInvalidateDelayed(20);
        }
        canvas.restore();

    }

    public enum Status {
        RUNNING, NONE
    }

}
(2)布局文件的实现:
<RelativeLayout xmlns:android="http://schemas.android.com/apk/res/android"
    xmlns:tools="http://schemas.android.com/tools"
    android:layout_width="match_parent"
    android:layout_height="match_parent"
    android:background="#000000"
    tools:context=".MainActivity" >

    <com.czm.mysinkingview.MySinkingView
        android:id="@+id/sinking"
        android:layout_width="wrap_content"
        android:layout_height="wrap_content"
        android:layout_centerInParent="true" >

        <ImageView
            android:id="@+id/image"
            android:layout_width="400dp"
            android:layout_height="400dp"
            android:src="@drawable/charming2" />
    </com.czm.mysinkingview.MySinkingView>

    <LinearLayout
        android:layout_width="wrap_content"
        android:layout_height="wrap_content"
        android:layout_alignParentBottom="true"
        android:layout_centerHorizontal="true"
        android:orientation="horizontal" >

        <Button
            android:id="@+id/btn_test"
            android:layout_width="80dp"
            android:layout_height="wrap_content"
            android:text="体验" />

    </LinearLayout>

</RelativeLayout>
(3)如何使用自定义波浪View:
package com.czm.mysinkingview;

import android.app.Activity;
import android.os.Bundle;
import android.view.View;
import android.view.View.OnClickListener;
import android.widget.ImageView;

/**
 * 使用并测试用例页
 *
 * @author caizhiming
 */
public class MainActivity extends Activity {
    private MySinkingView mSinkingView;

    private float percent = 0;

    @Override
    protected void onCreate(Bundle savedInstanceState) {
        super.onCreate(savedInstanceState);
        setContentView(R.layout.activity_main);
        mSinkingView = (MySinkingView) findViewById(R.id.sinking);

        findViewById(R.id.btn_test).setOnClickListener(new OnClickListener() {

            @Override
            public void onClick(View v) {
                // TODO Auto-generated method stub
                test();
            }
        });

        percent = 0.56f;
        mSinkingView.setPercent(percent);
    }


    private void test() {
        Thread thread = new Thread(new Runnable() {

            @Override
            public void run() {

                percent = 0;
                while (percent <= 1) {
                    mSinkingView.setPercent(percent);
                    percent += 0.01f;
                    try {
                        Thread.sleep(40);
                    } catch (InterruptedException e) {
                        e.printStackTrace();
                    }

                }
                percent = 0.56f;
                mSinkingView.setPercent(percent);
                // mSinkingView.clear();
            }
        });
        thread.start();
    }

}
最后,照例,给出源码地址:

