
Azure .NET Libraries 入门
本指南演示了以下 Azure .NET API 的用法,包括设置认证、创建并使用 Azure 存储、创建并使用 Azure SQL 数据库、部署虚拟机、从 GitHub 部署 Azure Web 应用。在本教程中完成的所有操作均符合1元试用条件。
开始之前
如果您还没有 Azure 账户,可以申请1元试用账户。
安装 Azure PowerShell
设置认证
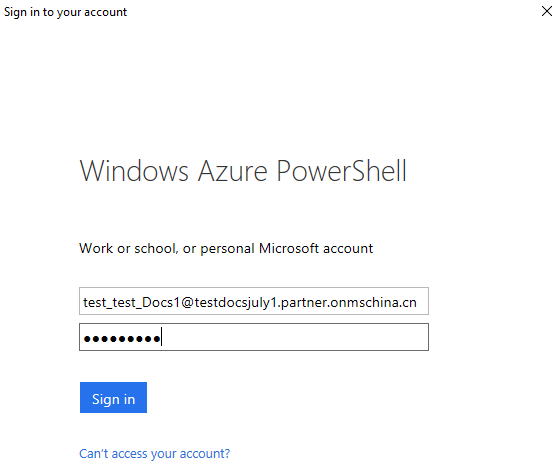
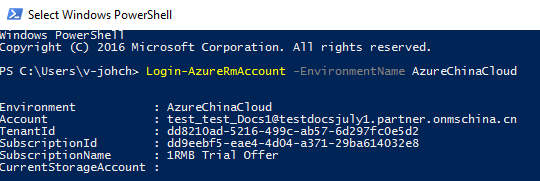
为了使用 Azure .NET Management Libraires ,您创建的应用程序需要权限来读取和创建 Azure 订阅中的资源。我们首先需要为应用程序创建一个 service principal , service principal 可以通过非交互方式授予应用程序所需的权限 。1. 以下 PoweShell 命令登陆中国区 Azure:
Login-AzureRmAccount -EnvironmentName AzureChinaClou

注意记录 TenandId 和 SubscriptionId,在后续步骤中需要用到。
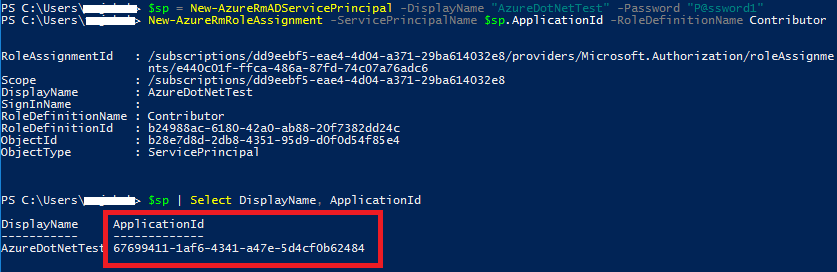
2. 以下命令创建 service principal:
# Create the service principal (use a strong password)
$sp = New-AzureRmADServicePrincipal -DisplayName "AzureDotNetTest" -Password "password"
# Give it the permissions it needs...
New-AzureRmRoleAssignment -ServicePrincipalName $sp.ApplicationId -RoleDefinitionName Contributor
# Display the Application ID, because we'll need it later.
$sp | Select DisplayName, ApplicationId
注意记录 ApplicationId。
3. 一个名为 Azureauth.properties 的 txt 文件,输入以下内容:
# sample management library properties file
subscription=dd9eebf5-eae4-4d04-a371-29ba614032e8
client=67699411-1af6-4341-a47e-5d4cf0b62484
key=P@ssword1
tenant=dd8210ad-5216-499c-ab57-6d297fc0e5d2
managementURI=https://management.core.chinacloudapi.cn/
baseURL=https://management.chinacloudapi.cn/
authURL=https://login.chinacloudapi.cn/
graphURL=https://graph.chinacloudapi.cn/
• subscription:1中记录的 SubscriptionId
• client:2中记录的 ApplicationId
• key:2中的 -Password 参数值
• tenant:1中记录的 TenantId
4. 保存 Azureauth.properties,运行以下命令将 Azureauth.properties 的存放路径设置为环境变量 AZURE_AUTH_LOCATION。
[Environment]::SetEnvironmentVariable("AZURE_AUTH_LOCATION", "C:\src\azureauth.properties.txt", "User")
设置 Visual Studio 连接到中国区 Azure
根据您使用的 Visual Studio 版本,请参考中国区 Azure 应用程序开发说明中的设置开发计算机,本教程使用的是 Visual Studio 2017 community 版本。
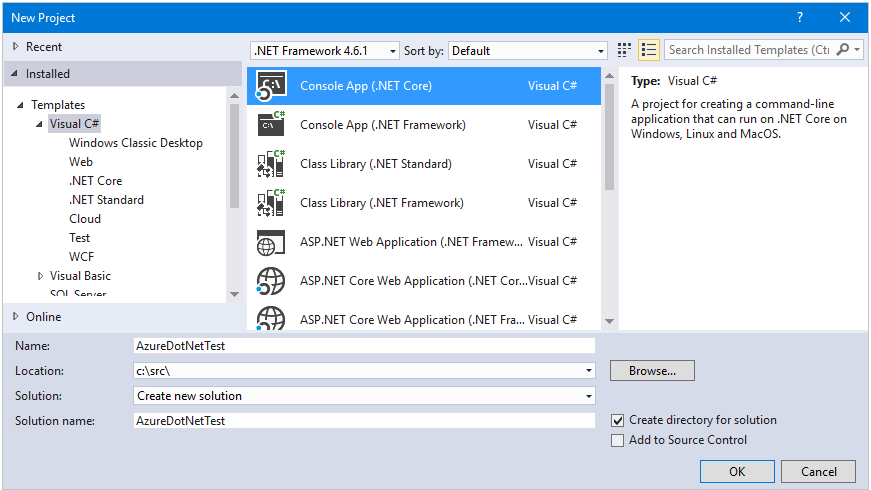
步骤3:创建新的 console 应用程序。
打开 Visual Studio, “File”->”New”->”Project”,选择 Console App (.NET Core)。
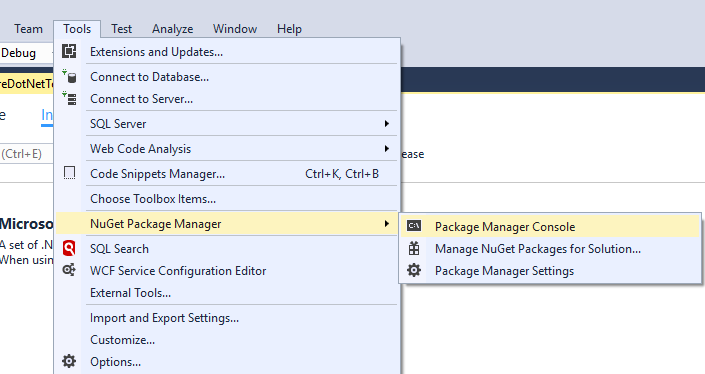
创建完成后,打开 Package Manager Console,运行以下命令安装 Azure .NET Management Libraries:
# Azure Management Libraries for .NET (Fluent)
Install-Package Microsoft.Azure.Management.Fluent
# Azure Store client libraries
Install-Package WindowsAzure.Storage
# SQL Database client libraries
Install-Package System.Data.SqlClient


创建虚拟机
打开 Program.cs 文件,添加以下命名空间:
using System;
using System.Linq;
using Microsoft.Azure.Management.Compute.Fluent;
using Microsoft.Azure.Management.Compute.Fluent.Models;
using Microsoft.Azure.Management.Fluent;
using Microsoft.Azure.Management.ResourceManager.Fluent;
using Microsoft.Azure.Management.ResourceManager.Fluent.Core;
using Microsoft.WindowsAzure.Storage;
using Microsoft.WindowsAzure.Storage.Blob;
using System.Data.SqlClient;
以下示例将在您的 Azure 订阅中创建一台 Windows 虚拟机,该虚拟机运行在“中国北部”,虚拟机类型为 StandardD2V2,系统为 WindowsServer2012R2Datacenter。
将 Main 方法替换为以下代码,请将 username 和 password 变量替换成您的值:
static void Main(string[] args)
{
// Set some variables...
string username = "vmuser1";
string password = "Password0123!";
string rgName = "sampleResourceGroup";
string windowsVmName = "sampleWindowsVM";
string publicIpDnsLabel = "samplePublicIP";
// Authenticate
var credentials = SdkContext.AzureCredentialsFactory
.FromFile(Environment.GetEnvironmentVariable("AZURE_AUTH_LOCATION"));
var azure = Azure
.Configure()
.WithLogLevel(HttpLoggingDelegatingHandler.Level.Basic)
.Authenticate(credentials)
.WithDefaultSubscription();
// Create the VM
Console.WriteLine("Creating VM...");
var windowsVM = azure.VirtualMachines.Define(windowsVmName)
.WithRegion(Region.ChinaEast)
.WithNewResourceGroup(rgName)
.WithNewPrimaryNetwork("10.0.0.0/28")
.WithPrimaryPrivateIPAddressDynamic()
.WithNewPrimaryPublicIPAddress(publicIpDnsLabel)
.WithPopularWindowsImage(KnownWindowsVirtualMachineImage.WindowsServer2012R2Datacenter)
.WithAdminUsername(username)
.WithAdminPassword(password)
.WithSize(VirtualMachineSizeTypes.StandardD2V2)
.Create();
// Wait for the user
Console.WriteLine("Press enter to continue...");
Console.ReadLine();
}
按 F5 运行程序。几分钟后,当看到“Press enter to continue...”时,说明虚拟机已经创建完毕,您可以运行以下 PowerShell 命令来确认虚拟机是否创建成功:
Get-AzureRmVm -ResourceGroupName sampleResourceGroup

或者在 Azure 门户中查看:

从 GitHub 仓库部署 Azure Web 应用
现在我们将修改代码来实现从 GitHub 仓库部署 Web 应用程序。将 Main 方法替换为以下代码:
static void Main(string[] args)
{
// Set some variables...
string rgName = "sampleWebAppGroup";
string appName = SdkContext.RandomResourceName("WebApp", 20);
// Authenticate
var credentials = SdkContext.AzureCredentialsFactory
.FromFile(Environment.GetEnvironmentVariable("AZURE_AUTH_LOCATION"));
var azure = Azure
.Configure()
.Authenticate(credentials)
.WithDefaultSubscription();
// Create the web app
Console.WriteLine("Creating Web App...");
var app = azure.WebApps.Define(appName)
.WithRegion(Region.ChinaNorth)
.WithNewResourceGroup(rgName)
.WithNewFreeAppServicePlan()
.DefineSourceControl()
.WithPublicGitRepository("https://github.com/Azure-Samples/app-service-web-dotnet-get-started")
.WithBranch("master")
.Attach()
.Create();
Console.WriteLine("Your web app is live at: https://{0}", app.HostNames.First());
// Wait for the user
Console.WriteLine("Press enter to continue...");
Console.ReadLine();
}
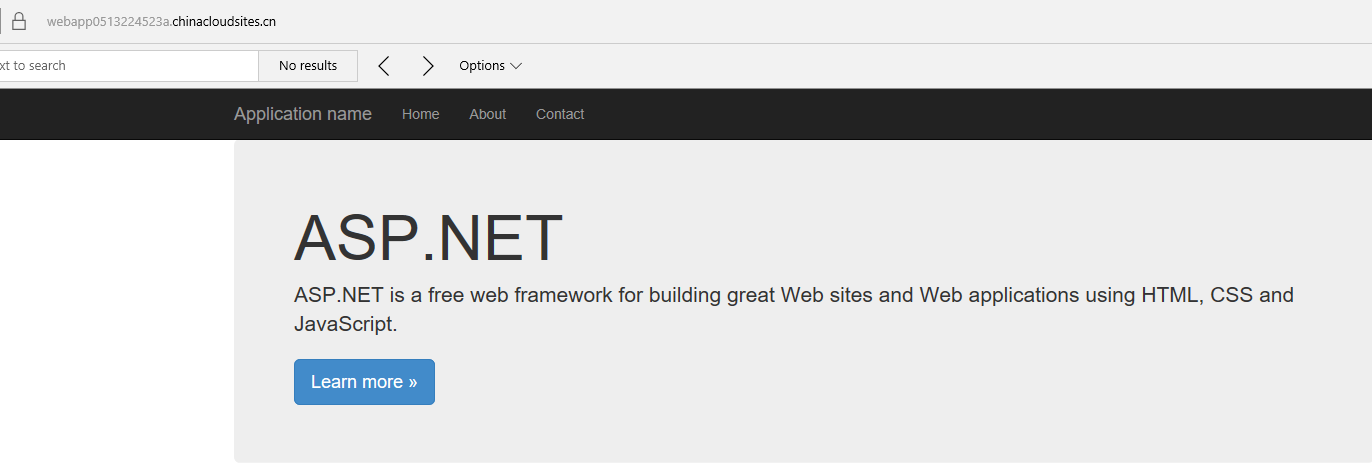
按 F5 运行程序,完成后返回如下结果。

访问 https://webapp0513224523a.chinacloudsites.cn 就能看到部署在 Azure web 应用中的.NET 程序啦。
连接到 Azure SQL 数据库
下面我们将演示如何创建 Azure SQL 数据库,连接到数据库创建表并插入值。将 Main 方法替换为以下代码:
static void Main(string[] args)
{
// Set some variables...
string rgName = "sampleSQLDBGroup";
string adminUser = SdkContext.RandomResourceName("db", 8);
string sqlServerName = SdkContext.RandomResourceName("sql", 10);
string sqlDbName = SdkContext.RandomResourceName("dbname", 8);
string dbPassword = "P@ssword01!";
// Authenticate
var credentials = SdkContext.AzureCredentialsFactory
.FromFile(Environment.GetEnvironmentVariable("AZURE_AUTH_LOCATION"));
var azure = Azure
.Configure()
.Authenticate(credentials)
.WithDefaultSubscription();
// Create the SQL server and database
Console.WriteLine("Creating server...");
var sqlServer = azure.SqlServers.Define(sqlServerName)
.WithRegion(Region.ChinaNorth)
.WithNewResourceGroup(rgName)
.WithAdministratorLogin(adminUser)
.WithAdministratorPassword(dbPassword)
.WithNewFirewallRule("0.0.0.0", "255.255.255.255")
.Create();
Console.WriteLine("Creating database...");
var sqlDb = sqlServer.Databases.Define(sqlDbName).Create();
// Display information for connecting later...
Console.WriteLine("Created database {0} in server {1}.", sqlDbName, sqlServer.FullyQualifiedDomainName);
Console.WriteLine("Your user name is {0}.", adminUser + "@" + sqlServer.Name);
// Build the connection string
var builder = new SqlConnectionStringBuilder();
builder.DataSource = sqlServer.FullyQualifiedDomainName;
builder.InitialCatalog = sqlDbName;
builder.UserID = adminUser + "@" + sqlServer.Name; // Format user ID as "user@server"
builder.Password = dbPassword;
builder.Encrypt = true;
builder.TrustServerCertificate = true;
// connect to the database, create a table and insert an entry into it
using (var conn = new SqlConnection(builder.ConnectionString))
{
conn.Open();
Console.WriteLine("Populating database...");
var createCommand = new SqlCommand("CREATE TABLE CLOUD (name varchar(255), code int);", conn);
createCommand.ExecuteNonQuery();
var insertCommand = new SqlCommand("INSERT INTO CLOUD (name, code ) VALUES ('Azure', 1);", conn);
insertCommand.ExecuteNonQuery();
Console.WriteLine("Reading from database...");
var selectCommand = new SqlCommand("SELECT * FROM CLOUD", conn);
var results = selectCommand.ExecuteReader();
while (results.Read())
{
Console.WriteLine("Name: {0} Code: {1}", results[0], results[1]);
}
}
// Wait for the user
Console.WriteLine("Press enter to continue...");
Console.ReadLine();
}
按 F5 运行程序,运行完成后我们通过 SQL Server Management Studio 来验证:
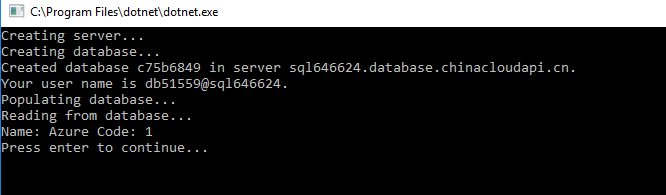
打开 SSMS,根据上面程序的输出结果,ServerName 为 sql646624.database.chinacloudapi.cn,用户名为:db51559@sql64662, 密码为代码中定义的变量 dbPassword 的值 P@ssword01!,使用 SQL Server Authenticaiton 方式登录:
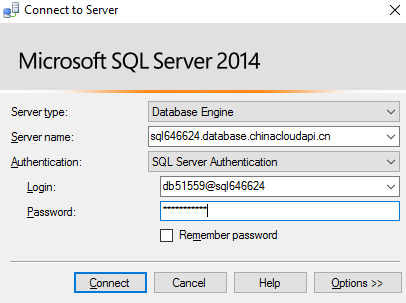
可以看到我们在 Azure SQL 数据库中创建了一张名为 dbo.CLOUD 的表,并插入了一条数据。

将文件上传到 Azure Storage
下面我们将演示如何在 Azure 中创建存储账户并将文件上传到 Blob 存储。将 Main 方法替换为以下代码:
static void Main(string[] args)
{
// Set some variables...
string rgName = "sampleStorageGroup";
string storageAccountName = SdkContext.RandomResourceName("st", 10);
// Authenticate
var credentials = SdkContext.AzureCredentialsFactory
.FromFile(Environment.GetEnvironmentVariable("AZURE_AUTH_LOCATION"));
var azure = Azure
.Configure()
.Authenticate(credentials)
.WithDefaultSubscription();
// Create the storage account
Console.WriteLine("Creating storage account...");
var storage = azure.StorageAccounts.Define(storageAccountName)
.WithRegion(Region.ChinaNorth)
.WithNewResourceGroup(rgName)
.Create();
var storageKeys = storage.GetKeys();
string storageConnectionString = "DefaultEndpointsProtocol=https;"
+ "AccountName=" + storage.Name
+ ";AccountKey=" + storageKeys[0].Value
+ ";EndpointSuffix=core.chinacloudapi.cn";
var account = CloudStorageAccount.Parse(storageConnectionString);
var serviceClient = account.CreateCloudBlobClient();
// Create container. Name must be lower case.
Console.WriteLine("Creating container...");
var container = serviceClient.GetContainerReference("helloazure");
container.CreateIfNotExistsAsync().Wait();
// Make the container public
var containerPermissions = new BlobContainerPermissions()
{ PublicAccess = BlobContainerPublicAccessType.Container };
container.SetPermissionsAsync(containerPermissions).Wait();
// write a blob to the container
Console.WriteLine("Uploading blob...");
var blob = container.GetBlockBlobReference("helloazure.txt");
blob.UploadTextAsync("Hello, Azure!").Wait();
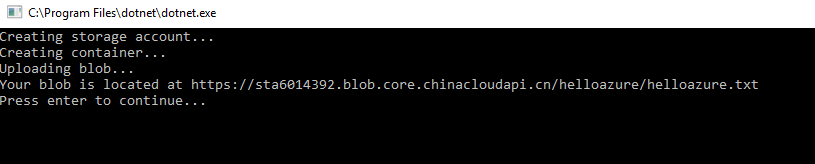
Console.WriteLine("Your blob is located at {0}", blob.StorageUri.PrimaryUri);
// Wait for the user
Console.WriteLine("Press enter to continue...");
Console.ReadLine();
}
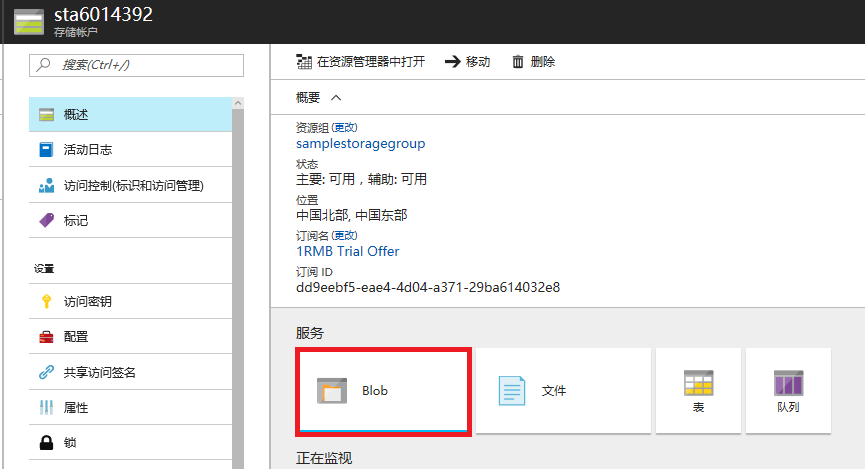
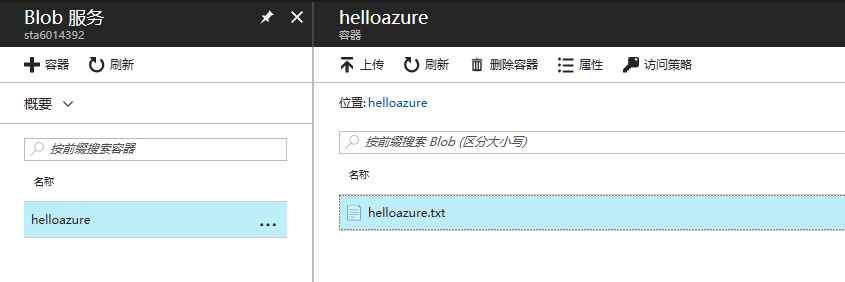
按 F5 运行程序,运行完成后。我们打开 Azure 门户,来验证文件是否已经上传到 Azure 存储中。
从 Azure 门户中我们可以看到文件已经上传到 Azure 存储中了。

至此,您已经学会了如何使用 Azure .NET Management Libraries 来创建并管理一些重要的 Azure 资源啦!
后续步骤
更多 Azure .NET 示例:
虚拟机
Web 应用
SQL 数据库
欢迎有兴趣的朋友多多交流
A究院研究生 Azurecommunity@qq.com

