

在上一篇文章中,介绍了搭建RapidWebDev的运行环境和一些配置项,并且演示了将自己的业务模块添加到系统中。当然,上一张中的那个Product还算不上是个业务模块,所以本章我准备对其进行扩充。同时给大家展示下如果通过RapidWebDev实现一个完整的业务功能。
首先,我们按照以往的思路,先将上一章中的t_product进行一定的扩展,如下图:
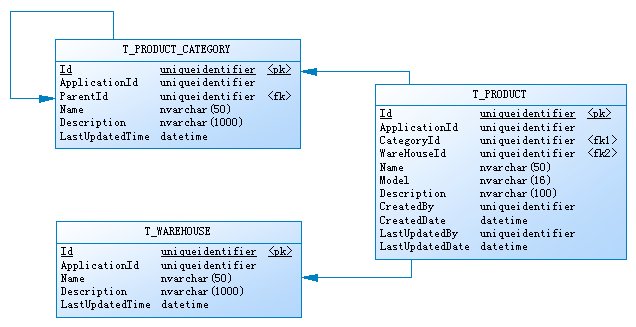
在这里,我增加了一张T_PRODUCT_CATEGORY表,用于存放产品分类信息,分类为树型结构,另外增加了一个T_WAREHOUSE表,用于存放仓库信信息,然后在T_PRODUCT增加了相应的外键和一些扩展字段。有了数据表,就开始分别对分类和仓库建了对应的管理代码(CRUD, UI等),然后在产品页面对其调用。为了节约篇幅,这里就不贴这些代码了,反正是一大堆。
在RapidWebDev中,类似于分类,仓库信息这种数据量不是很大的表,完全可以使用HierarchyDate和ConcreteData所替代。使用RapidWebDev,我们只需要将保留T_PRODUCT表,然后在sitemap.config中加入产品分类和仓库信息的配置信息,就可以实现上述的功能,在需求简单的情况下,连代码编写都省下了。
|
<Item Text="业务模块"> <Item Text="产品管理" PageUrl="~/ProductManagement/DynamicPage.svc" Value="Everyone" /> <Item Text="产品分类管理" PageUrl="~/HierarchyDataManagement/DynamicPage.svc?HierarchyType=产品分类" Value="ProductGategoryManagement" /> <Item Text="仓库管理" PageUrl="~/ConcreteDataManagement/DynamicPage.svc?ConcreteDataType=仓库" Value="DepotManagement" /> </Item> |
先来张贴图,这样更能说明问题,O(∩_∩)O

这里的一些文字信息的中文定义有些不尽人意,如果有好的建议,大家可以留言。英文版里面是Profile,中文版叫简介感觉很别扭。先将就了吧,反正在资源文件里面,可以自己动手改。^_^
分类信息和仓库信息已经有了,接下来该是产品管理了,这下需要自己编码了,不过也不是很多了。由于我在写本文的时候,RapidWebDev 1.4.2刚好发布,所以我就直接在code发布的编译版上面做demo了,一些上一章中的代码文件可以直接copy过来,然后做一定的修改。
STEP1. 将我们需要的数据表添加到数据库中
|
create table T_PRODUCT ( Id uniqueidentifier not null default newid(), ApplicationId uniqueidentifier not null, CategoryId uniqueidentifier null, WarehouseId uniqueidentifier null, Name nvarchar(50) not null, Model nvarchar(16) null, Description nvarchar(100) null, CreatedBy uniqueidentifier not null, CreatedDate datetime not
null default getdate(), LastUpdatedBy uniqueidentifier not null, LastUpdatedDate datetime not
null default getdate(), constraint
PK_T_PRODUCT primary key
(Id) ) |
STEP2. 在Product项目中添加一个Linq2SQL文件,命名为Product.dbml,将T_PRODUCT拖到LINQ的设计器里面,并将其重命名为Product.
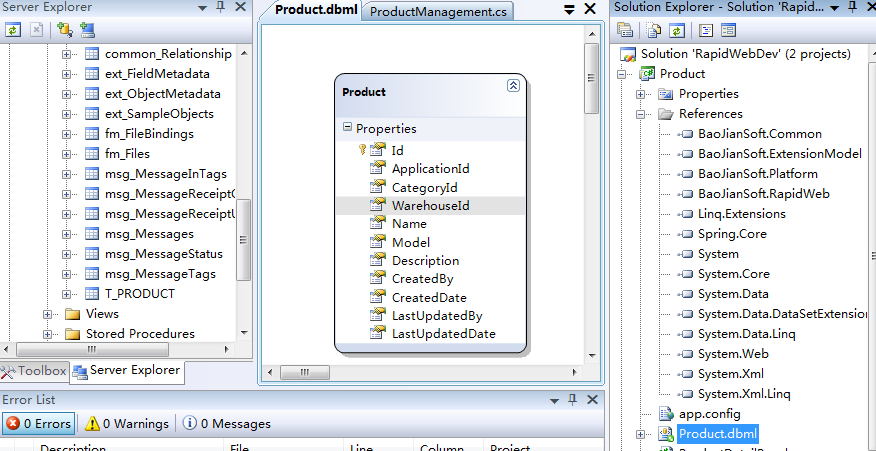
STEP3. 为Product项目添加必要的引用,比如:BaoJianSoft.Common, Spring.Core等(如上图)
STEP4. 将上一章中的ProductManagement添加到Product项目,并为调整为像下面这样。(高亮部分为改动的代码)
|
public override QueryResults Query(QueryParameter
parameter) { LinqPredicate
predicate = parameter.Expressions.Compile(); string
sortingExpression = null; if
(parameter.SortExpression != null) sortingExpression = parameter.SortExpression.Compile(); if (Kit.IsEmpty(sortingExpression))
sortingExpression = "LastUpdatedDate ASC"; using (ProductDataContext
ctx = DataContextFactory.Create<ProductDataContext>()) { int
recordCount; var q
= ctx.Products.AsQueryable(); if (!Kit.IsEmpty(predicate.Expression)) q =
q.Where(predicate.Expression,
predicate.Parameters); q = q.OrderBy(sortingExpression); recordCount =
q.Count(); var
products = q.Skip(parameter.PageIndex *
parameter.PageSize).Take(parameter.PageSize).ToList(); return
new QueryResults(q.Count(), products); } } |
这里需要注意的是ProductDataContext
ctx = DataContextFactory.Create<ProductDataContext>(),这里通过RapidWebDev的DataContextFactory创建一个LINQ CONTEXT,所以需要在web.config将ProductDataContext添加到dataContexxt中,如下代码:
|
<dataContext> <settings> <setting name="MembershipDataContext" type="BaoJianSoft.Platform.Linq.MembershipDataContext,
BaoJianSoft.Platform" connectionString="Global" /> <setting name="ExtensionModelDataContext" type="BaoJianSoft.ExtensionModel.Linq.ExtensionModelDataContext,
BaoJianSoft.ExtensionModel" connectionString="Global" /> <setting name="ProductDataContext" type="Product.ProductDataContext, Product" connectionString="Global" /> </settings> </dataContext> |
STEP 5. 重写ProductManagement类的Detete方法,为系统添加删除功能:
|
public override void Delete(string
entityId) { Kit.NotNull(entityId, "entityId"); Guid
productId = new
Guid(entityId); using (ProductDataContext ctx =
DataContextFactory.Create<ProductDataContext>()) { Product
product = ctx.Products.FirstOrDefault(d =>
d.Id ==
productId); if
(product == null)
return; ctx.Products.DeleteOnSubmit(product); ctx.SubmitChanges(); } } |
SETUP6. 这里,我们得先将上一章中的ProductManagement.dp.xml文件copy到当前解决方案的web\Spring\DynamicPage\Product\目录下。然后我们在这个文件里面进行扩展,实现一个完整产品模块。
首先,先为查询面板增加产品的规格型号和产品分类两个条件:
|
<QueryPanel HeaderText="产品管理"> <TextBox FieldName="Name" Label="产品名称: " /> <TextBox FieldName="Model" Label="规格型号:" />
<ComboBox FieldName="CategoryId" Label="产品分类:" Editable="true" MinChars="2" FieldValueType="System.Guid" ForceSelection="true">
<DynamicDataSource Url="/Services/HierarchyService.svc/json/FindByKeyword?limit=999" Method="GET" TextField="Name" ValueField="Id" QueryParam="q">
<Param Name="hierarchyType" Value="产品分类" />
</DynamicDataSource>
</ComboBox> </QueryPanel> |
然后,我们给GridView增加几个显示column
|
<Fields> <Field FieldName="Name" HeaderText="产品名称" Width="280" /> <Field FieldName="Model" HeaderText="规格型号" /> <Field FieldName="CategoryId" HeaderText="所属分类" > <Transform-Callback Type="Product.ShowCategoryById,
Product"/> </Field> <Field FieldName="WarehouseId" HeaderText="存放仓库" > <Transform-Callback Type="Product.ShowWarehouseById,
Product"/> </Field> <Field FieldName="CreatedDate" HeaderText="创建日期"/> <Field FieldName="LastUpdatedDate" HeaderText="最后修改日期" /> </Fields> |
请注意这里的两个Transform-Callback,它能让我们能按照自己的意愿来显示列表中的值,我们只需要实现IGridViewFieldValueTransformCallback接口的Format方法,并将实现类指定在这里就可以了。在这里我只是简单的将分类和仓库的名称显示在列表中,代码如下:
|
if (Kit.IsEmpty(fieldValue)) return string.Empty; Guid id = new Guid(fieldValue.ToString()); HierarchyDataObject categoryObj =
hierarchyApi.GetHierarchyData(id); return categoryObj.Name; |
ShowCategoryById
|
if(Kit.IsEmpty(fieldValue)) return string.Empty; Guid id = new Guid(fieldValue.ToString()); ConcreteDataObject warehouseObj =
concreteDataApi.GetById(id); return warehouseObj.Name; |
ShowWarehouseById
STEP7. 实现编辑页面
在ProductManagement.dp.xml配置文件中,增加DetailPanel配置节
|
<DetailPanel HeaderText="产品详细信息" ShowMessageAfterSavedSuccessfully="false"> <Type>Product.ProductDetailPanel, Product</Type> <SkinPath>~/Templates/Product/ProductDetail.ascx</SkinPath> <SaveButton /> <CancelButton /> </DetailPanel> |
这里的Type里面指定了在详细页面中的业务逻辑,这里指定的类必须实现IDetailPanelPage接口或者继承于DetailPanelPage类。ProductDetailPanel类稍微长一点,这里就不贴代码了,只对里面的几个DetailPanelPage重要方法简单介绍一下。
1.
Create方法,这个方法在新增数据到数据库时调用
2.
Update方法,这个方法在修改数据时调用
3.
Reset方法,这个方法在点击新增并继续按钮时调用
4.
LoadWriteableEntity方法,这个方法在点击列表中的修改按钮时调用
5.
LoadReadOnlyEntity方法,这个方法在点击列表中的查看按钮时调用,如果使用是系统的标准控件,此方法可以不用实现
最后,这DetailPanelPage类的子类中需要使用服务器端控件只需要向定义个和服务器端控件类型和名字相同的变量,然后为其指定[Binding]特性即可。如下:
|
[Binding] protected TextBox TextBoxName; |
SkinPath里面指定的是详细页面的模板,这个是标准的ASP.NET代码,就没有什么好说的了。
好了,这次就到这里了,最后来个完成图和代码下载[/Files/AlexHe/RapidWebDev.Product.rar]


