c#无边框异形窗体制作

下面是最终效果:


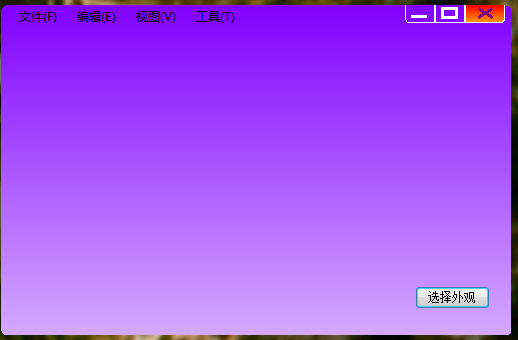
这就是一个无边框窗体 可以注意到它的外观 四个角是圆的 有控制按钮 并且还可以拖拽,当鼠标移动到窗体的四个角和边缘的时候可以拖拽大小

这个窗体没有标题栏和边框的限制 控件可以放在窗体上任何地方


下面就是直奔主题了:

先说一说制作这个窗体的思路(窗体集成自System.Windows.Forms.Form):

1.设置FormBorderStyle属性为none 让它成为一个无边框窗体

2.设置窗体的Region属性 该属性设置窗体的有效区域 而我们把窗体的有效区域设置为圆角矩形 窗体就变成圆角的了

3.自定义控件 3个按钮 控制窗体的最大化 最小化 还原 关闭

4.使窗体可以拖动 在边缘按下鼠标可以拖拽大小

主要涉及GDI+中两个重要的类 Graphics和GraphicsPath类 分别位于System.Drawing和System.Drawing.Drawing2D


首先我们创建一个C# windows窗体应用程序项目 将默认的Form1改名成MainForm 设置FormBorderStyle属性为none 让它成为一个无边框窗体

 接着我们需要这样一个函数 private void  SetWindowRegion() 此函数设置窗体有效区域为圆角矩形,以及一个辅助函数 private GraphicsPath GetRoundedRectPath(Rectangle rect, int radius)此函数用来创建圆角矩形路径,将在SetWindowRegion()中调用它


复制代码
public void SetWindowRegion() {     System.Drawing.Drawing2D.GraphicsPath FormPath;     FormPath = new System.Drawing.Drawing2D.GraphicsPath();     Rectangle rect = new Rectangle(00this.Width, this.Height);     FormPath = GetRoundedRectPath(rect, 10);     this.Region = new Region(FormPath);
} private GraphicsPath GetRoundedRectPath(Rectangle rect, int radius) {     int diameter = radius;     Rectangle arcRect = new Rectangle(rect.Location, new Size(diameter, diameter));     GraphicsPath path = new GraphicsPath();
    // 左上角     path.AddArc(arcRect, 18090);
    // 右上角     arcRect.X = rect.Right - diameter;     path.AddArc(arcRect, 27090);
    // 右下角     arcRect.Y = rect.Bottom - diameter;     path.AddArc(arcRect, 090);
    // 左下角     arcRect.X = rect.Left;     path.AddArc(arcRect, 9090);     path.CloseFigure();//闭合曲线     return path; }
复制代码


在窗体尺寸改变的时候我们需要调用SetWindowRegion()将窗体变成圆角的

private void MainForm_Resize(object sender, EventArgs e) {     SetWindowRegion(); }


到此 窗体的形状部分就完成了 通过创建不同的GraphicsPath对象 可以将窗体设置为任意形状 三角形 六边形 椭圆 以及任何不规则图形来制作不规则窗体

然后可以通过给窗体设置背景图片或者在窗体上作画来更改外观 无论图片是什么形状只要超过了窗体有效区域的部分都会被裁掉 这样给换皮肤带来了极大的方便 只需要换一张背景图而已 不需要去做圆角图片 就像迅雷7那样 换皮肤就换一张背景图片


然后是自定义控件 3个按钮 通过GDI+可以绘制比较漂亮的按钮 这部分相对简单很多 就不叙述了,这方面的资料也很好找

将这3个按钮控件拖到窗体右上角设置它们的Anchor属性为top right 让它们的位置始终相对于窗体右上角改变 并编写它们的单击事件处理代码 模拟窗体的最大化最小化和关闭

这里需要注意一点的就是 最大化的时候直接使用this.WindowState = FormWindowState.Maximized会遮盖任务栏 在执行这行代码前先限制窗体的最大尺寸为屏幕的工作区

this.MaximumSize = new Size(Screen.PrimaryScreen.WorkingArea.Width, Screen.PrimaryScreen.WorkingArea.Height); this.WindowState = FormWindowState.Maximized;


接下再运行的时候 窗体就是圆角 并且具有控制按钮了 只差拖动和拖拽大小了 下面完成最后一部分

实现这部分只能通过处理windows消息来完成 使用windows系统的功能来完成窗体的拖拽大小和移动 我们只需要处理WM_NCHITTEST消息就可以完成这部分功能 WM_NCHITTEST是告知鼠标事件位置的消息 是很常用的一个消息。查询MSDN API可以找到这些常量 WM_NCHITTEST常量地址http://msdn.microsoft.com/zh-cn/library/ms645618(en-us,VS.85).aspx


这里我们需要使用10个常量 1个WM_NCHITTEST 9个WM_NCHITTEST消息结果


复制代码
 1 const int WM_NCHITTEST = 0x0084;  2 const int HT_LEFT = 10;  3 const int HT_RIGHT = 11;  4 const int HT_TOP = 12;  5 const int HT_TOPLEFT = 13;  6 const int HT_TOPRIGHT = 14;  7 const int HT_BOTTOM = 15;  8 const int HT_BOTTOMLEFT = 16;  9 const int HT_BOTTOMRIGHT = 17; 10 const int HT_CAPTION = 2;
复制代码


定义好这些常量之后 就需要处理windows消息了 C#处理 windows消息就重写WndProc(ref Message Msg)函数


复制代码
protected override void WndProc(ref Message Msg) {     if (Msg.Msg == WM_NCHITTEST)     {         //获取鼠标位置         int nPosX = (Msg.LParam.ToInt32() & 65535);         int nPosY = (Msg.LParam.ToInt32() >> 16);         //右下角         if (nPosX >= this.Right - 6 && nPosY >= this.Bottom - 6)         {             Msg.Result = new IntPtr(HT_BOTTOMRIGHT);             return;         }         //左上角         else if (nPosX <= this.Left + 6 && nPosY <= this.Top + 6)         {             Msg.Result = new IntPtr(HT_TOPLEFT);             return;         }         //左下角         else if (nPosX <= this.Left + 6 && nPosY >= this.Bottom - 6)         {             Msg.Result = new IntPtr(HT_BOTTOMLEFT);             return;         }         //右上角         else if (nPosX >= this.Right - 6 && nPosY <= this.Top + 6)         {             Msg.Result = new IntPtr(HT_TOPRIGHT);             return;         }         else if (nPosX >= this.Right - 2)         {             Msg.Result = new IntPtr(HT_RIGHT);             return;         }         else if (nPosY >= this.Bottom - 2)         {             Msg.Result = new IntPtr(HT_BOTTOM);             return;         }         else if (nPosX <= this.Left + 2)         {             Msg.Result = new IntPtr(HT_LEFT);             return;         }         else if (nPosY <= this.Top + 2)         {             Msg.Result = new IntPtr(HT_TOP);             return;         }         else         {             Msg.Result = new IntPtr(HT_CAPTION);             return;         }     }     base.WndProc(ref Msg); }
复制代码

 最后 为了使窗体不会出现闪烁 可以使用双缓存 在重绘的时候进行双缓存 在窗体的Resize事件中重绘并使用双缓存


复制代码
private void MainForm_Resize(object sender, EventArgs e) {     SetStyle(ControlStyles.SupportsTransparentBackColor, true);     SetStyle(ControlStyles.AllPaintingInWmPaint, true);     SetStyle(ControlStyles.UserPaint, true);     SetStyle(ControlStyles.DoubleBuffer, true);     this.Refresh();     SetWindowRegion(); }
复制代码
posted @ 2015-07-04 13:46  zhenximeiyitian  阅读(760)  评论(0编辑  收藏  举报